2Modeler.com
  • Home
  • Start Here
  • Blog
  • Projects
    • HAWK Beta-I Atomic Bomber Rebuild Plus Ragnarok
    • Lindberg 1/172 XB-70 Rebuild
    • 1/144 F-82 Conversion
    • Resin Figure Mew Zakuro
    • Yo Yo 1/48 B-24J Custom Paint and Decals
  • History
    • Monogram Air Power Set (1959)
    • Revell 1/144 DC-10 / KC-10 Kit History
    • History of Titanic Model Kits: The Big List
    • Revell Gemini Kit History - 1/48 and 1/24
    • AURORA MONSTER MODELS
    • Atlantis / Revell 707 and KC-135
    • Revell's 1/535 USS Missouri: An Iowa Class Act
    • Monogram Days of Thunder NASCAR Kits
    • Atlantis USS Nautilus SSN-571 Model Kit Review and History
    • Weird-ohs, Roth Finks, Flypoggers and Lindy Loonies
    • Car Modeling in the 1970's
    • Armor Modeling
    • Smokey and the Bandit
    • Revell Apollo 11 Spacecraft
    • Minicraft Civil Aircraft in 1/48
    • Aurora's Alfred E Neuman
    • KC-135 and 707 Part One: The 1/72 Kits
    • KC-135 Part Two: The History and The Build
  • Reviews
    • AIRCRAFT KIT REVIEWS >
      • Atlantis Models 1/175 B-52 With X-15 Kit Review
      • Atlantis 1/93 B-58 Hustler Model Kit Review
      • Atlantis 1/400 Boeing 2707 SST Kit Review
      • Atlantis 1/70 F-100C Kit Review
      • Atlantis 1/135 Convair 990 Review!
      • Atlantis 1/139 Boeing 707-120 Kit Review
      • Atlantis 1/77 F-89D Kit Review
      • Atlantis 1/54 F11F-1 "Blue Angels" Kit Review
      • Atlantis 1/120 B-29 Kit Review
      • Atlantis PBY-5A Catalina
      • Atlantis P-3A Kit Review and History
      • Atlantis AH-56 Cheyenne Helicopter
      • Atlantis B-36 Kit Review
      • Atlantis HH-3E "Jolly Green Giant" Review
      • Atlantis B24J Buffalo Bill 1/92
      • Atlantis S2F Hunter Killer
      • Minicraft RB-29 Kit Review
      • Minicraft 1/200 H-4 "Spruce Goose" Kit Review
      • Minicraft 1/48 Cessna T-41 Mescalero Kit Review
      • Minicraft 1/144 B-52D/F Review
      • Minicraft 1/144 B-52H "Current Flying Version" Kit Review
      • Minicraft T-34A Mentor Kit Review
      • Minicraft 1/144 KC-135 Review
      • Minicraft 1/144 F-51 Kit Review
      • Minicraft 1/144 E-3/E-8 AWACS/J-Stars Kit Review
      • Minicraft 1/144 B-24J / PB4Y-1 / B-24D
      • Minicraft C-18 (Boeing 707)
      • Minicraft 1/144 Lancaster MK 1 Review
      • Minicraft 1/144 B-17G Kit Review
      • Minicraft 1/144 A6M2 Zero Review
      • Minicraft 1/144 G4M Type 1 "Betty" Kit Review
      • Minicraft 1/144 Ju 88A/C
      • Minicraft 1/144 P-47D Review
      • Minicraft 1/144 TBF Avenger Review
    • Atlantis 1/8 Creature Model Kit Review
    • Atlantis 1/8 Wolfman Model Kit Review
    • Atlantis Models 1/8 Wyatt Earp Figure Kit Review
    • Atlantis 1/24 Mack Bulldog Stake Truck Kit Review
    • Atlantis 1/8 "The Mummy" Kit Review
    • Atlantis Rat Fink Model Kit
    • Atlantis Super Fuzz Kit Review
    • Atlantis 1/160 Lighthouse Model Kit Review
    • Atlantis Models 1/8 Flash Gordon and the Martian Model Kit Review
    • Atlantis 1/32 Jungle Jim 1974 Funny Car
    • Atlantis 1/500 USS North Carolina Kit Review
    • Atlantis 1/128 U.S. Space Missiles Set Kit Review
    • Atlantis 1/48 Japanese Medium Tank
    • Atlantis Snoopy and his Classic Race Car Kit Review
    • Atlantis Models Metaluna Mutant Kit Review
    • Atlantis 1/48 JS-III Stalin Tank Review
    • Atlantis 1/32 Tom Daniel Funny Cars: Mustang, Camaro, Duster, Charger!
    • Atlantis 1/665 USS Wisconsin Kit Review
    • Atlantis 1/618 Bismarck Battleship Kit Review
    • Atlantis 1/24 Son of Troublemaker Kit Review
    • Atlantis 1/1200 US Combat Task Force Fleet Kit Review
    • Atlantis The Amoeba review
    • Atlantis Air-Land-Sea Gift Set
    • Atlantis 1/245 Monitor & Merrimac Ironclads Diorama Set
    • Atlantis 1/96 Moon Ship Kit Review
    • Atlantis 1/8 Forgotten Prisoner of Castel Mare Kit Review
    • ATLANTIS 1/25 King Kong Kit Review
    • Atlantis 1/32 1982 Camaro Review
    • Atlantis Snoopy and His Sopwith Camel / Red Baron Reviews
    • Atlantis Glow-Godzilla Review
    • Atlantis Phantom of the Opera Kit Review
    • Atlantis 1/535 USS Iowa and Wisconsin Battleship Kit Review
    • Atlantis Mr. Gasser Review
    • Minicraft 1/350 Titanic Kit Review
    • Moebius 1/1 Hal 9000 Kit Review
    • Moebius 1/144 Discovery XD-1
    • Dream Gear 1/3000 Arkhitect Kit Review
    • D&H 1/35 Cyclops and the Chariot from Lost in Space kit Review
    • Academy Titanic 1/700 MCP Review
    • Revell ALL NEW PT-109 Review
    • Tamiya 1/48 Ford Army Staff Car
    • Pegasus Space Ark - When Worlds Collide
    • A Weird-Oh World - The Art of Bill Campbell
    • The Vintage Years of Airfix Box Art
  • Contests
    • 2021 IPMS-USA Nationals Report
    • 2019 IPMS/USA Nationals Report
    • Boise Mad Dog Modelers Fall Show
    • IPMS-SLC Group Build
  • Rocketry
    • Starting Rocketry
    • History and Use of the Estes AstroCam 110
  • Gallery
    • Bill's Airliner Models Gallery
    • Dick's Large 1/72 Aircraft Models
    • Dick's scale Model car gallery
    • Guest Gallery
  • Sponsors
    • Minicraft Models Sponsor Page
    • Atlantis Models Sponsor Page
    • Moebius Models Sponsor Page
    • Amazon Associate
  • IPMS/USA
  • Contact

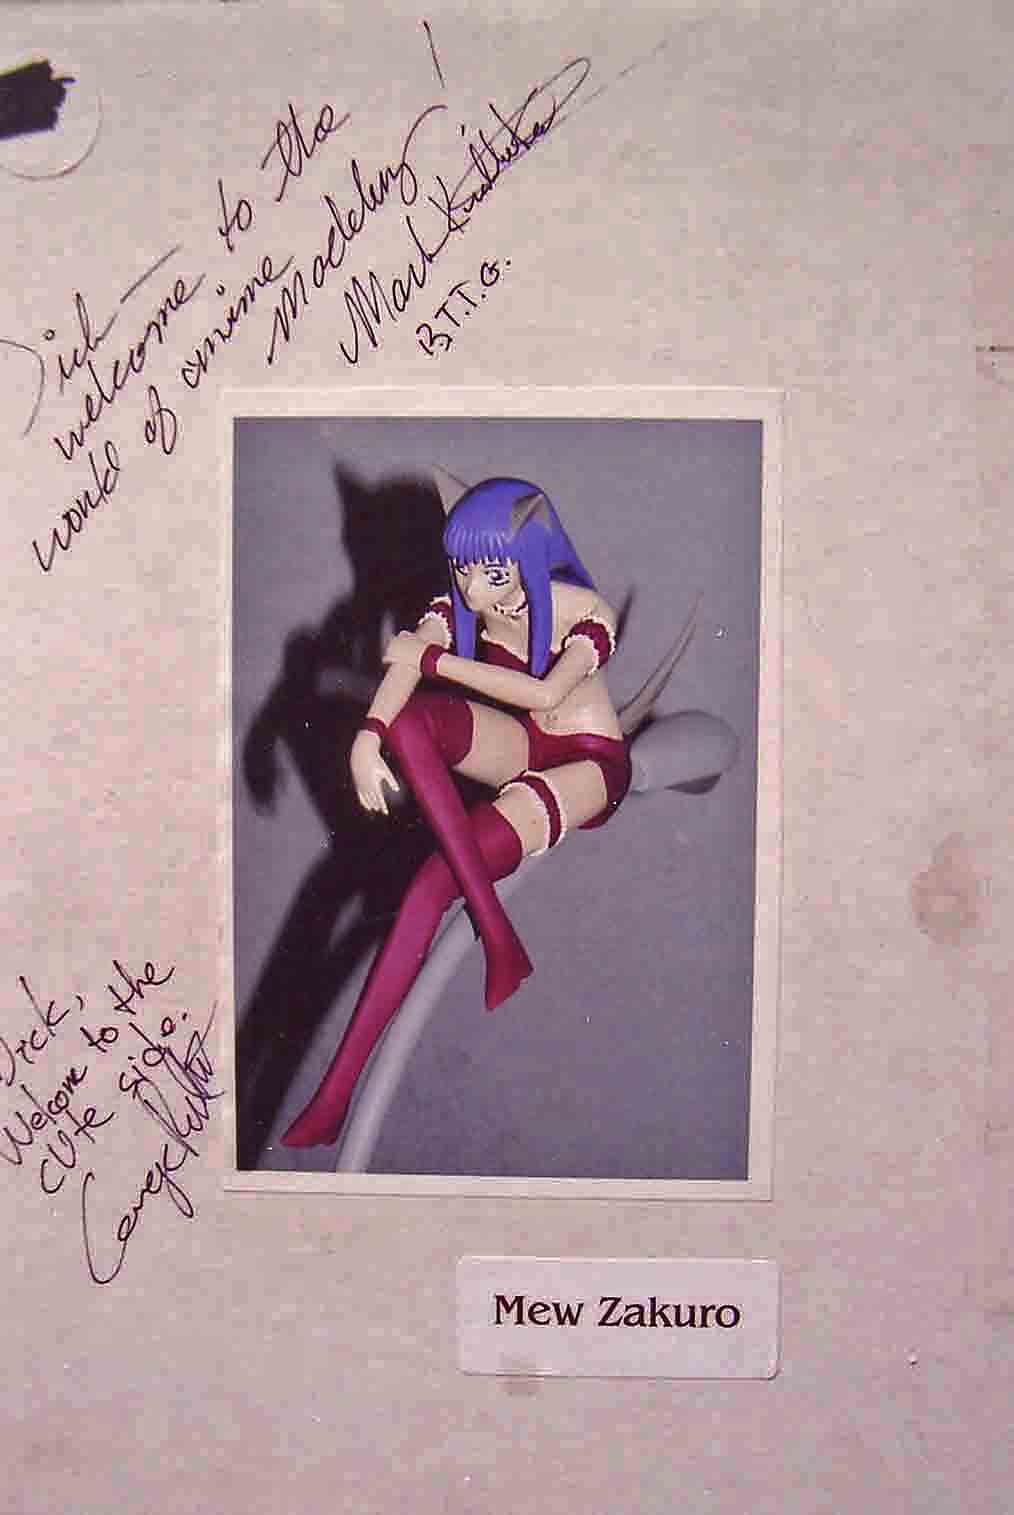
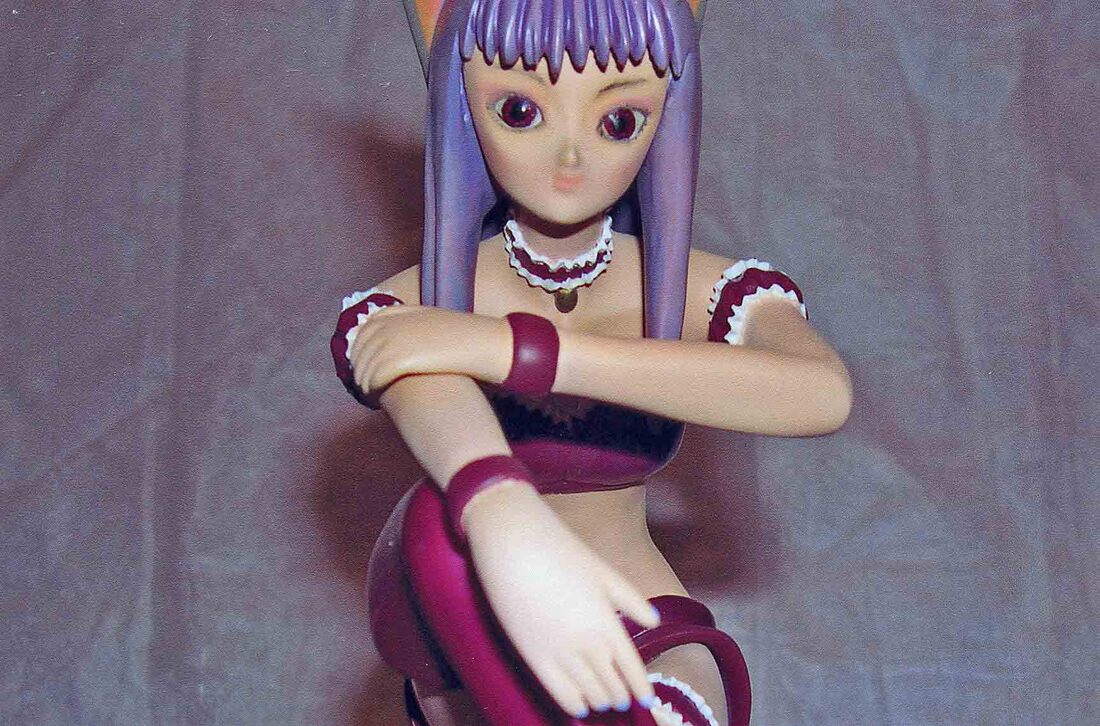
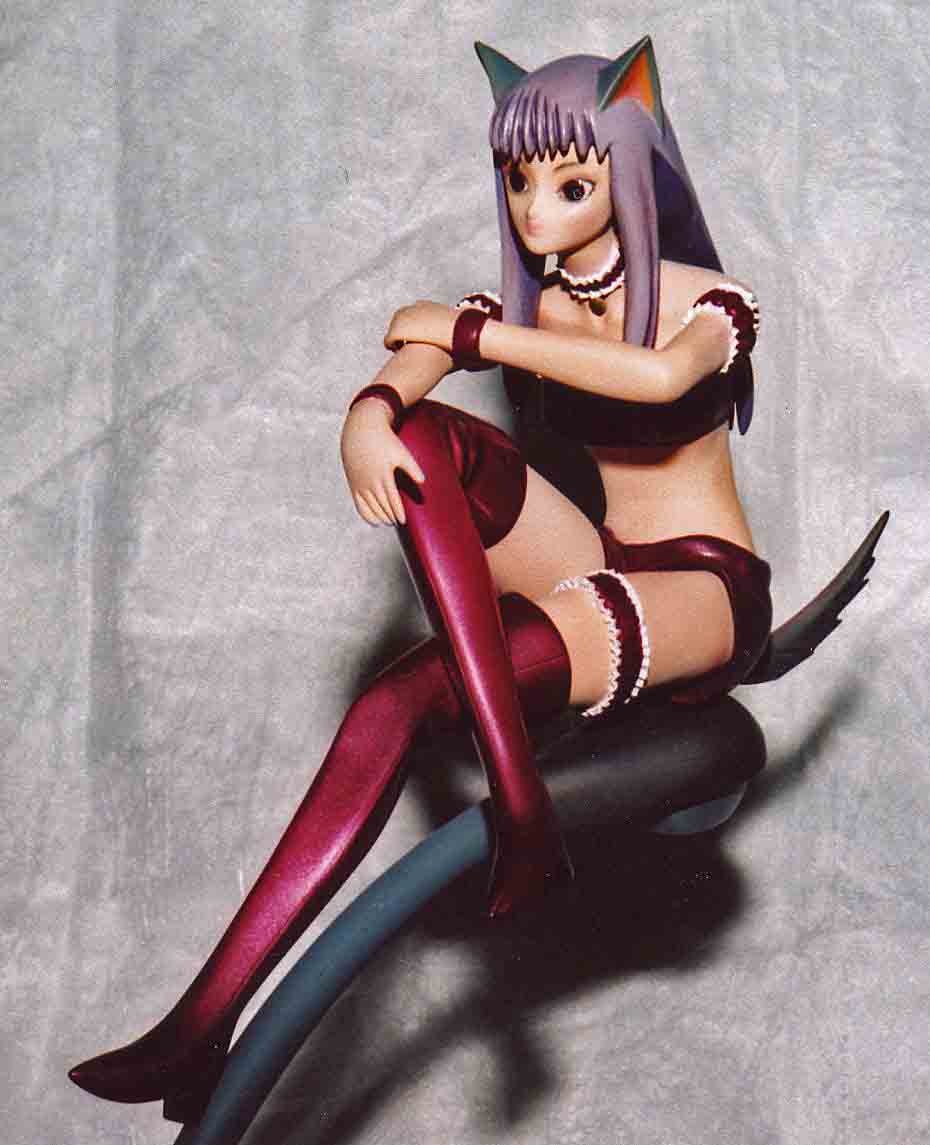
Build a Resin Figure:  Mew Zakuro

By Dick Engar

Mr. Editor Bill's Pre-Prologue:
 
This fine article by Dick was umm--rejected by a certain nameless modeling magazine and has not seen the light of day until now.  Some may feel it features an esoteric subject, but the techniques Dick used for his excellent rendering of this female anime figure have wide application for anyone building any multimedia/resin or figure kit.  Dick lived in Japan for a couple years, learning to speak and write in Japanese, and he became immersed enough in the culture to gain a unique perspective on many aspects of model kits and subjects that have evolved from The Land of the Rising Sun.


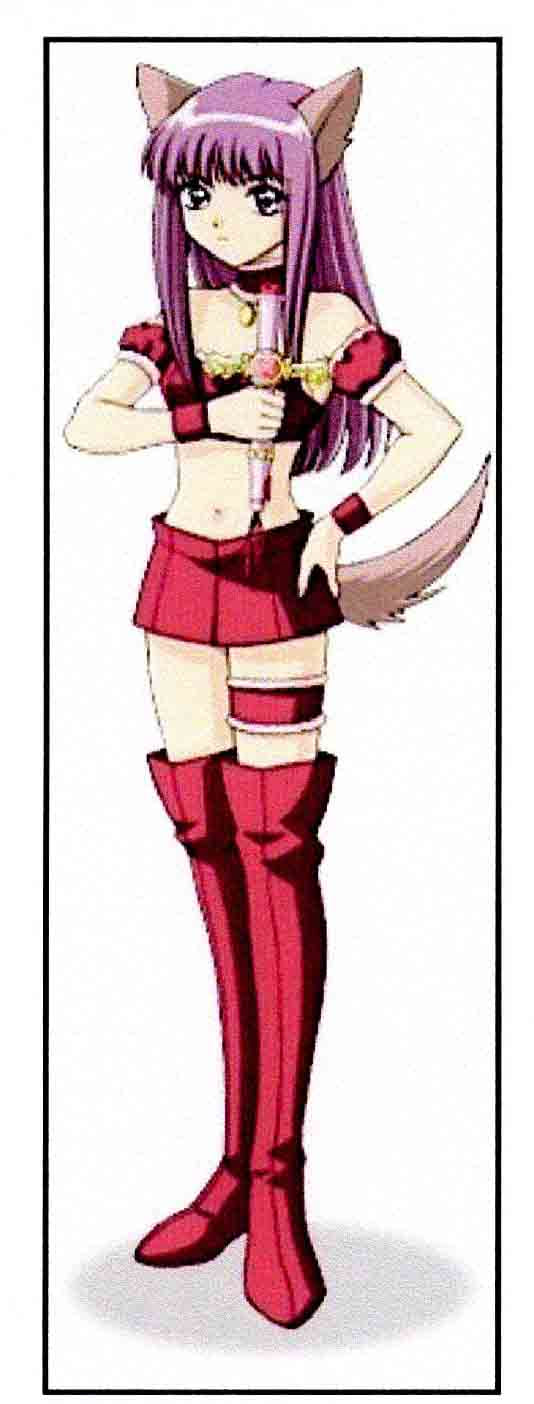
MEW ZAKURO, ANIME FIGURE PROLOGUE:
 

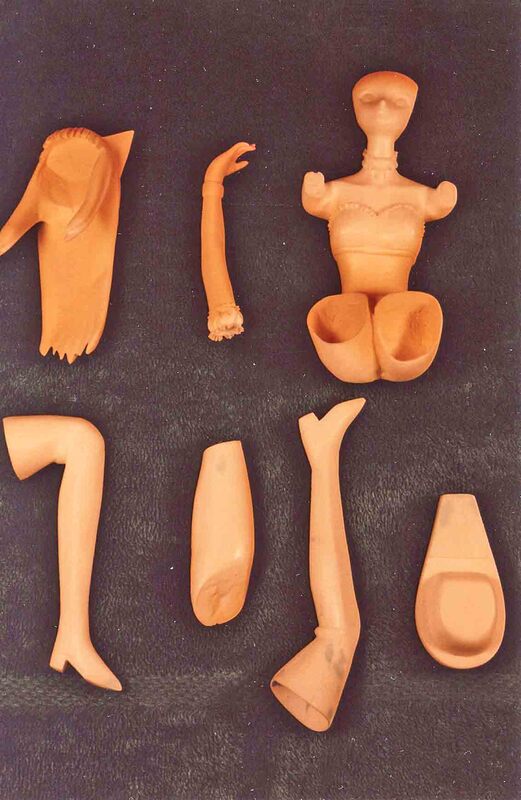
Judging from the large number of female fantasy figures present in competition at most IPMS National Conventions, many modelers are interested in purchasing and building the various and unusual possibilities that are part of this medium.  Indeed, there are often enough entries in the sub-category of Anime that the contest judges create a split for them alone.  Yet, how many articles are published in the major modeling journals featuring Japanese Anime figures?  In an effort to rectify the situation, this author has provided the following article describing a recent model-build that took him from the limits of reality to the realms of imagination.  


​
I concede that a few readers of the content of this website may not think initially that they have interest in anime or resin models per se.  Nevertheless, my objectives in writing are as follows: 


1.  Help readers deal with quirks of building resin kits
2.  Help readers handle mixed media including resin, wood and copper tubing
3.  Help readers manage surfaces that do not retain paint well
​4.  Help readers prepare a wood base to enhance the model.
5.  Help readers execute realistic eyes on a figure model.


As many model builders know, sooner or later it is necessary to stray from the comfortable confines of precision injection mold kits to more exotic media when the quest for more unique subjects dictates.  Fortunately the transition is not that difficult and can even evolve into a fun and rewarding journey.   Hopefully those who venture through this article will learn a number of tricks and pearls to help hone their own modeling talents even if anime is never attempted.  But, to quote a non-anime hero named James Bond, “Never say never!!”
​

INTRODUCTION:
 
After building over 200 examples of aircraft, spacecraft, automobiles and ships over the years, (not to mention a few Weird-ohs and Ed Roth figures, the unpleasant demise of which can be found elsewhere), the vast majority of which were standard injection molded kits, the opportunity presented itself to try a resin figure for a complete change of pace.  
 
What is “anime,” first of all?  It is a Japanese shortening of the English word “animation” (pronounced "ah-knee-meh" in Japan, but fine to pronounce "Anna-May" in the USA).  Cartoons and magazines featuring anime characters, many of which are found in situations more mature than in similar media the USA, are very popular in that creative nation.  

Japanese anime traces its roots to the early days of cinema.  Prior to WWII, Japanese animated productions were well established and then-available film technology was fully utilized to the point where the medium was considered as a viable alternative to live-action productions. Post-war, Japan rebuilt its film industry, and by the early 1960's, animated series such as Astro Boy were imported to the USA.
 
Picture
Mew Zakuro as she appears in cartoon form on the Zakuro Sisters web site.
A natural offshoot of these Anime magazines and cartoons are model kits, many of which can be found in Japan as regular injection molded kits.  Gundam is probably the best contemporary example.  However, there are a number of cottage industry manufacturers with owners interested enough in the subject to sculpt and manufacture kits of more obscure anime figures.  Such is the case with Mew Zakuro, the subject of this article.
Picture
Mew Zakuro (top left) and fellow Mew sisters as they appear in the Mew Mew Power magazine.  Note Mew's reserved expression compared to her bubbly cohorts.
Tokyo Mew Mew (with an English subtitle of Mew Mew Power) began as a magazine and anime series created by Japanese illustrator Mia Ikumi and writer Reiko Yoshida.  The "manga" (or magazine) series began in 2001 and there was also a graphic novel published by the Japanese company Kodansha.  The anime television show was created by Studio Pierrot and aired on TV Aichi Japan for a year starting in April 2002.  
 
A group of five junior high school girls are the heroines due to their unique ability to transform into superhuman forms that defend justice and fight aliens.  Each of the girls has some DNA from an endangered species whose attributes help them in the fight.  Our specific heroine, Fujiwara Zakuro, is the fifth member of the team and mingles with the DNA of a gray wolf.  The five girls work at the Café Mew Mew as waitresses, and the café doubles as their secret headquarters.

Tokyo Mew Mew demonstrates the depth of character development provided in many anime productions.  These are no two-dimensional cardboard characters!  In the series, Zakuro (which means pomegranate in Japanese) is the oldest and most beautiful of the heroines and is also the most aloof and cranky, with a definite attitude when provoked. 
In the English version of the series, she is known as Renee Roberts, and is the last to join with the other girls.  Early in the series, she expresses a reluctance to participate with them, as she considers them immature and prefers to work alone.  She is also cold and antisocial to customers of the restaurant.
Once Zakuro determines it best to be a part of the group, she is the one willing to test the virtues and commitment of the other Mews, whether they believe her behavior to be harsh or not.  When she transforms, she develops wolf ears and a gray wolf tail.  Her emotion-fueled power is fire, as there are flames in her transformation and as weapons, she has an energized ribbon whip and a purple dagger.
 
According to the sculptor of the kit, George Robbert, “The inspiration for the kit came from episode 21 of the Tokyo Mew Mew animated television series, wherein an enemy/monster is defeated but lets loose a flood of water.  We see a shot of the other four members of the team of valiant girls being washed down the street by the flood while Mew Zakuro sits calmly and serenely on a streetlight, safe above the water but by only a few feet.”

Interestingly, the kit from garage-kit company BTTG, came out before the show hit the U.S. market.  Mark Krabbenhoft, the resin kit producer, saw George working on the sculpting at a modeling get-together in spring 2003 and became so enchanted that he encouraged  cooperation in turning the master sculpture into a kit within a short time.  Information on Mew Zakuro and other BTTG kits may be obtained by going to www.angelfire.com/art2/bttg.
Picture
Mew Zakuro, showing her attitude in her restaurant garb.
THE MODEL:
 
My model came in a box autographed by both the sculptor and producer.  A picture of a finished subject is featured on the top of the box.
 
Otherwise, there were no instructions or paint guides but I simply went online to obtain color renderings of the subject.  Pictures above were used as painting reference.
Picture
George Robbert (R), the sculptor, and Mark Krabbenhoft (L), the producer of the BTTG Mew Zakuro kit.
Any modeler with experience building standard injection molded kits can figure out what goes where.  Contents of the model kit consists of a figure with nine resin parts, a street lamp made up of two resin parts, copper tubing and a wooden base. 
Picture
Top of the kit box with words of encouragement from George and Mark.
You will first want to wash the resin parts in warm, but not hot water with weak dish soap to remove any residue; otherwise you will run into frustration and wasted time when you paint and mask--stay tuned for highlights. The white resin was well cast for the most part, but as with any resin kit you must first inspect all parts to look for areas of casting failure and bubbles, which need to be filled in.  Small manufacturing defects like these are common with resin kits, but they are not at all difficult to fix.
Picture
Kit contents:  Mew in pieces along with her copper pipe lamppost and wood base.
Picture
Mew’s right ear is the victim of a slight casting mishap.
Although standard plastic adhesives such as Testors tube glue or Tamiya liquid cement do not work on resin, I found a good combination for filling these defects to be 3M Acryl Blue (available at auto body supply stores) with an overcoat or sealing coat of CYA glue.  Of course, myriads of brands and consistencies are out there but I like Great Planes Pro CA Glue, thin consistency.  Let the glue just barely dry, then sand and polish using a standard basic technique of wet sanding with increasingly finer grits, which should easily eliminate these basic casting mishaps.
Picture
Small casting bubbles mainly visible on the right side of Mew’s hair, plus her boot.
Once all parts have been filled and contoured to your satisfaction, it is time to plan your assembly.  Kits like this require some dry fitting and adjusting to ensure an efficient and frustration-minimized course of assembly.  For example, the hair and ears do not fit the head well without some grinding and fitting of both parts with a Dremel Tool.  I use a MultiPro 5, mostly running at the slowest speed.  

​Although my kit came with minimal flash in contrast with many resin kits, fine-tuning was still necessary.   To illustrate, the interior of Mew’s shorts had casting defects that could show after adhesion of her legs; the dry-fitting step, although somewhat time consuming and mundane, is essential to reveal what could be a major disaster later, especially if your goal is a contest quality model or even a display piece without obvious defects.
​Like any model, priming revealed a few small bubbles, etc. that would require filling, sanding and re-scribing in some cases.  Magnification with a glass or even a jeweler’s monocle will enable you to pick up minute defects which can be corrected with your favorite filler along with wet sanding.  I use an old broken dental instrument sharpened to a point to refine my scribing.  You can often obtain these from your favorite dentist (after they have been sterilized) or you can use a needle mounted in a cork or piece of wood to achieve similar results. 
Picture
Defects fixed with Acryl Blue putty and sanding.
Picture
Mew’s body parts look much better after more sanding and polishing.
After some practice, you’ll learn to determine the proper amount of pressure to cut as you wish.  You will find that scribing resin is very similar to scribing injection molded plastic.  Fine-tuning of sharp edges can be obtained with the gentle persuading power of a standard pink eraser; just be sure to clean up any residue before you paint.
Picture
Mew’s right ear looks much better after some shaping, sculpting, polishing and painting.
Picture
​After some dry fitting and adjusting, Mew’s hair and ears are ready to fasten to the figure.
A coat of Testor light-tan paint mixed with white was applied as primer over the entire figure portion of the model, and various shades of gray on the lamp portion were airbrushed using various assorted Testor Model Master enamel paints.  The paint should spray and cover well if thinned to the approximate consistency of milk with lacquer thinner.  I masked the skin areas in preparation for painting the clothing and garters.  I use Tamiya tape and 3M Scotch blue plastic tape, which is available at any auto body paint accessory store.  The blue plastic tape comes in various widths such as 1/8 to 3/4” and conforms very well to curves.   Its elasticity allows a slight amount of stretching without losing adequate adhesion, especially in the narrower widths.
Picture
​The inside of Mew’s shorts needed a lot of work to eliminate some casting flaws that might show with the finished legs in place.
Normally, when following a camouflage scheme on any military subject, you want to paint the lighter colored areas first.  The ruffles of the garters would have been too hard to mask first, so I deviated from the standard procedure and painted the reddish purple outfit first.  I actually wanted a softer white so I felt that the underlying red color would enhance.  I still added a touch of light blue to the white paint to prevent yellowing.  About one drop of blue paint to the jar is the approximate mix that will cool down the shade but not make it powder-blue.
Picture
Fine tuning the bumps and defects renders them virtually invisible after painting.
Upon removing the tape, I learned that my effort to clean the model parts prior to assembly was insufficient as evidenced by paint peeling off the resin.  I cleaned the resin better with an old toothbrush and dish soap and lukewarm water and then filled these areas in with darker skin tone paint to assist in preventing over-sanding as I hoped to keep the texture similar.
Picture
​A standard pink eraser worked well to bevel and shape Mew's ear properly.
[Mr. Editor Bill will interject here to say that using paint thinner to clean parts prior to assembly is much more effective at removing stubborn mold-release agents than soap and water.  This trick definitely applies to standard styrene plastic kits as well.  When you do this, it is important to check first that the paint thinner isn’t too strong to melt the plastic.  Try it out on a sprue or area of plastic that will not be seen on the finished kit.  
Picture
​Mew’s arm looks pretty good until you look at her hand above the wristband.  Tape adhesive pulled up the paint!
NEVER use lacquer thinner to do this.  While it may not affect a resin kit, it will always instantly dissolve the top surface on a styrene kit.  Use gloves and a small amount of thinner in a bowl.  Wipe the parts down with a small cloth or paper towel saturated with thinner.  A toothbrush will help get into tight spots.  When through, wipe down the parts with dry paper towel to remove all traces of thinner that will certainly dissolve the plastic if left over time, and then wash the parts in soapy water and let air-dry.]
Picture
​Masking the skin tones after painting in preparation for handling the garters and other parts of Mew’s costume, with a mix of blue plastic tape and Tamiya masking tape.
It took some careful masking of the frills and clothing areas, but a couple of runs with the airbrush yielded a surface free of defects and any resultant further paint adhesion failure.  The clothing presented some unique challenges.  I wanted the boots to have a shiny patent leather look, so they required meticulous smoothing and preparation before the Testors purple metallic paint was applied to provide contrast with the flatter maroon shorts and top.  I also painted Mew’s belt with the same metallic purple gloss paint and then polished liberally with plastic polish after carefully sanding to even out paint defects.  I also polished the clothing slightly in spots with a cloth to make it look more natural, being careful not to mess up the nearby skin.  Some pastels were also used to fine-tune the skin to enhance a more realistic look.
Picture
Correcting areas where the paint peeled off when pulling off the masking tape--Note the darker shade of paint applied to help prevent over-sanding.  Sometimes things just go wrong with a project and you can't be afraid to fix unanticipated problems.
Picture
A comprehensive view of various sizes of areas where the paint peeled from masking and the darker-primer paint applied to remedy the situation.  This is prior to sanding.
Masking Mew’s wolf ears was straightforward using Tamiya masking tape and care to burnish the edges down with a soft rubber-plastic paintbrush handle to ensure that there was no bleeding of unwanted colors under the tape.  Mew’s tail was completed with various shades of gray paint to conform with the pointy wolf ears, but I also added some variety of color and shades to make it more interesting.  Pastels were used in spots to enhance as well.
Picture
Mew’s face completely masked with yellow Tamiya tape.  The eye areas in the model have a recessed area where the tape was burnished down.  Although it appears that the eyes are symmetrical, once the bandages were removed a different result was observed!
The main challenge for any figure model is to create a face that is realistic and correct.  

​
The eyes have it.  Why?  Because anyone knows what a face is supposed to look like, and a minor error will glare out to even the most casual observer.  So, with some trepidation, I decided to go for it to start a luxurious full day of modeling.  

I had read a number of articles about doing eyes and picked up a few suggestions from some excellent figure modelers.    Since this was an anime model, I had to make a decision:  Should I paint the eyes as two dimensional cartoon caricatures, or should I paint a three-dimensional face with realistic eyes.
I did a few ink drawings on paper and decided to go for the 3-D, more natural look.  I decided to do the whites first and masked off the rest of the face in preparation for some preliminary coats of gloss white paint.  To ensure a good mask I used clear tape first and made a pencil template, which I transferred to Tamiya masking tape.  This works well to prevent paint bleeding under the mask.
Picture
A pencil-drawn template on clear tape used to transfer the correct shape to better masking tape.
Picture
Clear template and subsequent custom masking tape ready to cut.
Picture
​Don’t shoot more paint until you see the whites of her eyes--obviously a little clean-up was in order next!
As Mew is definitely not an Ed Roth caricature, I did not want any bloodshot look, so pure white paint for the eyeball base ruled the day.  I used a dental dam to make masking easier giving Mew the look of a barbershop customer.  

[Mr. Editor Bill note:  Not being a Mad Doctor myself, I’m a little clueless as to what a “dental dam” is, other than an epithet to curse my dentist when he scrapes my gums so hard that they bleed and then he tells me I need to floss more.  The way I interpret Dick’s meaning would be to use a piece of a latex glove or even a balloon with a small hole that could be stretched over the object to mask.  Or maybe some Parafilm, the old lab standby, could be used here.]
After giving the eyes some time to dry, I pulled off the tape to reveal some character-lacking white blobs as expected.  I decided to add mascara by painting a black border, but ended up with a result looking like the Pharaoh’s daughter.  Ugh!  Sorry, but I could not bring myself to taking a picture (use your imagination here), so I re-masked and repainted over.  There was a slight bit of black that showed through which actually looked good.  So I went to the next step, and painted some round pupils.  But when I took the masks off, I realized that the molded eyes were not symmetrical and the right eye was actually rotated 90 degrees!  The adjacent photo shows the problem along with some early drawings, which were going to help me envision what the eyes were going to look like (I thought).  Thank goodness the end result was different.
Picture
Surprise!  Mew’s left eye appears to be rotated 90 degrees (the left eye is on the right side in the photo).  Time to do some plastic surgery.
I did some whittling with a blade and formed small ridges with the Acryl Blue putty to improve the shape of the left eye (which is to the right side as you look at the pictures) such that it looked far more natural.  Once satisfied with my plastic surgery, I used clear purple paint to create the irises and made sure that there was no white showing top or bottom to avoid an unnatural “doll eye” appearance.  Rather than trying to mask, I carefully applied a drop of paint letting gravity and capillary action create a natural round result.  It was hard to get the irises perfectly round but I got close enough that the end result was pleasing, especially under normal conditions without magnification.  Then came some gloss black paint dots to serve as the pupils.  Care must be taken to ensure that the pupils are looking at the same thing; cross-eyed or divergent eyes on figures do not look make them look happy or realistic.
Picture
What a difference good surgery (or is it a good surgeon) makes!  Mew’s eyes after the irises and pupils are refined and Clear Coat has been applied.  Preliminary make-up is also visible along with mascara and subtle eyelashes.  
I ensured that the final black dots over the purple paint were in the right place so the eyes were coordinated and then I let everything dry for a couple of days.   I then finished the eyes with multiple applications of Floquil Crystal Cote to blend everything in and give the eyes a more natural look.   The adjacent photo shows Mew with some pencil added mascara and eyebrows along with some eye shadow and lipstick secretly borrowed from my daughter’s make-up kit.
[Mr. Editor Bill sez:  The use of a high-gloss finish on a model figure’s eyeball will provide a natural reflection of source light for the viewer.  Any real eyeball has this characteristic, and it is one of the things we naturally accept subconsciously as we view any normal eye.  The high-gloss approach generally works on any figure’s face, so long as the eye surface is somewhat spherical.  Another way to duplicate this literal highlight on a model is to paint a small, white dot, usually in the upper half of the eye surface.  It’s a common technique for figure modeling, and the white dot satisfies the viewer in a subliminal fashion that the simulated eye has the qualities of a real eye.  The dot will normally be smaller than the pupil.  It works, so long as the white dot is in the same relative position on each eye!].
Now that the face was acceptable, it was time to fine tune the flesh tones on the rest of Mew’s body to create a more realistic look:  lighter on surfaces such as the underarms, etc. and darker on the front surfaces of arms and legs, etc.  From there, assembly of her arms and legs to her trunk was straightforward, although some selective grinding was necessary in spots to ensure a tight fit.  Pre-painting the garters worked very well as the arms fit inside and masking would have been very difficult once assembly was complete. 
Picture
With hair in place, Mew starts to look content.  Look hard and you’ll see a few places that need some cleanup.  Notice how Mew’s fingernails match her hair.
The final trick of assembly was to get a tight fit with the hair and head, but that was accomplished without much trouble.  After grinding the parts to fit with the Dremel tool, I painted the hair using various shades of purple, and streaking the hair to create a natural look.  The hair was done using mostly semi-gloss paint to replicate a realistic sheen.  Once it was fastened in place, Mew seemed content with her almost finished look.
Picture
A look at Mew’s hair shows the streaking and shadowing done to improve the appearance.  Careful masking around the ears is also evident in this photo.
Picture
Mew takes a seat while her base is prepared.   This view accentuates the patent leather look of her boots and belt as compared to the rest of her outfit.

I then used some pastels, thinned paint, and spot sanding and smoothing to fine tune the model to cover defects, blend hair, and create an overall finished look.  Mew looked comfortable now with her shiny boots and well coiffed hair so I could sit her down and set her aside while I turned to what would become her permanent perch.

The model comes with a wood base.  Instead of a wood-grain look, I wanted a very shiny, black finish.  First of all, I drilled a hole in the base for the copper pipe portion of Mew’s perch before painting to ensure that my beautiful finish would not be marred by unnecessary handling after the finish is applied.
Picture
Mew’s wood base after the final smoothing with fine steel wool.  Polishing and preparation will result in a mirror smooth finish.
Picture
​A guitar string post is fastened to the streetlamp top in preparation for Mew to have a seat.
I used an Olympic Paint product, Carver Tripp Pre-stain Wood Seal, to provide several coats of wood sealer to create a suitable gloss finish.  You have to follow the same process that is necessary to make a Pinewood Derby car look like a really spiffy racer.  Add sealer, let dry, sand, add more sealer, let dry, sand and eventually you have a completely smooth surface that will not suck up paint.  Once the preparation was ready, I applied Testor’s Model Master gloss black paint, let it dry, and polished vigorously with increasingly fine sandpaper.  I finish polishing with super fine steel wool, which really eliminates the defects.
 
Our car modeling friends really bring their auto model finishes to an amazing brightness by using trusty Meguiar’s Mirror Glaze auto polish.  A go-round with this product really made the base shine almost like a mirror!
Picture
Mew looks comfortable atop her perch and prior planning and dry-fitting ensured that the model would balance well without any weights or other devices.
The resin lamp portion for the base was easily assembled and painted with varying shades of silver and gray to create a realistic look.  The copper tubing post was cut to the proper length so Mew could perch in a way that the set-up was balanced and not top-heavy.  I had previously planned to work the base such that Mew was sitting over it to ensure a proper center of gravity and did some dry fitting with tape, etc. first to ensure that my engineering truly created a better mousetrap. 
 
Measure twice, cut once works well here, as resin models are heavy and the worst nightmare would be for the finished project to be unsteady, topple and shatter into shards of disappointment while on display at a show, etc.  Especially, if you compete or like to show your models at various events you have to keep in mind they are going to be moved by judges, show coordinators and even by unsuspecting spectators who ignore the “Do not touch or else” signs and turn the model, etc. to get a better look at something.
 
CYA glue has weak tensile strength and I knew that a heavy resin figure would not do well sitting atop a resin light fixture without some form of reinforcement.  
I determined that the best way to safely secure Mew was to use a metal post that extended into both her derriere and the top of the light fixture.  I drilled a hole in Mew first, used a thick guitar string portion for the post since it had the wrap-around wire, which would enhance glue retention, and drilled a matching hole into the lamp.  Then the post was glued into the hole.
  Finally the big day came and I used the CYA glue to fasten her to the lamp.  The challenge was to make the fit close enough and tight enough such that no one could see the post or any glue residue and I was successful initially.  Mew looked really great on her lamp post and I added a drop of CYA glue to the back of her boot to keep it on the right place on the light pole.  I eagerly looked forward to letting her debut at a local model contest and planned to sneak her onto the contest table such that the other guys did not know that an avid aircraft builder had resorted to building an unusual female fantasy figure.  I picked out a box that seemed to fit and used several sponges to try to keep Mew in the right place.  Comfortable with the box and sponge configuration, I drove to the contest.

Alas, when I arrived at the contest location, the ride had jostled Mew such that she was loose from the top of the lamp but not from her post.  She would not quite balance on the top correctly, the post showed glaringly, and so, of course, she did not win her category.  Her boot popped loose from the pole and she was now a wayward child off center.  Furthermore, while transporting her back to my office where she is displayed, I broke her tail off. 


Picture
Mew in her refined shipping box.  Note the recessed area custom cut to accept the wide base, the lamppost and the Mew figure.  Her most vulnerable body part is the tail, and there is plenty of leeway to assure it does not break off.
Fortunately, I had a few months to repair her in preparation for a 700-mile trip to Southern California for the 2007 IPMS Nationals and I had to come up with a better way to transport her.  I decided to use packing foam and peanuts.  I cut out a portion of the foam to fit and then sprayed straight lacquer thinner with my airbrush.  Keep in mind that lacquer thinner does a beautiful job of dissolving the foam such that I could fasten the cut open part to a solid lower base.  I had another piece of soft, pliable foam which served as a bed and once Mew was repaired with her gray tail secured better and reinforced with a smaller post added to the light pole and her heel to keep her foot in the right place, she was ready to travel.  The new box worked magnificently and Mew had a cushioned ride, which kept her tail and every other part properly in place.
Picture
This view shows Mew’s ears and the subtle changes in shading added along with some sharp masking.  It also shows the shading in the back of her hair along with her patent leather boots.
Picture
Would you like a date with this model?  Good luck dealing with her altitude (or is that attitude?
A few photos of the finished model show Mew Zakuro from various angles which emphasize some of the subtle differences in skin tones, the contrast between the shiny boots plus belt with the flatter clothing items, and the slight streaking, etc. in her hair.  Different lighting conditions bring out various nuances in color, etc.  Digital photography can help you spruce up the model as you will see minor defects or areas which need clean-up thanks to the different point of view.  
Picture
Side view of Mew the thinker
Picture
A close-up view of Mew’s bangs shows the shading necessary to improve the appearance of her hair.  The modeler has to become a hair stylist!
For this author, building Mew Zakuro was a step outside the conventional and a way to think and model outside the standard box.  I had never before completed a model of a fantasy figure but the project taught me a lot.  I appreciated the encouragement of fellow modeler Tom Grossman who provided the kit as well as much encouragement to finally get me going on the project.
 
THE MAD DOCTOR’S PRESCRIPTION FOR SUCCESS:
 
1.  Occasionally step out of your standard modeling medium, whether it be aircraft, armor, or whatever and try something completely different.  Even if the result is not perfect or contest quality (if you are into competition), you will learn new techniques and improve your skills.  You will also win new fans.  When she saw the finished Mew, one of my employees insisted that I keep the new display case I bought (that was tall enough for Mew) in her office since she reminded me that Mew was much more pleasing to look at than any old airplane model!
 
2.  All plastic kits, resin or injection molded notwithstanding, should be cleaned initially with soap and water to remove residual materials that are part of the molding process that will interfere with the adhesion of any kind of paint [Ed:  Or paint thinner if the mold release agent is particularly stubborn!].
 
3.  Don’t shy away from multi-media kits.   In this case, resin, copper and wood were combined to make an aesthetically pleasing model where it is not possible at first glance or even a more detailed look to tell that wood is involved, for example.
 
4.  Faces take some effort to get right.  I have seen even small figures that are part of dioramas eliminated by judges right off the bat due to “bug-eyes” or other issues that are not part of pathology-free nature.  Take some time to practice painting on paper or a practice model first and ensure that facial features are within normal limits in a larger figure.  It is easier to perform plastic surgery before you to go a lot of trouble to paint and characterize.  As mentioned earlier in this article, the eyes have it and can make or break the end result.
 
5.  Texture and the proper use of gloss and flat paint or mixtures of the two are important in terms of achieving a natural result and ending up with a natural looking replica of something real in nature in lieu of just a toy-like model.  Even gloss paints can be mastered with a little effort in terms of patience and technique to avoid an orange-peel surface, dust specks and other sins that detract from the final result.
 
6.  Although we as modelers are grateful for the tried and true traditional companies that have provided us with great subjects over the years, occasionally you’ll enjoy digressing from the standard P-51s, Sherman tanks, Enterprise models and so on.  Try some more esoteric subjects!  There are a number of cottage industry suppliers out there that will suit the bill and are certainly worth a go.  Such is the beauty of a wide variety of choices in the world of modeling.  And don’t be afraid to try something unusual like an anime figure!
 
SOURCES
 
Mew Zakuro, the Model:  BTTG Models:   www.angelfire.com/art2/bttg.
 
Tamiya Masking Tape:  Tamiya, Inc.  www.tamiya.com  3-7 Ondowara, Shizuoka City, Japan

Meguiar’s Mirror glaze:  Meguiars, Inc.  www.meguiarsdirect.com  Irvine, CA  92614

Testor’s Model Master Paints, www.testors.com 440 Blackhawk Ave., Rockville, IL  61104

Scotch Plastic Tape:  3M Industrial Tape Division, St. Paul, MN  55144-1000

Acryl Blue:  3M Automotive Aftermarket Division, St. Paul, MN  55144-1000

Dremel Tools:  Dremel Tools, Box 1468, Racine, WI  53401-1468

Pro CA Cyanoacrylate Glue:  Great Planes Products, P. O. Box 9021, Champaign, IL
​  
Carver Tripp Pre-Stain Wood Seal:  Olympic HomeCare Products, 2233 112th Ave. NE, Belleview, WA  98004
Picture
Different lighting conditions with a different camera.  Does this photo teach any lessons about how different lighting conditions (or different types of film) can affect the appearance of  color?  How do you really determine accuracy?   We’re sure that Mew probably doesn’t care!!  And she knows that this picture is her builder’s favorite view of her, and a good way to conclude this article! 
Check back often!  We have a lot of cool upcoming content!


NEW:


Oct 2022:  Atlantis 1/48 JS-III Stalin Tank Kit Review!
Sept 2022:  Atlantis 1/32 Tom Daniel Funny Cars Kit Review!
August 2022:  Atlantis 1/665 USS Wisconsin Kit Review!
August 2022:  Atlantis 1/618 D.K.M. Bismarck Kit Review!
​29 July 2022:  D&H Cyclops and Chariot From Lost in Space Kit Review!
16 July 2022:  Moebius Hal 9000 Review YouTube Video!
07 June 2022:  Atlantis 1/135 Convair 990 Airliner Kit Review!
01 June 2022:  Atlantis 1/24 Son of Troublemaker Kit Review!
​21 May 2022:  Atlantis 1/1200 US Combat Task Force Fleet Kit Review!
14 May 2022:  Atlantis 1000/1 The Amoeba Kit Review!
06 May 2022:  Atlantis Air-Land-Sea Gift Set!
26 April 2022:  Atlantis 1/139 Boeing 707-120 Kit Review!
25 April 2022:  Atlantis 1/77 F-89D Kit Review!
22 April 2022:  Atlantis 1/245 Monitor and Merrimac Civil War Set
15 January 2022:  Dream Gear 1/3000 Arkhitect Review!  Landmark new kit includes integrated lighting!
15 December 2021:  Atlantis 1/8 Forgotten Prisoner Review!
10 December 2021:  New Atlantis 1/96 Moon Ship Review
01 December 2021:  NEW Minicraft Kit Releases!
30 November 2021:  Atlantis 1/139 707 Kit Update
25 November 2021:  Atlantis 1/54 F11F-1 Cougar Kit Review
15 November 2021:  Convair 1/135 990 Test Shot from Atlantis!
September 2021:  NEW 1/25 Atlantis King Kong Kit Review
September 2021:  Minicraft 1/200 "Spruce Goose" Review and History
September 2021:  Minicraft 1/48 T-41 Review Update
September 2021:  Minicraft 1/144 F-51 Review
September 2021:  NEW Atlantis 1/32 1982 Camaro Review!
August 2021:  Minicraft 1/144 B-52 (Current Flying) Review
August 2021:  Minicraft 1/144 E-3/E-8 AWACS/J-STARS Review

July 2021:  New Atlantis 1/300 Nautilus Review updates our Nautilus history page!
July 2021:  Revell's Gemini Spacecraft Kits History
June 2021:  Minicraft 1/350 RMS Titanic Review
12 May 2021:  Titanic Models List!  One Movie.  Lots of Titanics.
29 April 2021:  Snoopy vs Red Baron live on YouTube!
15 March 2021:  Atlantis Snoopy and His Sopwith Camel Lands -- What Happens when they meet The Red Baron?
12 March 2021:  Atlantis 1/120 B-29 Review!  New Kit!  
08 March 2021:  Minicraft 1/144 B-24J / PB4Y-1 / B-24D Review!
10 February 2021:  Moebius 1/144 Discovery on YouTube!
07 February 2021:  Guest Gallery!  See our pals' models!
05 February 2021:  Moebius 1/144 Discovery XD-1 Review
Will the Utah Monolith stay vertical this time?
05 January 2021:  Hawk Beta-I Atomic Bomber Rebuild!
28 December:  Bill's Airliner Gallery! 
19 December:  Just in time for Christmas!  Atlantis Phantom of the Opera with Glow-in-the-dark Parts!
13 December:  Godzilla Returns Again!  Atlantis Godzilla with Glow-in-the-Dark Parts!
30 November:  Revell KC-135 and 707 Kit History!
23 November:  Minicraft 1/144 C-18A/707 Kit Review!
Another feature in our series about the KC-135/707!

12 November:  Atlantis Mr Gasser Review updated photos
09 November:  Dick's Lindberg XB-70 Restoration
09 November:  Monogram Air Power Set YouTube Video!
30 October:  Special Project:  Monogram's 1959 Air Power Set! (web page)
09 October:  A Review of Minicraft's KC-135 Kits continues our special series on the KC-135 (feature in-progress).
28 September:  Let's Play Battleship!  Atlantis 1/535 Iowa Class Kits review - and bonus comparison between Revell's USS Missouri and Atlantis Iowa Class Battleship kits!

20 September:  Kit History --  Revell 1/535 USS Missouri
07 September:  Ship It!  Academy 1/700 Titanic ICP Kit Review
22 August:  Revell's All-New PT-109 Elco PT Boat Kit Review
13 August:  KC-135 History Series Part II - AMT's 1/72 Kit:  It's In There
04 August:  Dueling Subchasers-- Atlantis S2F Hunter Killer Review
29 July:  Kit Review and History:  Atlantis Models P-3A Orion
26 July:  Book reviews:  The Vintage Years of Airfix Box Art by Roy Cross
A Weird-Oh World - The Art of Bill Campbell by Bill Campbell

24 July:  DEM BRUDDERS GO OFF THE DEEP END WITH THEIR  ATLANTIS PBY CATALINA KIT VIDEO REVIEW!
22 July:  Why Buy a PBY:  Atlantis PBY-5A Catalina Web Review!

09 July:  No shyin' away from the Cheyenne:  Atlantis AH-56 Cheyenne Kit Web Review
06 July:  Rank the Lanc:  Minicraft Lancaster MK-1 Kit Review
17 June:  88 Reasons:  Minicraft Ju-88A/C Kit Review
16 June:  We Dug the Jug:  Minicraft P-47D Kit Review
15 June:  DICK DOES CARS!  Dick's Car Gallery!
10 June: 
Minicraft RB-29 Review Updated!  Minicraft's Own Lewis Nace Builds an Amazing B-29 Conversion Collection!
05 June:  Minicraft 1/144 B-17 Kit Review!
03 June:  The Big Stick:  Atlantis' B-36 Kit Review!
30 May:  Minicraft A6M2 Zero Kit Review in 1/144
26 May:  Dem Brudders On Youtube!  Watch our Atlantis Ah-56 Cheyenne review. (We're a little disappointed with our new spokesman Roddy Redshirt.  When we find all his pieces, we might not use him again.)
22 May:  The Girl Next Door:  Minicraft 1/144 G4M1 "Betty" Kit Review
20 May:  Unmasking the Avenger:  Minicraft 1/144 TBF Avenger Kit Review
18 May:  B young!  B-29 again!  Minicraft RB-29 Superfortress "Postwar" Kit Review - We've expanded content on this page!
06 May:  KC-135/707 Kit History Series Begins!

27 April:  Enter the Mentor:  Minicraft T-34A Mentor kit Review. 
24 March:  See Dick.  See Dick build.  See  Dick's Large Aircraft Gallery.  Build, Dick, Build.
04 March:  Eat all your vegetables.  Open-Box New Kit Review:  Atlantis HH-3E "Jolly Green Giant"  
06 February:  Requiem for Mad Magazine: Aurora/Revell Alfred E. Neuman Kit History
12 December:  BEECH TRIP!!!  Minicraft's Civilian Aircraft Product Line

20 November:  More pictures added to Dick's Yo-Yo page:  B-24J Liberator "Yo-Yo" - Custom-Painting a 1/48 Diecast Model
20 November:  IPMS/SLC Group Build, Italy/Bulgaria Theme!
12 November:  We welcome Minicraft Models as our first sponsor!
​07 November:  We've again expanded our Report on the 2019 IPMS/USA Nationals in Chattanooga, TN!
15 October:  IPMS Boise Mad Dog Modelers Fall Show!

13 September 2019:  Aerial Photography for a Song:  The Estes AstroCam 110
28 August:  Kit Review - Atlantis 1/92 B-24J Liberator Bomber 
01 August:  We continue our Apollo at 50 celebrations by kicking off our new model rocketry page, and ask:
​Apollo at 50:  Was it Worth It?
20 JULY 2019:  HAPPY 50TH ANNIVERSARY, APOLLO 11 (We don't think you look a day over 40)!  Revell's Apollo Spacecraft Kits
25 June:  A New Blog Post:  Join us at the IPMS/USA Nationals!
19 June:  Build a Resin Figure Kit.  Dick shows step-by-step how he built Anime subject Mew Zakuro
15 May:  Smokey and the Bandit:  MPC's 1977 Pontiac Trans Am
25 April: 
History of Armor Modeling with pals James Guld and John Tate
03 April:  Car Modeling in the 1970's expands our History Series
26 March:  Kit Review--1/350 Space Ark from When Worlds Colllide
17 March:  Weird-oh's, Finks, Flypoggers, and More!  We continue our History Series with our various encounters in the Monster Figures craze of the 1960s
10 March:  Our First Kit Review!  Tamiya 1/48 Army Staff Car - Are we too hard on a Tamiya kit?
​23 February:  The Nuclear Family:  SSN Nautilus 571 - About the Lindberg, Revell, and Aurora Kits
15 February:  DON'T TRY THIS AT HOME I - Dick Builds a Batmobile--in 1/3 Scale!
13 February:  Modeling Outside the Box.  Dick goes all over the place, building a number of unusual subjects!
04 February:  NASCAR or Not?  Monogram's Days of Thunder Cars
31 January:  History Series Begins With The Aurora Monsters
27 January:  Build a P-82 in 1/144 Scale or Other Crazy Conversion
13 January:  The Anti-Modelers
05 January 2019:  The Day I Quit Modeling
01 January 2019:  dembrudders.com is live!!!

  • Home
  • Start Here
  • Blog
  • Projects
    • HAWK Beta-I Atomic Bomber Rebuild Plus Ragnarok
    • Lindberg 1/172 XB-70 Rebuild
    • 1/144 F-82 Conversion
    • Resin Figure Mew Zakuro
    • Yo Yo 1/48 B-24J Custom Paint and Decals
  • History
    • Monogram Air Power Set (1959)
    • Revell 1/144 DC-10 / KC-10 Kit History
    • History of Titanic Model Kits: The Big List
    • Revell Gemini Kit History - 1/48 and 1/24
    • AURORA MONSTER MODELS
    • Atlantis / Revell 707 and KC-135
    • Revell's 1/535 USS Missouri: An Iowa Class Act
    • Monogram Days of Thunder NASCAR Kits
    • Atlantis USS Nautilus SSN-571 Model Kit Review and History
    • Weird-ohs, Roth Finks, Flypoggers and Lindy Loonies
    • Car Modeling in the 1970's
    • Armor Modeling
    • Smokey and the Bandit
    • Revell Apollo 11 Spacecraft
    • Minicraft Civil Aircraft in 1/48
    • Aurora's Alfred E Neuman
    • KC-135 and 707 Part One: The 1/72 Kits
    • KC-135 Part Two: The History and The Build
  • Reviews
    • AIRCRAFT KIT REVIEWS >
      • Atlantis Models 1/175 B-52 With X-15 Kit Review
      • Atlantis 1/93 B-58 Hustler Model Kit Review
      • Atlantis 1/400 Boeing 2707 SST Kit Review
      • Atlantis 1/70 F-100C Kit Review
      • Atlantis 1/135 Convair 990 Review!
      • Atlantis 1/139 Boeing 707-120 Kit Review
      • Atlantis 1/77 F-89D Kit Review
      • Atlantis 1/54 F11F-1 "Blue Angels" Kit Review
      • Atlantis 1/120 B-29 Kit Review
      • Atlantis PBY-5A Catalina
      • Atlantis P-3A Kit Review and History
      • Atlantis AH-56 Cheyenne Helicopter
      • Atlantis B-36 Kit Review
      • Atlantis HH-3E "Jolly Green Giant" Review
      • Atlantis B24J Buffalo Bill 1/92
      • Atlantis S2F Hunter Killer
      • Minicraft RB-29 Kit Review
      • Minicraft 1/200 H-4 "Spruce Goose" Kit Review
      • Minicraft 1/48 Cessna T-41 Mescalero Kit Review
      • Minicraft 1/144 B-52D/F Review
      • Minicraft 1/144 B-52H "Current Flying Version" Kit Review
      • Minicraft T-34A Mentor Kit Review
      • Minicraft 1/144 KC-135 Review
      • Minicraft 1/144 F-51 Kit Review
      • Minicraft 1/144 E-3/E-8 AWACS/J-Stars Kit Review
      • Minicraft 1/144 B-24J / PB4Y-1 / B-24D
      • Minicraft C-18 (Boeing 707)
      • Minicraft 1/144 Lancaster MK 1 Review
      • Minicraft 1/144 B-17G Kit Review
      • Minicraft 1/144 A6M2 Zero Review
      • Minicraft 1/144 G4M Type 1 "Betty" Kit Review
      • Minicraft 1/144 Ju 88A/C
      • Minicraft 1/144 P-47D Review
      • Minicraft 1/144 TBF Avenger Review
    • Atlantis 1/8 Creature Model Kit Review
    • Atlantis 1/8 Wolfman Model Kit Review
    • Atlantis Models 1/8 Wyatt Earp Figure Kit Review
    • Atlantis 1/24 Mack Bulldog Stake Truck Kit Review
    • Atlantis 1/8 "The Mummy" Kit Review
    • Atlantis Rat Fink Model Kit
    • Atlantis Super Fuzz Kit Review
    • Atlantis 1/160 Lighthouse Model Kit Review
    • Atlantis Models 1/8 Flash Gordon and the Martian Model Kit Review
    • Atlantis 1/32 Jungle Jim 1974 Funny Car
    • Atlantis 1/500 USS North Carolina Kit Review
    • Atlantis 1/128 U.S. Space Missiles Set Kit Review
    • Atlantis 1/48 Japanese Medium Tank
    • Atlantis Snoopy and his Classic Race Car Kit Review
    • Atlantis Models Metaluna Mutant Kit Review
    • Atlantis 1/48 JS-III Stalin Tank Review
    • Atlantis 1/32 Tom Daniel Funny Cars: Mustang, Camaro, Duster, Charger!
    • Atlantis 1/665 USS Wisconsin Kit Review
    • Atlantis 1/618 Bismarck Battleship Kit Review
    • Atlantis 1/24 Son of Troublemaker Kit Review
    • Atlantis 1/1200 US Combat Task Force Fleet Kit Review
    • Atlantis The Amoeba review
    • Atlantis Air-Land-Sea Gift Set
    • Atlantis 1/245 Monitor & Merrimac Ironclads Diorama Set
    • Atlantis 1/96 Moon Ship Kit Review
    • Atlantis 1/8 Forgotten Prisoner of Castel Mare Kit Review
    • ATLANTIS 1/25 King Kong Kit Review
    • Atlantis 1/32 1982 Camaro Review
    • Atlantis Snoopy and His Sopwith Camel / Red Baron Reviews
    • Atlantis Glow-Godzilla Review
    • Atlantis Phantom of the Opera Kit Review
    • Atlantis 1/535 USS Iowa and Wisconsin Battleship Kit Review
    • Atlantis Mr. Gasser Review
    • Minicraft 1/350 Titanic Kit Review
    • Moebius 1/1 Hal 9000 Kit Review
    • Moebius 1/144 Discovery XD-1
    • Dream Gear 1/3000 Arkhitect Kit Review
    • D&H 1/35 Cyclops and the Chariot from Lost in Space kit Review
    • Academy Titanic 1/700 MCP Review
    • Revell ALL NEW PT-109 Review
    • Tamiya 1/48 Ford Army Staff Car
    • Pegasus Space Ark - When Worlds Collide
    • A Weird-Oh World - The Art of Bill Campbell
    • The Vintage Years of Airfix Box Art
  • Contests
    • 2021 IPMS-USA Nationals Report
    • 2019 IPMS/USA Nationals Report
    • Boise Mad Dog Modelers Fall Show
    • IPMS-SLC Group Build
  • Rocketry
    • Starting Rocketry
    • History and Use of the Estes AstroCam 110
  • Gallery
    • Bill's Airliner Models Gallery
    • Dick's Large 1/72 Aircraft Models
    • Dick's scale Model car gallery
    • Guest Gallery
  • Sponsors
    • Minicraft Models Sponsor Page
    • Atlantis Models Sponsor Page
    • Moebius Models Sponsor Page
    • Amazon Associate
  • IPMS/USA
  • Contact