2Modeler.com
  • Home
  • Start Here
  • Blog
  • Projects
    • HAWK Beta-I Atomic Bomber Rebuild Plus Ragnarok
    • Lindberg 1/172 XB-70 Rebuild
    • 1/144 F-82 Conversion
    • Resin Figure Mew Zakuro
    • Yo Yo 1/48 B-24J Custom Paint and Decals
  • History
    • Monogram Air Power Set (1959)
    • Revell 1/144 DC-10 / KC-10 Kit History
    • History of Titanic Model Kits: The Big List
    • Revell Gemini Kit History - 1/48 and 1/24
    • AURORA MONSTER MODELS
    • Atlantis / Revell 707 and KC-135
    • Revell's 1/535 USS Missouri: An Iowa Class Act
    • Monogram Days of Thunder NASCAR Kits
    • Atlantis USS Nautilus SSN-571 Model Kit Review and History
    • Weird-ohs, Roth Finks, Flypoggers and Lindy Loonies
    • Car Modeling in the 1970's
    • Armor Modeling
    • Smokey and the Bandit
    • Revell Apollo 11 Spacecraft
    • Minicraft Civil Aircraft in 1/48
    • Aurora's Alfred E Neuman
    • KC-135 and 707 Part One: The 1/72 Kits
    • KC-135 Part Two: The History and The Build
  • Reviews
    • AIRCRAFT KIT REVIEWS >
      • Atlantis Models 1/175 B-52 With X-15 Kit Review
      • Atlantis 1/93 B-58 Hustler Model Kit Review
      • Atlantis 1/400 Boeing 2707 SST Kit Review
      • Atlantis 1/70 F-100C Kit Review
      • Atlantis 1/135 Convair 990 Review!
      • Atlantis 1/139 Boeing 707-120 Kit Review
      • Atlantis 1/77 F-89D Kit Review
      • Atlantis 1/54 F11F-1 "Blue Angels" Kit Review
      • Atlantis 1/120 B-29 Kit Review
      • Atlantis PBY-5A Catalina
      • Atlantis P-3A Kit Review and History
      • Atlantis AH-56 Cheyenne Helicopter
      • Atlantis B-36 Kit Review
      • Atlantis HH-3E "Jolly Green Giant" Review
      • Atlantis B24J Buffalo Bill 1/92
      • Atlantis S2F Hunter Killer
      • Minicraft RB-29 Kit Review
      • Minicraft 1/200 H-4 "Spruce Goose" Kit Review
      • Minicraft 1/48 Cessna T-41 Mescalero Kit Review
      • Minicraft 1/144 B-52D/F Review
      • Minicraft 1/144 B-52H "Current Flying Version" Kit Review
      • Minicraft T-34A Mentor Kit Review
      • Minicraft 1/144 KC-135 Review
      • Minicraft 1/144 F-51 Kit Review
      • Minicraft 1/144 E-3/E-8 AWACS/J-Stars Kit Review
      • Minicraft 1/144 B-24J / PB4Y-1 / B-24D
      • Minicraft C-18 (Boeing 707)
      • Minicraft 1/144 Lancaster MK 1 Review
      • Minicraft 1/144 B-17G Kit Review
      • Minicraft 1/144 A6M2 Zero Review
      • Minicraft 1/144 G4M Type 1 "Betty" Kit Review
      • Minicraft 1/144 Ju 88A/C
      • Minicraft 1/144 P-47D Review
      • Minicraft 1/144 TBF Avenger Review
    • Atlantis 1/8 Creature Model Kit Review
    • Atlantis 1/8 Wolfman Model Kit Review
    • Atlantis Models 1/8 Wyatt Earp Figure Kit Review
    • Atlantis 1/24 Mack Bulldog Stake Truck Kit Review
    • Atlantis 1/8 "The Mummy" Kit Review
    • Atlantis Rat Fink Model Kit
    • Atlantis Super Fuzz Kit Review
    • Atlantis 1/160 Lighthouse Model Kit Review
    • Atlantis Models 1/8 Flash Gordon and the Martian Model Kit Review
    • Atlantis 1/32 Jungle Jim 1974 Funny Car
    • Atlantis 1/500 USS North Carolina Kit Review
    • Atlantis 1/128 U.S. Space Missiles Set Kit Review
    • Atlantis 1/48 Japanese Medium Tank
    • Atlantis Snoopy and his Classic Race Car Kit Review
    • Atlantis Models Metaluna Mutant Kit Review
    • Atlantis 1/48 JS-III Stalin Tank Review
    • Atlantis 1/32 Tom Daniel Funny Cars: Mustang, Camaro, Duster, Charger!
    • Atlantis 1/665 USS Wisconsin Kit Review
    • Atlantis 1/618 Bismarck Battleship Kit Review
    • Atlantis 1/24 Son of Troublemaker Kit Review
    • Atlantis 1/1200 US Combat Task Force Fleet Kit Review
    • Atlantis The Amoeba review
    • Atlantis Air-Land-Sea Gift Set
    • Atlantis 1/245 Monitor & Merrimac Ironclads Diorama Set
    • Atlantis 1/96 Moon Ship Kit Review
    • Atlantis 1/8 Forgotten Prisoner of Castel Mare Kit Review
    • ATLANTIS 1/25 King Kong Kit Review
    • Atlantis 1/32 1982 Camaro Review
    • Atlantis Snoopy and His Sopwith Camel / Red Baron Reviews
    • Atlantis Glow-Godzilla Review
    • Atlantis Phantom of the Opera Kit Review
    • Atlantis 1/535 USS Iowa and Wisconsin Battleship Kit Review
    • Atlantis Mr. Gasser Review
    • Minicraft 1/350 Titanic Kit Review
    • Moebius 1/1 Hal 9000 Kit Review
    • Moebius 1/144 Discovery XD-1
    • Dream Gear 1/3000 Arkhitect Kit Review
    • D&H 1/35 Cyclops and the Chariot from Lost in Space kit Review
    • Academy Titanic 1/700 MCP Review
    • Revell ALL NEW PT-109 Review
    • Tamiya 1/48 Ford Army Staff Car
    • Pegasus Space Ark - When Worlds Collide
    • A Weird-Oh World - The Art of Bill Campbell
    • The Vintage Years of Airfix Box Art
  • Contests
    • 2021 IPMS-USA Nationals Report
    • 2019 IPMS/USA Nationals Report
    • Boise Mad Dog Modelers Fall Show
    • IPMS-SLC Group Build
  • Rocketry
    • Starting Rocketry
    • History and Use of the Estes AstroCam 110
  • Gallery
    • Bill's Airliner Models Gallery
    • Dick's Large 1/72 Aircraft Models
    • Dick's scale Model car gallery
    • Guest Gallery
  • Sponsors
    • Minicraft Models Sponsor Page
    • Atlantis Models Sponsor Page
    • Moebius Models Sponsor Page
    • Amazon Associate
  • IPMS/USA
  • Contact

KC-135 Part Two:  Build a 1/72 KC-135!

BY DICK ENGAR

--BACKGROUND INFORMATION

--INTERIOR ASSEMBLY


A BRIEF HISTORY OF THE KC-135
 
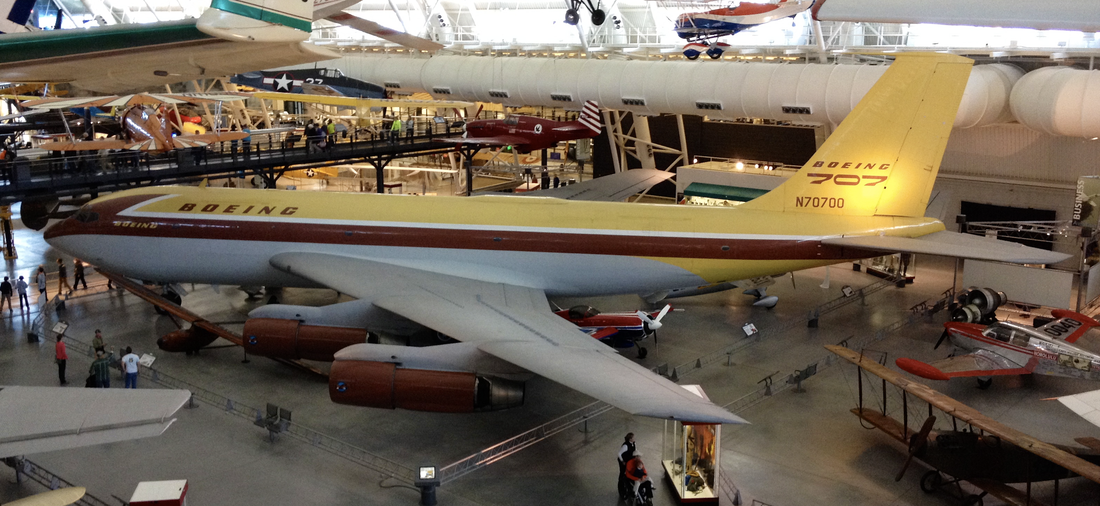
On May 14, 1954 an epochal and somewhat clandestine aircraft prototype was rolled out at the Boeing plant in Renton, Washington.  This large, four-engine jet aircraft had wings swept back 35 degrees akin to the company’s operational medium bomber, the B-47.  With no military or airline contract in hand, Boeing executives took quite a chance in sinking substantial company funds into the project.  At the time, the airlines were satisfied with large, proven piston-engine classics such as the Lockheed Super Constellation and the Douglas DC-6.  Interest in early jet airliners had plummeted in conjunction with unfortunate crashes of the once-promising jet-powered British Comet airliner.

Boeing executives knew that the Air Force would eventually need a high-flying tanker with the necessary speed to match the performance of up-and-coming fighters and bombers powered by improving jet engines.  In May, 1952, Boeing’s president William Allen presciently convinced his Board to invest $16 million (two thirds of the company’s net profits from the post war years) in the construction of a single prototype that would cross into both military and commercial zones of usefulness.  Hence, the Model 367-80 “Dash Eighty” prototype was conceived and built.

Developed in secrecy such that competitors would view the Dash Eighty as a mere improved modification of the KC-97 tanker, the 367-80 prototype flew for the first time in July 1954 and soon proved its mettle as a promising design.  Timing is everything as General Curtis LeMay and the Air Force brass had recently announced their need for a jet tanker.  General LeMay was quite taken by the Dash Eighty’s potential and rammed through the necessary funding to procure twenty-nine newly christened KC-135 Stratotankers.
Picture
Today, the "Dash-80" resides in the Smithsonian Museum, specifically at the Udvar-Hazy Annex near Dulles Airport in Chantilly, VA.
The Dash Eighty also led to the development of the now classic 707 airliner, but despite the common ancestor, several key differences set apart the civilian and military descendants of their venerable sire.  The KC-135 became over eight feet longer than the 367-80, became twelve inches wider at the fuselage, and tipped the scales at over 300,000 pounds at maximum weight.  External reinforcing bands were also added at the rear fuselage.  Other differences included an extended nose radome, minimal fuselage windows, a single cargo door, and of course the operator’s pod and flying boom necessitated by virtue of the plane’s role as a tanker.
Picture
The KC-97's days were numbered with the advent of jet fighters.  These F-100's appear near stall-speed as the piston-engined '97's probably had their throttles to the firewall in this photo.
Orders continued from 1955 through 1964.  Over the years a total of 820 C-135 variants were built by Boeing.  All but twelve (built for France as the C-135F/FR) were intended for use by the U.S. armed forces and most were still operational as of 2012.  The large Aerospace Maintenance and Recovery Center (AMRC) at Davis-Monthan Air Force Base in Tucson, Arizona has processed at least 120 C-135 variants, most as spares.  By 2012, over 75 C-135 variants had been lost to accidents and others are displayed in museums.
Over 500 continue in service, many quite different in appearance and function in contrast to their original intent.  Fifty different models have been operational over the past fifty years, but currently there are fewer than twenty-five versions in service.

Upgrades have been done to keep the C-135 variants flying through 2030 and beyond, including re-skinning the lower wings with improved aluminum alloys for increased strength.  The original J57-P-59W turbojets were replaced with more efficient and reliable TF-33 turbofans.  Even beyond that, with improved struts, nacelles and wiring improvements, the most recently refurbished Stratotankers were designated as KC-135Rs, with fuel efficient high-bypass CFM-56 turbofan engines.
Now, out of all of the box art described in our first article in this series, my favorite is the AMtech version – you can be the judge of your own favorite, however!  So, of course, the first version that I chose to build was indeed “The Nose that Goes,”  the EC-135N.  In an article on the ScaleWorld March 2003 edition from the www.internetmodeler.com website, Richard Marmo wrote that the EC-135N/E was originally created by AMT/Ertl, but never released until AMtech reached an agreement with AMT/Ertl to produce a limited run of these kits.  According to Marmo, only 5,000 of these kits were produced. 
Picture
Box art to the AmTech EC-135 kit without text and other model kit box accoutrements.
Unfortunately, AMtech went the way of many upstart kit manufacturers by fading into oblivion and so the kits are now harder to come by.  Nevertheless, you may be able to find this kit for sale to bidders on E-Bay or you might be able to pry one out of the hands of a not-so-parsimonious collector (like me).  I actually found another EC-135N kit in March 2008 at a now-defunct local hobby shop and purchased it for $40.49.  So there are still 4,998 kits out there somewhere, but I know that at least five others have been finished by other builders who have sent me pictures of their finished projects.  Do you want to buy mine?  Only three figure offers accepted but four figures just might land you a sale!  Unless I decide to build the E version, of course!
Picture
Boeing Boeing:  A then-new KC-135A refuels an early B-52.
I selected the AMtech kit to be my lead C-135 to build because it is so unusual.  It is molded in gray and has all the standard features of the basic AMT KC-135A kit with the following exceptions:
            1.  Fuselage is custom molded to include the longer, drooping nose.
            2.  Black Box Resin detail parts are included with the kit since there is no refueling boom and modifications are necessary for TACSAT housings, fuselage plugs and fuel dump housings.
            3.  An optional ALOTS (Airborne Light Optical Tracking System) pod is included, which is injection molded.
            4.  Both J-57 and TF-33 engine injection molded parts come with the kit as you can choose from four different versions.  Some slight modifications are necessary as will be described later.  So you’ll end up with a spare set of engines when you’re done!
            5.  Additional instructions show you how to cut an additional intake on the ventral  fuselage as well as how to ensure straighter wings, with an insert written by Chuck Davenport, a former IPMS/USA officer.

It turns out that the EC-135N/E kit is the most complicated and difficult version to build as it consists of a mix of a number of what would normally be aftermarket parts and features, which are already a part of the basic kit.  Thus, it is my pleasure to help readers solve the various problems that the simpler versions will present, whether your preference is a model straight out of the box or a model with several aftermarket additions.  I will describe how to deal with this model’s own unique challenges in terms of alignment, warping and presentation which will be addressed in depth.
Picture
The KC-135A at Castle Air Museum in Atwater, CA in 1998.
As mentioned previously, this reporter contributed to the difficulty of the kit by making a number of incredible errors along the way; hopefully an honest account of the assembly process will spare dembrudders.com readers the temptation to wall-chuck their own C-135 projects when the going gets tough because the end result will be something to really enhance a model shelf, large display case, or club meeting.  When you run into one of my prescriptions within the body of the article, filing it at your local tips list will cure or prevent an ailment that I suffered during the building process.  Parenthetically, my unfinished EC-135N ARIA was brought to the IPMS Nationals in Anaheim, CA in August 2007 and attracted a lot of attention, even in its incomplete state as a display-only subject.  So, with the objective in mind of helping the reader build a better C-135 model, let the description begin!
 
Picture
Brudder Dick waves from the over-wing exit of this KC-135A
A Brief History of the EC-135 ARIA
 
Apollo Range Instrumented Aircraft (ARIA) were C-135s modified in the mid-1960s by NASA to deploy around the world to provide telemetry acquisition, vehicle tracking and voice relay between manned Apollo spacecraft and Mission Control in Houston.  The ARIA were instrumental in maintaining communication where no ground based telemetry and tracking facilities were available and they were also used to assist in locating the Apollo command capsule following splashdown.
 
The need for continuous orbital communication for Apollo became apparent during the Gemini 8 mission.  A thruster malfunction that resulted in an emergency abort from orbit began during a gap in the ground-based infrastructure.  Neil Armstrong resolved that situation himself thanks to his knowledge of spacecraft systems while incommunicado from Mission Control, but in a similar situation, another set of astronauts might have been in serious trouble without ground help.  Adding the ARIA aircraft eliminated these gaps.
Picture
The cargo deck of a KC-135A configured for the primary purpose of refueling other aircraft.  This area of the ARIA aircraft certainly would have had mission-specific workstations and hardware.
The most unique aspect of the EC-135 ARIA is the large, drooping nose, which housed the world’s largest airborne parabolic dish antenna at seven feet in diameter.  Besides the nicknames previously mentioned, the aircraft is called “Bulbous” and “Hognose.”  The ARIA were deployed over the Atlantic Ocean and Gulf of Mexico during the Apollo launches and over the Pacific ocean during re-entry and splashdown. 
 
All eight original ARIA modified C-135s were first used during the Apollo 6 mission in 1968.  A typical mission lasted ten hours and was limited by on-board fuel consumption since these aircraft were not capable of in-flight refueling.  Depending on mission complexity, the total crew was as high as 25; minimum crew included thirteen, including pilot, co-pilot, flight engineer, navigator, airborne mission controller and technicians.
The EC-135N I chose to build was modified to carry a Northrop-built Airborne Light Optical Tracking System (ALOTS) carried within a removable, external pod mounted on the cargo door.  Within the pod were cameras so precise that they could spot and track a seven-inch target at ten miles and a 12-foot target at 200 miles.  Following the last Apollo mission, the ARIA were renamed and reassigned to a number of missions, including Department of Defense spy missions, cruise missile development, support missions for the Space Shuttle and tests for several missile systems.  The specifications for the EC-135N ARIA included a 131 ft. wingspan, fuselage of 136 ft. length, maximum altitude capability of 41,000 ft at 197,000 lb. and a maximum airspeed of 335 knots.  The markings for the aircraft completed by me depict an EC-135N ARIA/ALOTS of the 4556th Test Group, Air Force Eastern Test Range, Patrick AFB, Florida in 1970.
Picture
Some sprue connections were pretty heavy, and a saw was used to prevent damage to kit parts.  Note the sanded Acryl Blue putty-spots covering punch-out pin marks.

The tail on my kit was warped.  It needed fixing with hot water.
Picture
 Interior Assembly Sequence

Even though the ARIA aircraft would have a different interior, I decided to build the AMTech EC-135 out-of-box to gain experience for later builds where I might take measures to display the exceptional interior detail that comes the AMT KC-135 kit variants.   Unless you cut away part of the fuselage for viewing, it will all be entombed and invisible once you fasten the fuselage halves together (but you know it's in there!).  For purposes of this article, I decided to complete and paint all interior parts, even though I planned on building the model with no cut-aways or other features to enhance interior viewing other than to leave the crew access door open.  Adding the ALOTS pod prevents you from being able to open the port side cargo door.  I also made the decision to build the model out-of-the box or only with kit parts to give readers a chance of what the end result will be just with the basics.  The EC-135’s interior would have been outfitted with workstations and consoles and quite different from a refueling KC-135, and none of those details were included with the kit. 
Picture
A piece of sheet metal kept near the stove is used for uniform flattening of parts after heating with boiling water.
Picture
​Boiling water and tail correction in progress.  Note residual warping to starboard which was dealt with later.
The third decision a builder of this kit has to make is to choose the version to be built from the four options available as engine selection and the use of other parts provided is predicated on this early preference.
Cleaning the large parts with warm (but not hot!!) soapy water is a boring but necessary step with large 1/72 scale models to wash off any residue from the molding process which will interfere with parts assembly and paint adhesion.  It is not necessary to remove parts from the sprues for this step.  Following the cleanup, an initial examination of the parts revealed a number of mold marks and sinkholes that would need filling.  The molding is decent but not free of defects.  As most of the preliminary work was to be done on the interior, I kept my copy of Volume 10 of International Air Power Review handy, along with several photographs taken at the Castle Air Museum of a KC-135 they had open for public walk-through.
 
Picture
Commode details with masking.
I also went through the parts trees to ensure that my model was complete and that my paint supply for the interior was sufficient.  I prefer Testor’s Model Master enamel paints thinned with lacquer thinner and I found that I was short of enough Light Ghost Gray.  I went to a nearby hobby shop that was closing out their supply of Model Master Paint and snagged six bottles of various hues at a fire-sale price.  They did not have the light ghost gray but had dark, so with white paint it would be easy to adapt, especially because the interior would not really see the light of day when the model was finished. 
Picture
The commode after painting.  Bulkheads not yet added, which will provide some privacy in 1/72 scale.
I did not sufficiently stock an adequate supply of SNJ silver paint initially which was still available when I was building Snoopy, or even Testors Model Master non-buffing aluminum, however, which really frustrated me later.  Prescription #1:  At the beginning of the project, make a list of all different paint types you will need, check your own supply, make a list of estimated needs, and purchase the paint immediately so you have it on hand ready to go!  Gloss black and Alclad II white aluminum or polished aluminum paints may be your best bet now! 

(Mr. Editor Bill Sez:  Keep this list with the model, preferably in the box.  If you set the project aside for a while, it will be much easier to pick up where you left off if your paint list and notes are with the model.  Don't ask me how I know this.)
I went ahead and filled in the mold pop-outs inside the fuselage with my personal favorite filler, Acryl Blue, with an alcohol wipe.  You can usually find this product at auto body supply outlets; if it is not available in your area, you can use Tamiya putty instead which is an adequate substitute.   I mixed the light ghost gray paint to my satisfaction and painted all the parts that required it, using my references and personal photographs as a guide.  Our photos from the Castle Air Museum show the interior of an actual KC-135, which can help you determine the proper shades of color and fuselage interior details.  Contrary to the instructions, the fuselage walls should be painted light gull gray, for example, and you must paint yellow and red squares on the floor.
I had two initial modifications – part #7, an equipment rack had some plastic extensions, which did not look right so I simply removed them.  The instructions were no help here, of course.  The second modification would be far more difficult – a look at the tail showed some pretty significant warpage as should be expected when building some large scale 1/72 aircraft projects.  The fuselage is attached to the tree with such thick connections that I had to use a plastic saw in lieu of my snips to avoid really nicking it.  The window openings needed a lot of clean-up as well. I had to do some re-scribing when painting revealed some rough defects – again this step is more necessary if you are going to display the interior. 
Picture
Navigator's station at left, commode at right.  That's a little roll of toilet paper just to the right of the sink.  Dick added a small piece of Bare-Metal Foil to make a mirror.
I carefully boiled water in a large sauce-pan, held the tail section in the water being careful not to touch the sides of the pan, and then formed the hot tail against a large piece of sheet metal placed next to my stove.  This initial forming went reasonably well, but more fine-tuning would be necessary later on.

Picture
The actual navigator's desk in the Castle Air KC-135A.
Picture
The "front office" showing cockpit at left, navigator's station middle, and commode at right.
Next I removed all fuselage interior parts with my snips, smoothed where the sprue joint was with sanding sticks, and filled in areas with mold marks and sink spots with Acryl-blue putty and otherwise prepared for painting.  I sealed the puttied areas with Mr. Surfacer 1200 applied with a brush, which removes residual sanding marks, etc. and makes a nice, smooth surface for final painting.  Using my interior pictures as a guide, I mixed my custom made light ghost gray paint and painted, ensuring that I had extra left over for touch up-work.  Prescription #2:  Never mix thinned paint back in with unthinned unless you want to start your paint bottle curing immediately.  I use empty paint bottles for storage and recommend that you keep the used paint bottles for a given project in the same box, handy at all times through the duration of your modeling project, so you don’t have to hunt for them later or have to remix and match a shade, not an easy task!!
Picture
Aft-end of fuselage with Brudder Bill for size comparison.
Picture
Not so many tanks: the kit only has one row.
I went on to mask some of the interior parts that were going to take a slightly different shade of paint and I prepared to paint the portions of the crew head.  I prefer Tamiya tape as it lays down well and is easy to work with.  I went to more than usual effort, both for this article and for practice since none of these interior parts would ever see the light of day once the fuselage halves were fused together.  I also experimented with spray paint vs. hand painting.  One problem with masking gloss white, for example is that you often end up with raised edges once you remove the masking tape, as the trash containers reveal.  I was able to carefully remove these edges with a sharp Excel blade and touch up the overspray areas with a brush.  The yellow squares were added by hand.  Most of the small parts required airbrushing because hand painting leaves unsatisfactory surfaces and textures unless you can sand, something not possible with all the interior parts shown.  AMT did their homework with the inside of the model for the refueling version as the plastic interior compares favorably with the navigator’s desk shown in the actual aircraft as shown in our side-by-side comparison photos.
Picture
The APU in the rear fuselage of the Castle Air Museum KC-135A.
Picture
The APU in the rear fuselage of the AMT model kit.  There are some differences, but it's a reasonable facsimile.
Why go to all of this trouble with an invisible interior?  Someday I plan to build a KC-135A model with parts of the fuselage cut away, or I will do the floor plus parts as a separate model, and it does not hurt to have a run-through to make the second go-around easier.  This idea of repeats to get better matches how I’ve seen the KC-135 pilots practice touch and go exercises at Hill Air Force Base to hone their skills.
Picture
KC-135A forward cockpit of the museum aircraft
Picture
AMT kit forward cockpit 
I used SNJ powder to great effect in small areas.  It really made the tops of the commode receptacles look good and is not hard to apply with a small brush reserved exclusively for this task.  Testor Model Master Chrome also works well sprayed, but not brushed.  But don’t try to mask it, as I’ll explain later.  For the chrome portion of the oxygen bottles seen on the real thing (along with brudder Bill) I used an x-ray film marking pencil, which can be obtained through a dental supply company.  A regular lead pencil will work also, but not quite as well.  The model comes with a reasonably well-molded APU which compares to the real thing.  Again, some intricate masking is necessary, and that was actually fun to accomplish.  Your own reference photos allow you to mix and match your own paint on hand to mimic in plastic what you have seen in reality.  One of the most enjoyable aspects of this project was to create small, painted replicas of the real components such as the APU.  Naturally, you need to remember to take plenty of digital photo memory with you to any aircraft museum and take many photos of interiors, landing gear, and so forth.
Picture
Two views showing the finished cockpit.  Note seat harness straps, which were made from lead foil.  
Picture
AMT gives you a flat instrument panel with a decal or a textured version you can paint yourself.  I chose to simply use the decal since the panel is quite hidden within the cockpit.  My own photos plus those published in International Air Power Review ,Volume 10, p.67 (fold-out), were very helpful in achieving a reasonable result.  I made lap belts out of lead foil, which is a tedious but necessary addition, and hand painted them with tan Model Master paint.  These are quite visible through the cockpit windows so some effort should be extended to ensure a good result (especially to impress a judge with magnification and a flashlight).  I used my favorite liquid cement, Tenax 7R, to apply the seats since I wanted some working time to get them in straight.  You want everything to line up, even though once finished no one will be able to tell, and the straight-on cockpit photo attests that I came pretty close.
Picture
I found that you will have to hunt quite a bit for part #143, the rack back, which fits on the equipment rack which goes behind the pilot’s seat on the left.  Just look on the same tree as parts 2A, 2B (Instrument panels) 3, 4, 6, and 14.  In other words, look by the oxygen tanks (#14).  (I bet AMT forgot to label that part until near the end of the project!)  You will also be applying the nose wheel well with the interior, so you need to work on that part early on.  You will find a huge hole on the nose gear strut, which must have served as a vent during the molding process.  It must be filled in prior to cementation.  I painted the interior well plus the strut gloss white, in accordance with my photos, even though the instructions call for a flat sheen.  I touched up a few interior parts (after looking at them under substantial magnification with a jeweler’s monocle), gave the seat belts a final dry brushing effort to fix some spots where the paint chipped off, and then prepared for final assembly of the interior floor to the port fuselage.
Picture
Step 5 in the instructions has to do with the main gear wheel well plus wing struts, which fit on the ventral portion of the fuselage floor.  You have to complete this portion before affixing the floor to the fuselage.  The engineering and molding is good, however, and much of this will show if you display your model on a mirror.  I pre-painted the parts with flat white paint after filling the seams with a mixture of white glue and my regular Acryl-blue putty depending on the spot, and after some finishing efforts, painted with gloss white.  Unfortunately, I popped most of these seams when fiddling around with the wing assembly later so many of these steps represented wasted time.  Prescription #3:  Spending ample time dry fitting and looking for trouble spots during major assembly steps will save you legions of frustration and wasted hours later on.  You should scrutinize for poor seams, sinkholes accidentally left unfilled and so forth.  Sometimes a second set of eyes (second opinion by a willing modeler friend such as Brudder Bill) will help you see several more small but pertinent problems that you might otherwise miss!
Picture
In the next part of this series, we will cover the remaining construction steps of the basic model and will cover the wing warping prevention so important in keeping your kit preserved and looking good on display for years.  We will also cover final painting and presentation.  Our series will continue with features on the KC-135 in 1/144 scale!
REFERENCES
 
Boeing C-135 Family, Current Operations.  International Air Power Review, Vol. 10, Fall 2003, p. 50
 
Kit Review, Fine Scale Modeler, May 1993, Vol. 11, No. 4, p. 10
 
Stratotanker!!! – The KC-135, by Charles T. Davenport, IPMS/USA Journal, Vol. 5, No. 5, July/August 1993, p. 12
 
Boeing RC-135V….Me and My RC, by Scott Hackney, 1994 IPMS National Convention Program,
            p. 20
 
Offut’s White Tops, World Air Power Journal, Volume 17, Summer 1994, p. 136
 
Building AMT/ERTL’s RC-135V “Rivet Joint,” IPMS/USA Journal, Vol. 7, No. 1, Nov/Dec.
            1994, p. 39
 
KC-135 Stratotanker in Action, Aircraft #118, Squadron/Signal Publications, Carrollton, TX  www.squadron.com
 
www.theaviationzone.com  Boeing KC-135 Stratotanker by Mike Neely
 
www.internetmodeler.com/2003/march Scaleworld by Richard Marmo

​Scroll down just a bit to check out all the other fun stuff we have going on here
Check back often!  We have a lot of cool upcoming content!


NEW:


Oct 2022:  Atlantis 1/48 JS-III Stalin Tank Kit Review!
Sept 2022:  Atlantis 1/32 Tom Daniel Funny Cars Kit Review!
August 2022:  Atlantis 1/665 USS Wisconsin Kit Review!
August 2022:  Atlantis 1/618 D.K.M. Bismarck Kit Review!
​29 July 2022:  D&H Cyclops and Chariot From Lost in Space Kit Review!
16 July 2022:  Moebius Hal 9000 Review YouTube Video!
07 June 2022:  Atlantis 1/135 Convair 990 Airliner Kit Review!
01 June 2022:  Atlantis 1/24 Son of Troublemaker Kit Review!
​21 May 2022:  Atlantis 1/1200 US Combat Task Force Fleet Kit Review!
14 May 2022:  Atlantis 1000/1 The Amoeba Kit Review!
06 May 2022:  Atlantis Air-Land-Sea Gift Set!
26 April 2022:  Atlantis 1/139 Boeing 707-120 Kit Review!
25 April 2022:  Atlantis 1/77 F-89D Kit Review!
22 April 2022:  Atlantis 1/245 Monitor and Merrimac Civil War Set
15 January 2022:  Dream Gear 1/3000 Arkhitect Review!  Landmark new kit includes integrated lighting!
15 December 2021:  Atlantis 1/8 Forgotten Prisoner Review!
10 December 2021:  New Atlantis 1/96 Moon Ship Review
01 December 2021:  NEW Minicraft Kit Releases!
30 November 2021:  Atlantis 1/139 707 Kit Update
25 November 2021:  Atlantis 1/54 F11F-1 Cougar Kit Review
15 November 2021:  Convair 1/135 990 Test Shot from Atlantis!
September 2021:  NEW 1/25 Atlantis King Kong Kit Review
September 2021:  Minicraft 1/200 "Spruce Goose" Review and History
September 2021:  Minicraft 1/48 T-41 Review Update
September 2021:  Minicraft 1/144 F-51 Review
September 2021:  NEW Atlantis 1/32 1982 Camaro Review!
August 2021:  Minicraft 1/144 B-52 (Current Flying) Review
August 2021:  Minicraft 1/144 E-3/E-8 AWACS/J-STARS Review

July 2021:  New Atlantis 1/300 Nautilus Review updates our Nautilus history page!
July 2021:  Revell's Gemini Spacecraft Kits History
June 2021:  Minicraft 1/350 RMS Titanic Review
12 May 2021:  Titanic Models List!  One Movie.  Lots of Titanics.
29 April 2021:  Snoopy vs Red Baron live on YouTube!
15 March 2021:  Atlantis Snoopy and His Sopwith Camel Lands -- What Happens when they meet The Red Baron?
12 March 2021:  Atlantis 1/120 B-29 Review!  New Kit!  
08 March 2021:  Minicraft 1/144 B-24J / PB4Y-1 / B-24D Review!
10 February 2021:  Moebius 1/144 Discovery on YouTube!
07 February 2021:  Guest Gallery!  See our pals' models!
05 February 2021:  Moebius 1/144 Discovery XD-1 Review
Will the Utah Monolith stay vertical this time?
05 January 2021:  Hawk Beta-I Atomic Bomber Rebuild!
28 December:  Bill's Airliner Gallery! 
19 December:  Just in time for Christmas!  Atlantis Phantom of the Opera with Glow-in-the-dark Parts!
13 December:  Godzilla Returns Again!  Atlantis Godzilla with Glow-in-the-Dark Parts!
30 November:  Revell KC-135 and 707 Kit History!
23 November:  Minicraft 1/144 C-18A/707 Kit Review!
Another feature in our series about the KC-135/707!

12 November:  Atlantis Mr Gasser Review updated photos
09 November:  Dick's Lindberg XB-70 Restoration
09 November:  Monogram Air Power Set YouTube Video!
30 October:  Special Project:  Monogram's 1959 Air Power Set! (web page)
09 October:  A Review of Minicraft's KC-135 Kits continues our special series on the KC-135 (feature in-progress).
28 September:  Let's Play Battleship!  Atlantis 1/535 Iowa Class Kits review - and bonus comparison between Revell's USS Missouri and Atlantis Iowa Class Battleship kits!

20 September:  Kit History --  Revell 1/535 USS Missouri
07 September:  Ship It!  Academy 1/700 Titanic ICP Kit Review
22 August:  Revell's All-New PT-109 Elco PT Boat Kit Review
13 August:  KC-135 History Series Part II - AMT's 1/72 Kit:  It's In There
04 August:  Dueling Subchasers-- Atlantis S2F Hunter Killer Review
29 July:  Kit Review and History:  Atlantis Models P-3A Orion
26 July:  Book reviews:  The Vintage Years of Airfix Box Art by Roy Cross
A Weird-Oh World - The Art of Bill Campbell by Bill Campbell

24 July:  DEM BRUDDERS GO OFF THE DEEP END WITH THEIR  ATLANTIS PBY CATALINA KIT VIDEO REVIEW!
22 July:  Why Buy a PBY:  Atlantis PBY-5A Catalina Web Review!

09 July:  No shyin' away from the Cheyenne:  Atlantis AH-56 Cheyenne Kit Web Review
06 July:  Rank the Lanc:  Minicraft Lancaster MK-1 Kit Review
17 June:  88 Reasons:  Minicraft Ju-88A/C Kit Review
16 June:  We Dug the Jug:  Minicraft P-47D Kit Review
15 June:  DICK DOES CARS!  Dick's Car Gallery!
10 June: 
Minicraft RB-29 Review Updated!  Minicraft's Own Lewis Nace Builds an Amazing B-29 Conversion Collection!
05 June:  Minicraft 1/144 B-17 Kit Review!
03 June:  The Big Stick:  Atlantis' B-36 Kit Review!
30 May:  Minicraft A6M2 Zero Kit Review in 1/144
26 May:  Dem Brudders On Youtube!  Watch our Atlantis Ah-56 Cheyenne review. (We're a little disappointed with our new spokesman Roddy Redshirt.  When we find all his pieces, we might not use him again.)
22 May:  The Girl Next Door:  Minicraft 1/144 G4M1 "Betty" Kit Review
20 May:  Unmasking the Avenger:  Minicraft 1/144 TBF Avenger Kit Review
18 May:  B young!  B-29 again!  Minicraft RB-29 Superfortress "Postwar" Kit Review - We've expanded content on this page!
06 May:  KC-135/707 Kit History Series Begins!

27 April:  Enter the Mentor:  Minicraft T-34A Mentor kit Review. 
24 March:  See Dick.  See Dick build.  See  Dick's Large Aircraft Gallery.  Build, Dick, Build.
04 March:  Eat all your vegetables.  Open-Box New Kit Review:  Atlantis HH-3E "Jolly Green Giant"  
06 February:  Requiem for Mad Magazine: Aurora/Revell Alfred E. Neuman Kit History
12 December:  BEECH TRIP!!!  Minicraft's Civilian Aircraft Product Line

20 November:  More pictures added to Dick's Yo-Yo page:  B-24J Liberator "Yo-Yo" - Custom-Painting a 1/48 Diecast Model
20 November:  IPMS/SLC Group Build, Italy/Bulgaria Theme!
12 November:  We welcome Minicraft Models as our first sponsor!
​07 November:  We've again expanded our Report on the 2019 IPMS/USA Nationals in Chattanooga, TN!
15 October:  IPMS Boise Mad Dog Modelers Fall Show!

13 September 2019:  Aerial Photography for a Song:  The Estes AstroCam 110
28 August:  Kit Review - Atlantis 1/92 B-24J Liberator Bomber 
01 August:  We continue our Apollo at 50 celebrations by kicking off our new model rocketry page, and ask:
​Apollo at 50:  Was it Worth It?
20 JULY 2019:  HAPPY 50TH ANNIVERSARY, APOLLO 11 (We don't think you look a day over 40)!  Revell's Apollo Spacecraft Kits
25 June:  A New Blog Post:  Join us at the IPMS/USA Nationals!
19 June:  Build a Resin Figure Kit.  Dick shows step-by-step how he built Anime subject Mew Zakuro
15 May:  Smokey and the Bandit:  MPC's 1977 Pontiac Trans Am
25 April: 
History of Armor Modeling with pals James Guld and John Tate
03 April:  Car Modeling in the 1970's expands our History Series
26 March:  Kit Review--1/350 Space Ark from When Worlds Colllide
17 March:  Weird-oh's, Finks, Flypoggers, and More!  We continue our History Series with our various encounters in the Monster Figures craze of the 1960s
10 March:  Our First Kit Review!  Tamiya 1/48 Army Staff Car - Are we too hard on a Tamiya kit?
​23 February:  The Nuclear Family:  SSN Nautilus 571 - About the Lindberg, Revell, and Aurora Kits
15 February:  DON'T TRY THIS AT HOME I - Dick Builds a Batmobile--in 1/3 Scale!
13 February:  Modeling Outside the Box.  Dick goes all over the place, building a number of unusual subjects!
04 February:  NASCAR or Not?  Monogram's Days of Thunder Cars
31 January:  History Series Begins With The Aurora Monsters
27 January:  Build a P-82 in 1/144 Scale or Other Crazy Conversion
13 January:  The Anti-Modelers
05 January 2019:  The Day I Quit Modeling
01 January 2019:  dembrudders.com is live!!!

  • Home
  • Start Here
  • Blog
  • Projects
    • HAWK Beta-I Atomic Bomber Rebuild Plus Ragnarok
    • Lindberg 1/172 XB-70 Rebuild
    • 1/144 F-82 Conversion
    • Resin Figure Mew Zakuro
    • Yo Yo 1/48 B-24J Custom Paint and Decals
  • History
    • Monogram Air Power Set (1959)
    • Revell 1/144 DC-10 / KC-10 Kit History
    • History of Titanic Model Kits: The Big List
    • Revell Gemini Kit History - 1/48 and 1/24
    • AURORA MONSTER MODELS
    • Atlantis / Revell 707 and KC-135
    • Revell's 1/535 USS Missouri: An Iowa Class Act
    • Monogram Days of Thunder NASCAR Kits
    • Atlantis USS Nautilus SSN-571 Model Kit Review and History
    • Weird-ohs, Roth Finks, Flypoggers and Lindy Loonies
    • Car Modeling in the 1970's
    • Armor Modeling
    • Smokey and the Bandit
    • Revell Apollo 11 Spacecraft
    • Minicraft Civil Aircraft in 1/48
    • Aurora's Alfred E Neuman
    • KC-135 and 707 Part One: The 1/72 Kits
    • KC-135 Part Two: The History and The Build
  • Reviews
    • AIRCRAFT KIT REVIEWS >
      • Atlantis Models 1/175 B-52 With X-15 Kit Review
      • Atlantis 1/93 B-58 Hustler Model Kit Review
      • Atlantis 1/400 Boeing 2707 SST Kit Review
      • Atlantis 1/70 F-100C Kit Review
      • Atlantis 1/135 Convair 990 Review!
      • Atlantis 1/139 Boeing 707-120 Kit Review
      • Atlantis 1/77 F-89D Kit Review
      • Atlantis 1/54 F11F-1 "Blue Angels" Kit Review
      • Atlantis 1/120 B-29 Kit Review
      • Atlantis PBY-5A Catalina
      • Atlantis P-3A Kit Review and History
      • Atlantis AH-56 Cheyenne Helicopter
      • Atlantis B-36 Kit Review
      • Atlantis HH-3E "Jolly Green Giant" Review
      • Atlantis B24J Buffalo Bill 1/92
      • Atlantis S2F Hunter Killer
      • Minicraft RB-29 Kit Review
      • Minicraft 1/200 H-4 "Spruce Goose" Kit Review
      • Minicraft 1/48 Cessna T-41 Mescalero Kit Review
      • Minicraft 1/144 B-52D/F Review
      • Minicraft 1/144 B-52H "Current Flying Version" Kit Review
      • Minicraft T-34A Mentor Kit Review
      • Minicraft 1/144 KC-135 Review
      • Minicraft 1/144 F-51 Kit Review
      • Minicraft 1/144 E-3/E-8 AWACS/J-Stars Kit Review
      • Minicraft 1/144 B-24J / PB4Y-1 / B-24D
      • Minicraft C-18 (Boeing 707)
      • Minicraft 1/144 Lancaster MK 1 Review
      • Minicraft 1/144 B-17G Kit Review
      • Minicraft 1/144 A6M2 Zero Review
      • Minicraft 1/144 G4M Type 1 "Betty" Kit Review
      • Minicraft 1/144 Ju 88A/C
      • Minicraft 1/144 P-47D Review
      • Minicraft 1/144 TBF Avenger Review
    • Atlantis 1/8 Creature Model Kit Review
    • Atlantis 1/8 Wolfman Model Kit Review
    • Atlantis Models 1/8 Wyatt Earp Figure Kit Review
    • Atlantis 1/24 Mack Bulldog Stake Truck Kit Review
    • Atlantis 1/8 "The Mummy" Kit Review
    • Atlantis Rat Fink Model Kit
    • Atlantis Super Fuzz Kit Review
    • Atlantis 1/160 Lighthouse Model Kit Review
    • Atlantis Models 1/8 Flash Gordon and the Martian Model Kit Review
    • Atlantis 1/32 Jungle Jim 1974 Funny Car
    • Atlantis 1/500 USS North Carolina Kit Review
    • Atlantis 1/128 U.S. Space Missiles Set Kit Review
    • Atlantis 1/48 Japanese Medium Tank
    • Atlantis Snoopy and his Classic Race Car Kit Review
    • Atlantis Models Metaluna Mutant Kit Review
    • Atlantis 1/48 JS-III Stalin Tank Review
    • Atlantis 1/32 Tom Daniel Funny Cars: Mustang, Camaro, Duster, Charger!
    • Atlantis 1/665 USS Wisconsin Kit Review
    • Atlantis 1/618 Bismarck Battleship Kit Review
    • Atlantis 1/24 Son of Troublemaker Kit Review
    • Atlantis 1/1200 US Combat Task Force Fleet Kit Review
    • Atlantis The Amoeba review
    • Atlantis Air-Land-Sea Gift Set
    • Atlantis 1/245 Monitor & Merrimac Ironclads Diorama Set
    • Atlantis 1/96 Moon Ship Kit Review
    • Atlantis 1/8 Forgotten Prisoner of Castel Mare Kit Review
    • ATLANTIS 1/25 King Kong Kit Review
    • Atlantis 1/32 1982 Camaro Review
    • Atlantis Snoopy and His Sopwith Camel / Red Baron Reviews
    • Atlantis Glow-Godzilla Review
    • Atlantis Phantom of the Opera Kit Review
    • Atlantis 1/535 USS Iowa and Wisconsin Battleship Kit Review
    • Atlantis Mr. Gasser Review
    • Minicraft 1/350 Titanic Kit Review
    • Moebius 1/1 Hal 9000 Kit Review
    • Moebius 1/144 Discovery XD-1
    • Dream Gear 1/3000 Arkhitect Kit Review
    • D&H 1/35 Cyclops and the Chariot from Lost in Space kit Review
    • Academy Titanic 1/700 MCP Review
    • Revell ALL NEW PT-109 Review
    • Tamiya 1/48 Ford Army Staff Car
    • Pegasus Space Ark - When Worlds Collide
    • A Weird-Oh World - The Art of Bill Campbell
    • The Vintage Years of Airfix Box Art
  • Contests
    • 2021 IPMS-USA Nationals Report
    • 2019 IPMS/USA Nationals Report
    • Boise Mad Dog Modelers Fall Show
    • IPMS-SLC Group Build
  • Rocketry
    • Starting Rocketry
    • History and Use of the Estes AstroCam 110
  • Gallery
    • Bill's Airliner Models Gallery
    • Dick's Large 1/72 Aircraft Models
    • Dick's scale Model car gallery
    • Guest Gallery
  • Sponsors
    • Minicraft Models Sponsor Page
    • Atlantis Models Sponsor Page
    • Moebius Models Sponsor Page
    • Amazon Associate
  • IPMS/USA
  • Contact