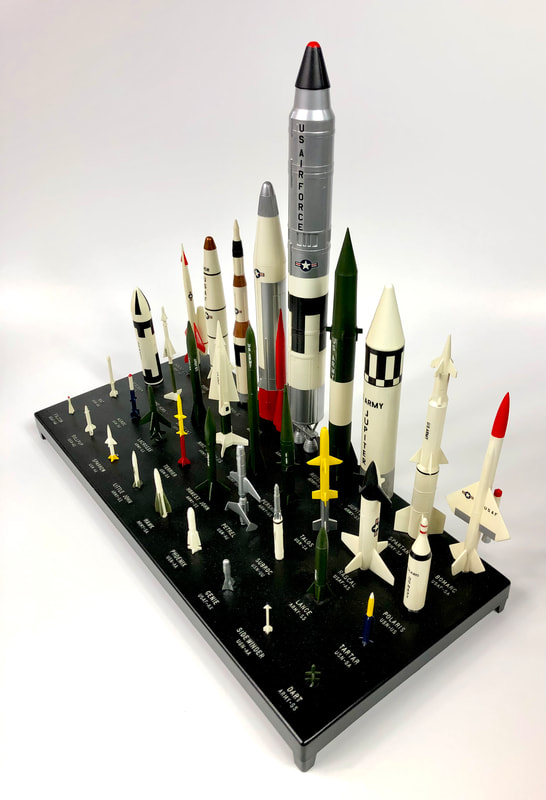
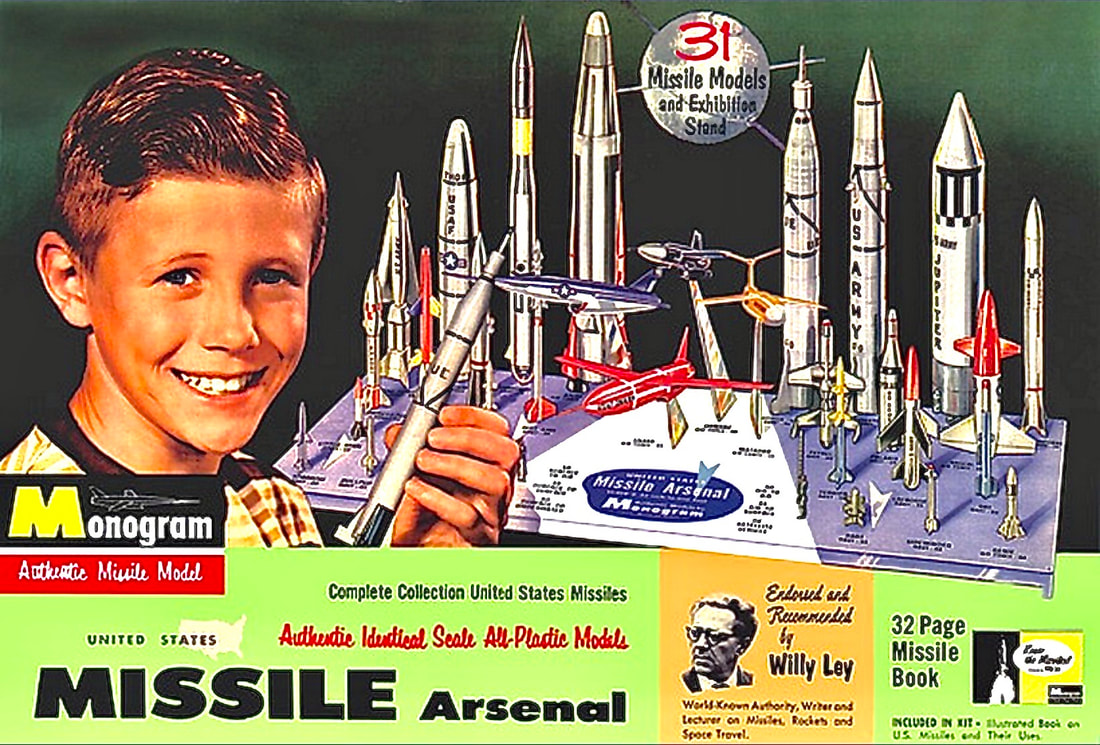
Atlantis Models has re-released the former Monogram U.S. Space Missiles set in 1/128 scale. This kit provides an interesting collection of military missiles of various types and sizes in-use prior to 1970. The model hasn’t been available in nearly 40 years. Previously, it was a Monogram “Heritage Edition” kit released in 1983.
BY BILL ENGAR
BY BILL ENGAR
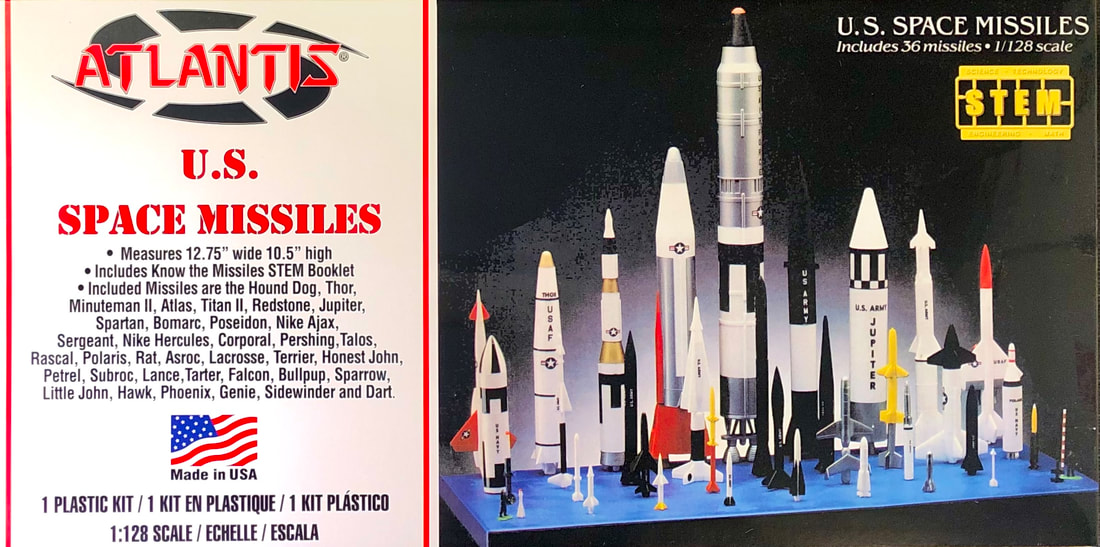
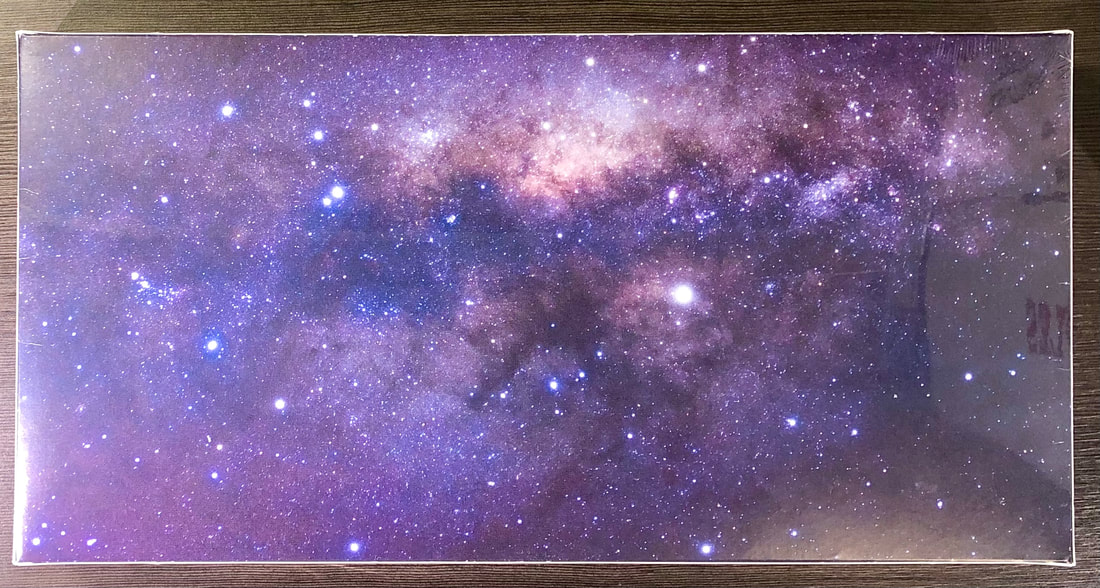
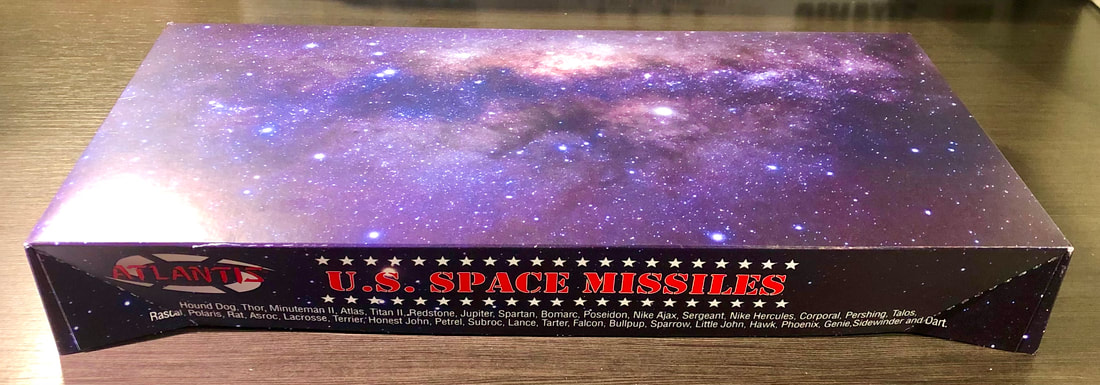
The Atlantis Models box uses a former Monogram company photograph for this release of their "U.S. Space Missiles." You may remember it from the 1983 "Heritage Edition" version of the kit. It hasn't been released since then.
Monogram Models is fondly remembered for a number of groundbreaking model kits. For example, their B-52 in 1/72 scale was one of the first "superkits" followed by their 1/48 B-17 and others including the 1/48-scale B-29 and 1/72 B-36. Much earlier, they experimented with some collection-kits including an earlier version of this kit that first debuted in 1958 and the legendary Air Power set that followed in 1959. Stay tuned for our bonus features where we'll take a deep-dive into the Monogram collection kits which include the Missile Arsenal, Air Power set, and the USA/USSR Missile Set.
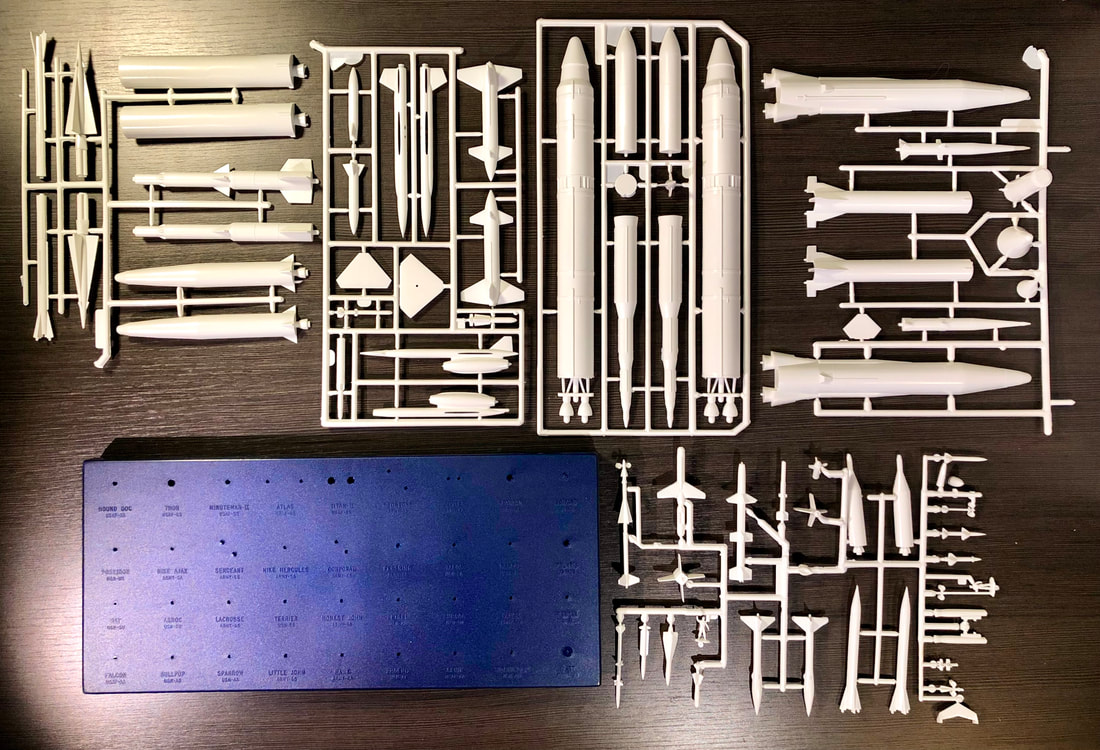
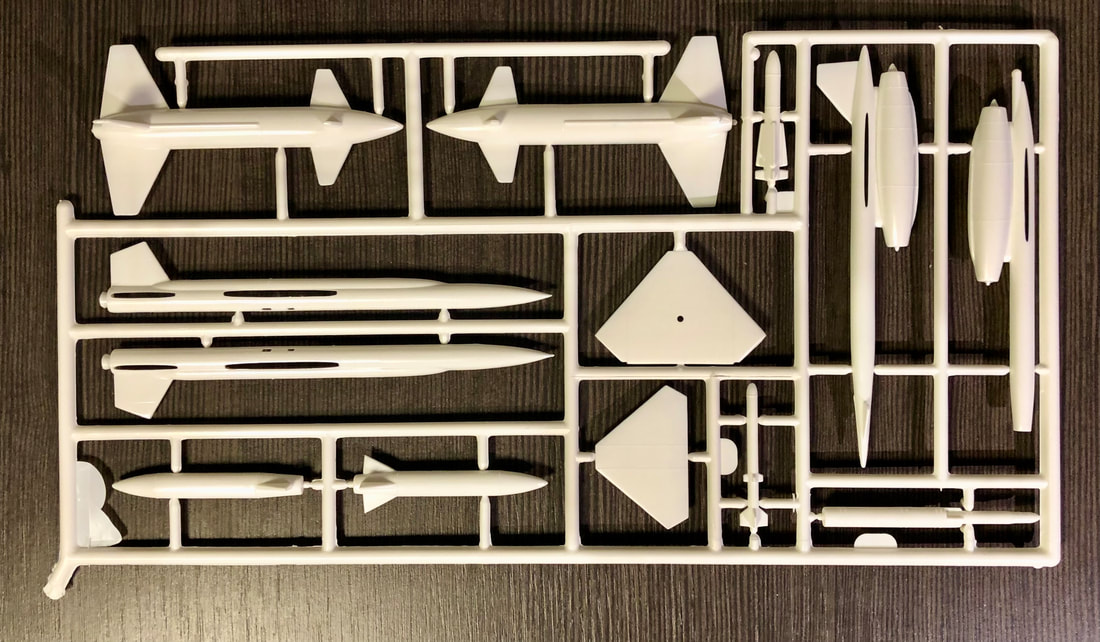
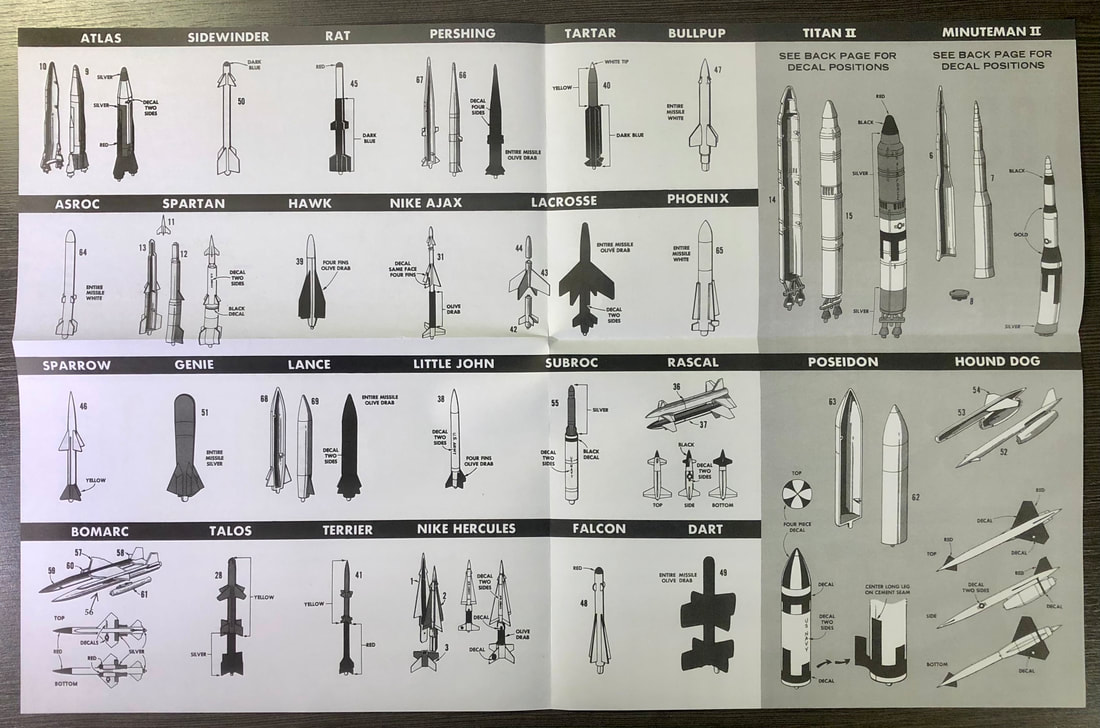
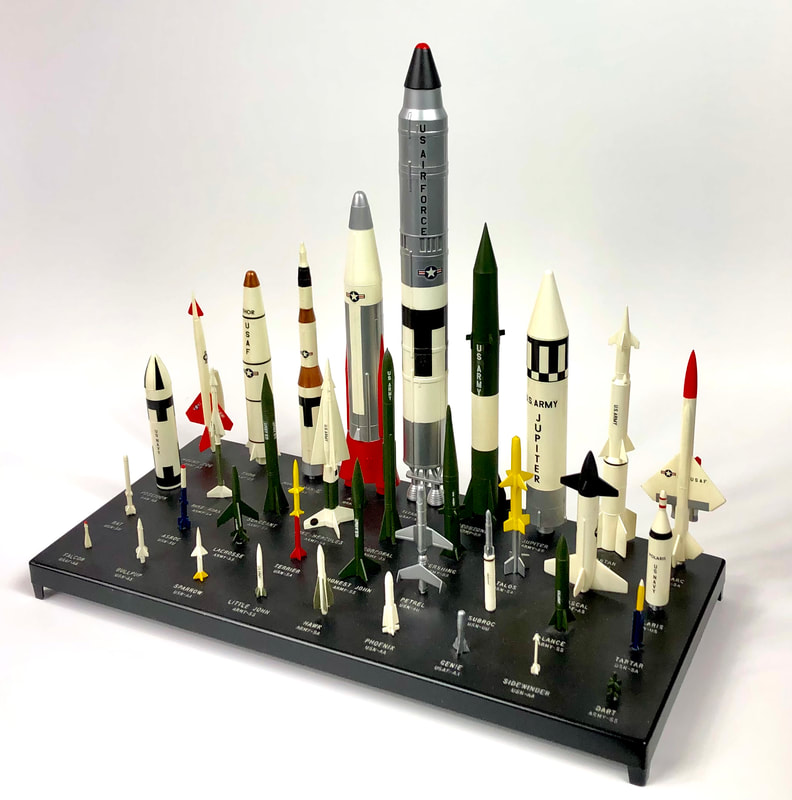
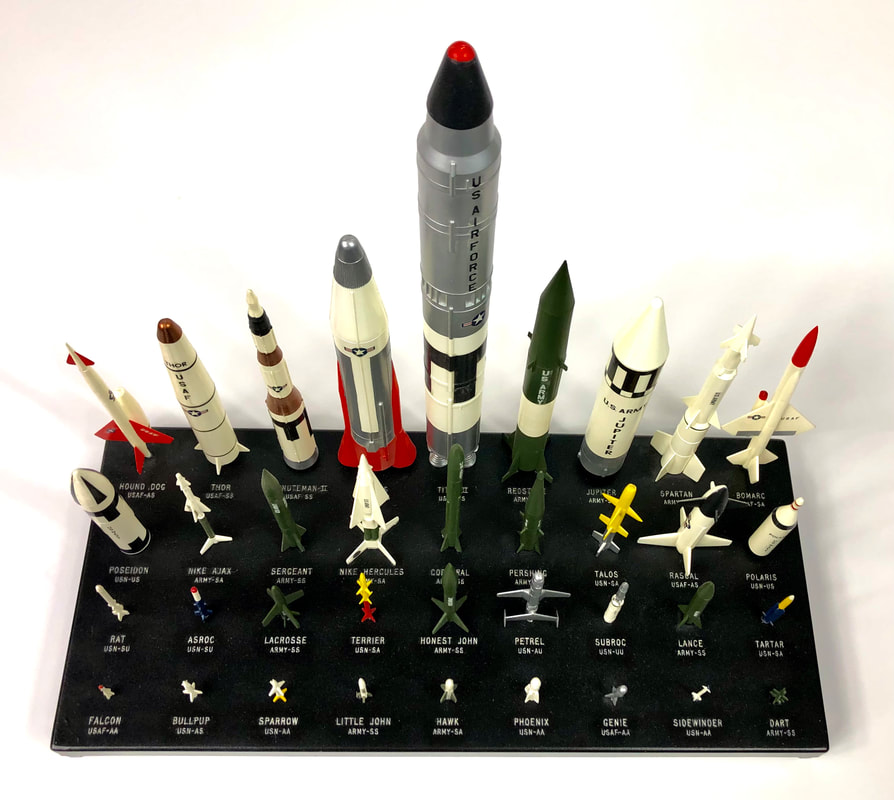
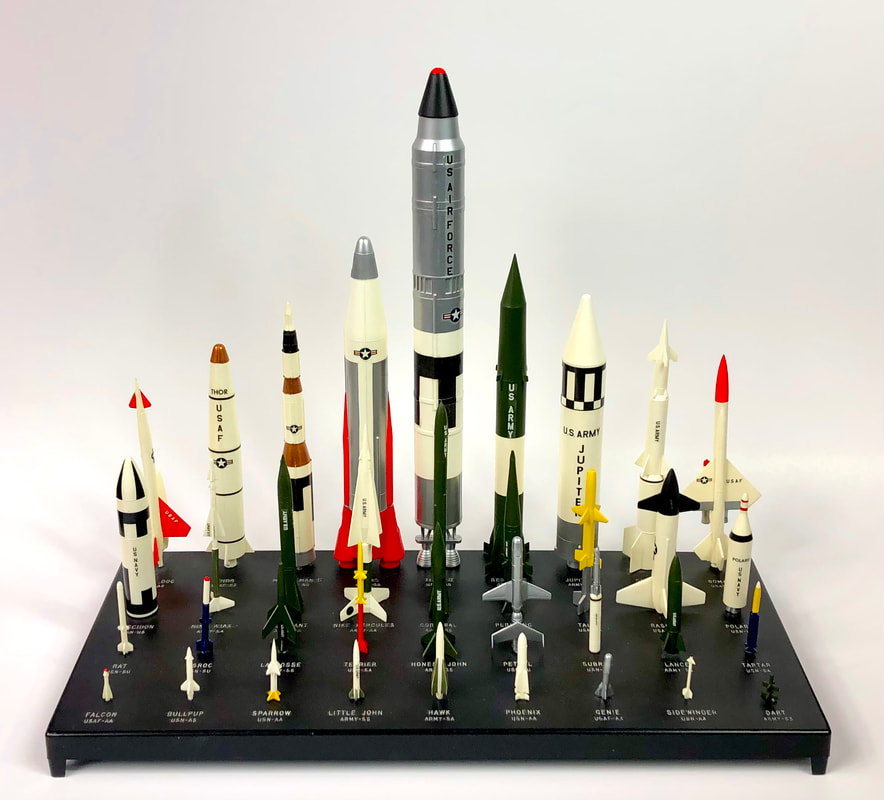
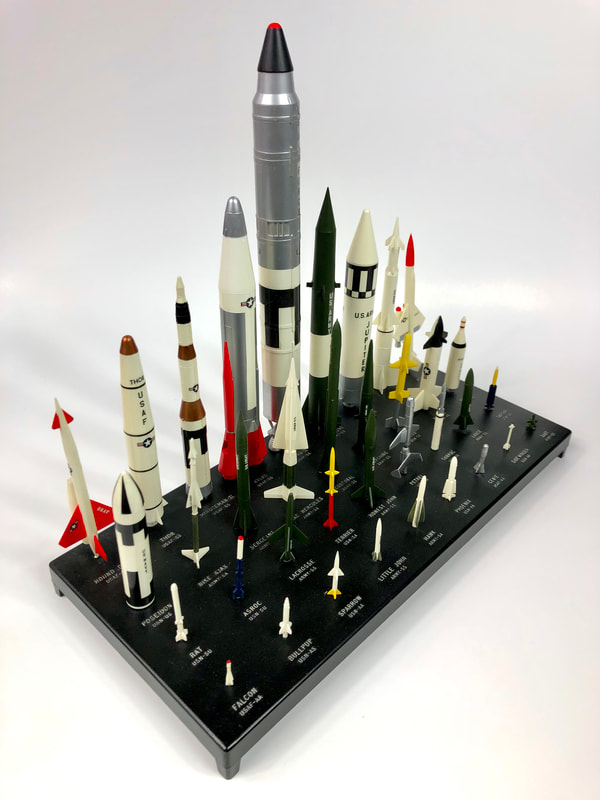
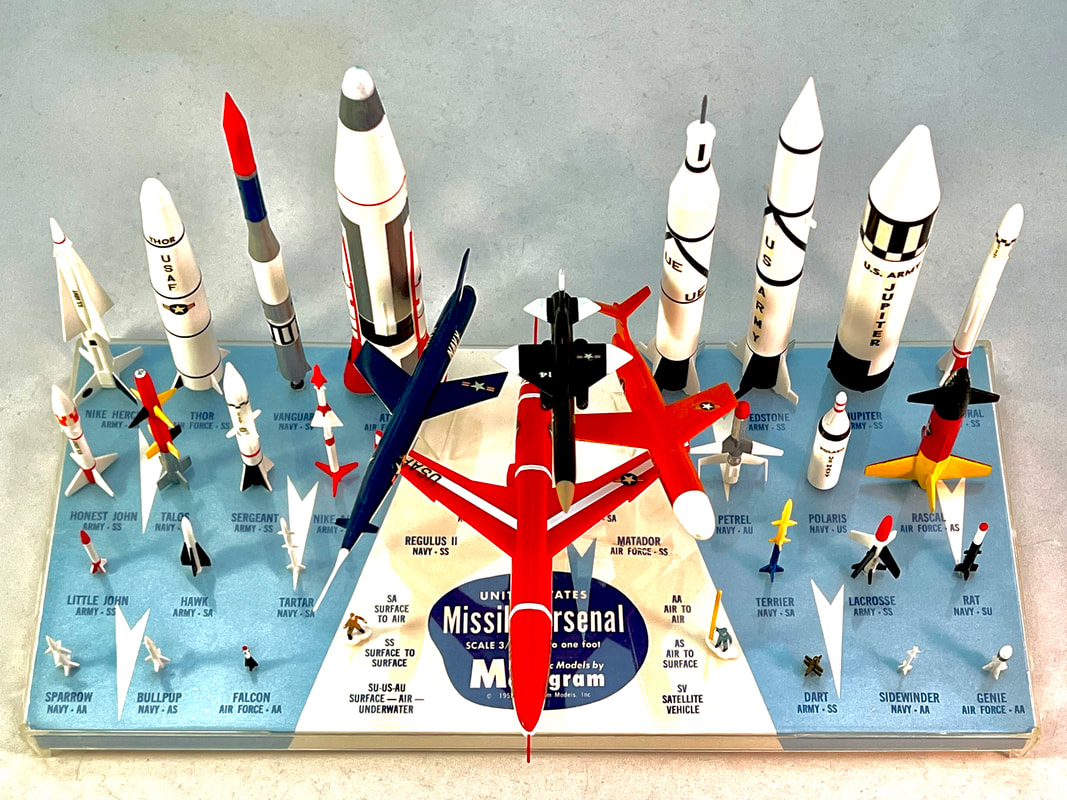
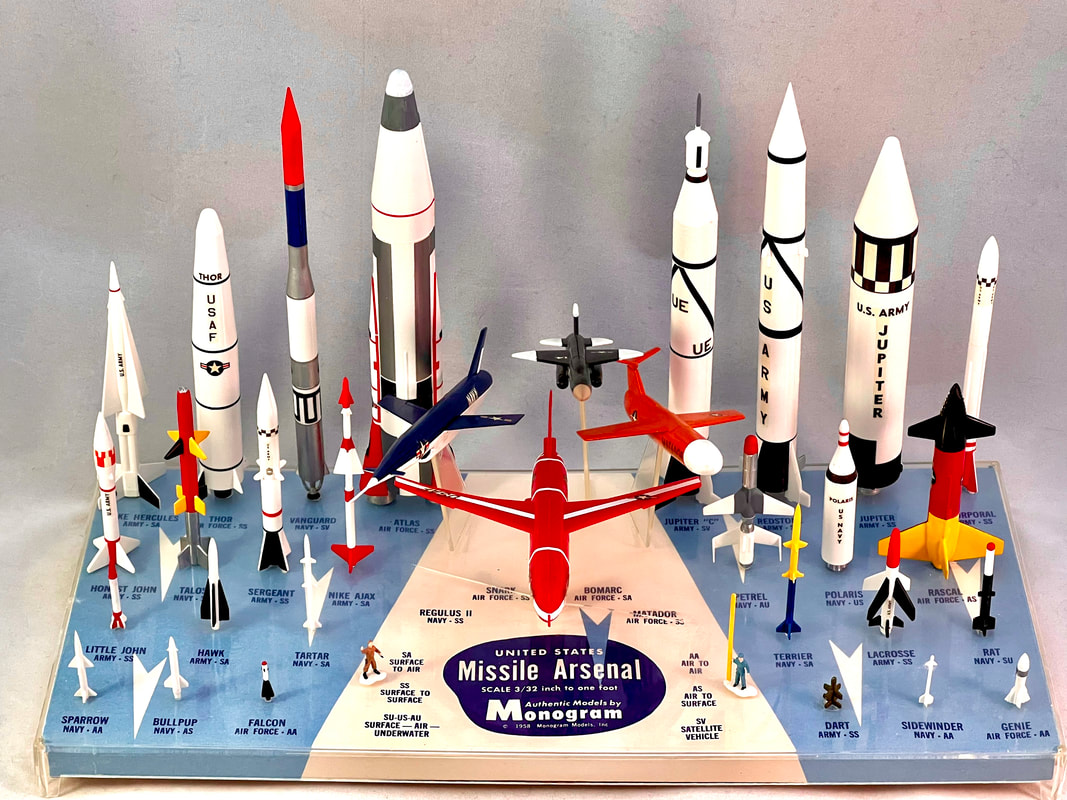
71 styrene parts are included for 36 missiles. The blue base has raised lettering with the names and official numeric designations for the missiles.
Originally, the model was released as the United States Missile Arsenal in 1958. Composition of the set was a little different. In 1969, the set was reintroduced with some updates. We’ll discuss the specific changes in our Bonus Features that will accompany this review.
The term “Space Missiles” is a bit of a misnomer. Back in 1969 when the kit was retooled, the Space Race to the moon was reaching its climax. Monogram decided to make the kit relevant to the excitement of the era by naming it the Space Missiles set even though Missile Arsenal would have been a more accurate title. However, with many modelers, the Space Missiles designation for the set carries a lot of nostalgia and Atlantis decided to take advantage of this.
The term “Space Missiles” is a bit of a misnomer. Back in 1969 when the kit was retooled, the Space Race to the moon was reaching its climax. Monogram decided to make the kit relevant to the excitement of the era by naming it the Space Missiles set even though Missile Arsenal would have been a more accurate title. However, with many modelers, the Space Missiles designation for the set carries a lot of nostalgia and Atlantis decided to take advantage of this.
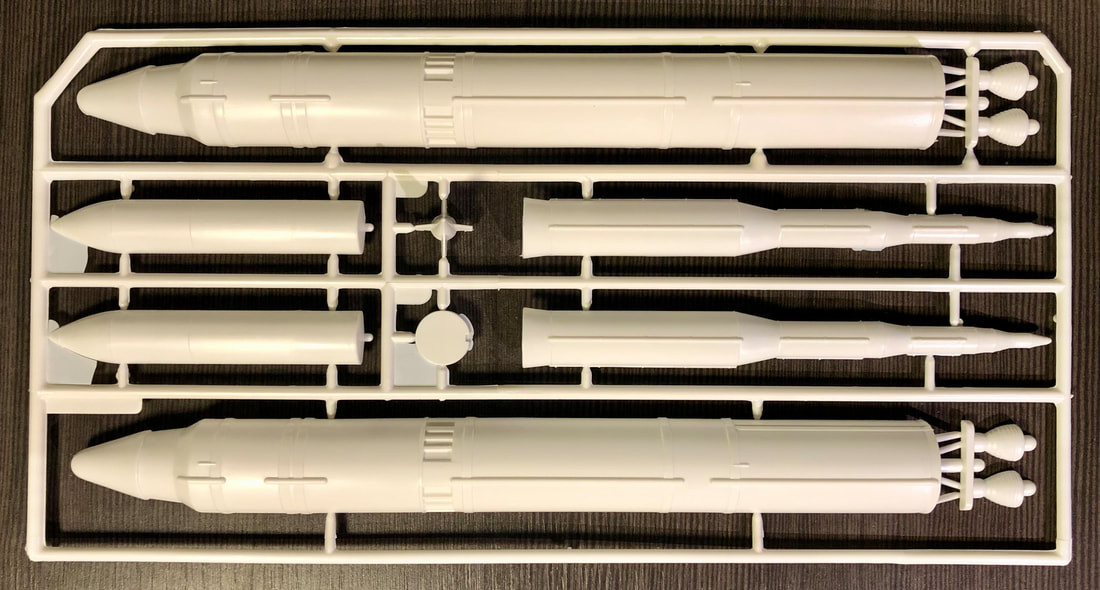
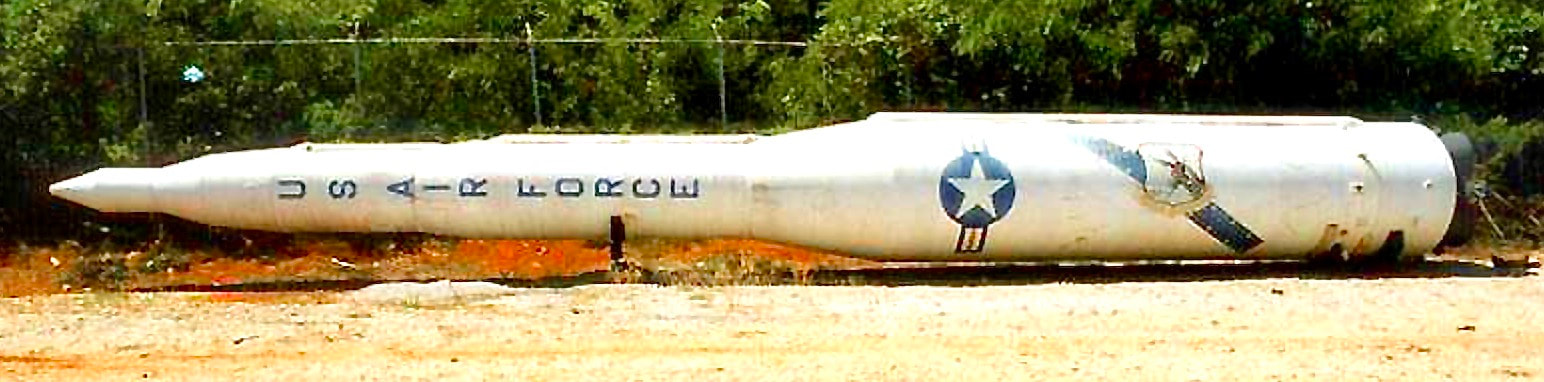
The Titan is the largest missile in the set and is composed of only two parts.
The missiles in the set are many variants of ground-to-air, air-to-air, and air-to-ground weapons that were used by various United States military services. They range from the Dart, a 5-foot, 100-lb antitank missile to the 103-foot Titan II ICBM.
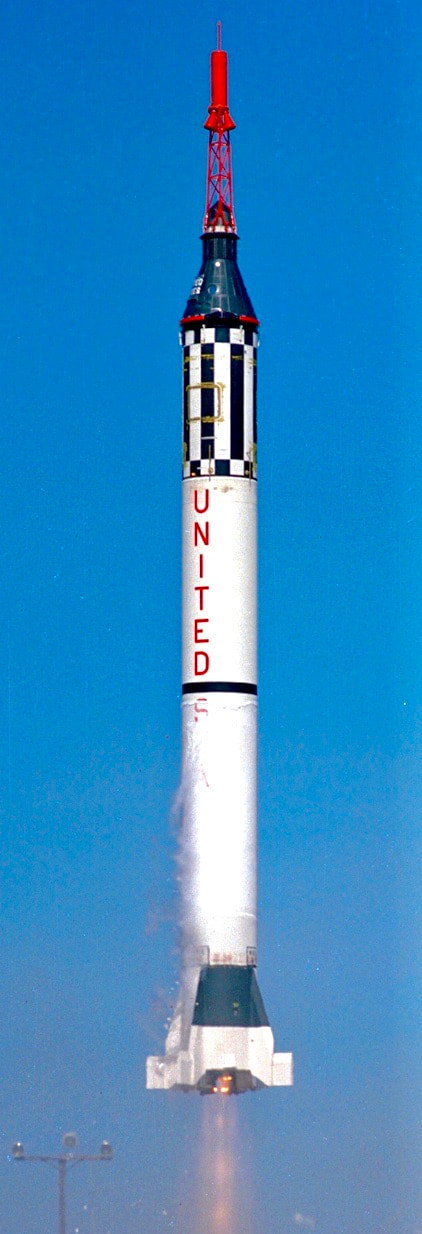
The kit's Atlas is an early test variant with only two engines. The earliest Atlases had conical engine bells, accurately represented here. Both the Atlas and Redstone rockets (the next biggest missile on the sprue) were selected as key components of NASA's Mercury program which sent the first Americans into space.
|
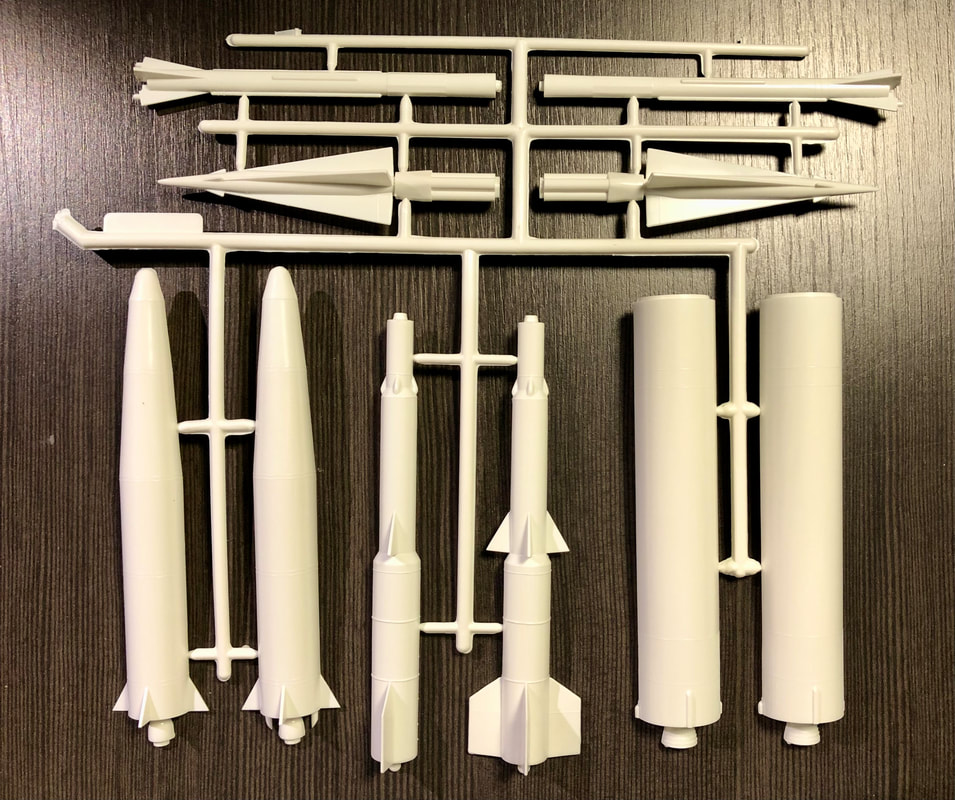
This sprue has the Delta and Jupiter missiles. In their civilian configurations, these rockets played important roles for NASA. The Spartan and Nike Hercules, also on this sprue, were early anti-missile missiles. At top, the Corporal missile was the first guided weapon authorized by the U.S. military to carry a nuclear warhead.
|
The models are molded in white plastic. The smaller missiles are one-piece. The kit is easy to build. Fit of most parts is very good; probably better than most kits of the eras. Most of the missiles have fine, raised panel lines typical of Monogram kits. Monogram Models was beloved by many young modelers and developed a strong reputation for nicely detailed and fairly accurate models and this kit reflects this philosophy and engineering. Modelers will find a small amount of flash and minimal sink-holes. Some of the missiles have ejector pin-marks but only contest modelers will probably care about these. Parts prep was fun and easy and assembling those missiles that were multi-part was a cinch. The one-piece missiles have mold parting lines that were easily cleaned up. In a nutshell, parts prep and assembly is very easygoing and this model was very fun to build!
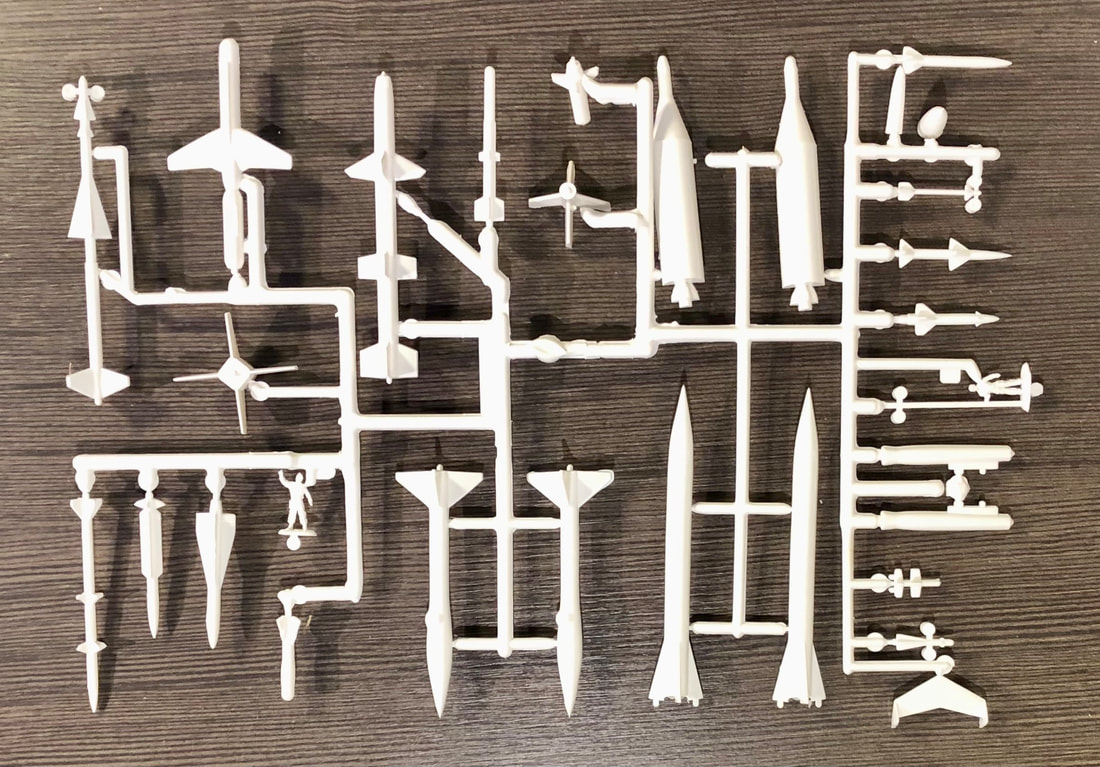
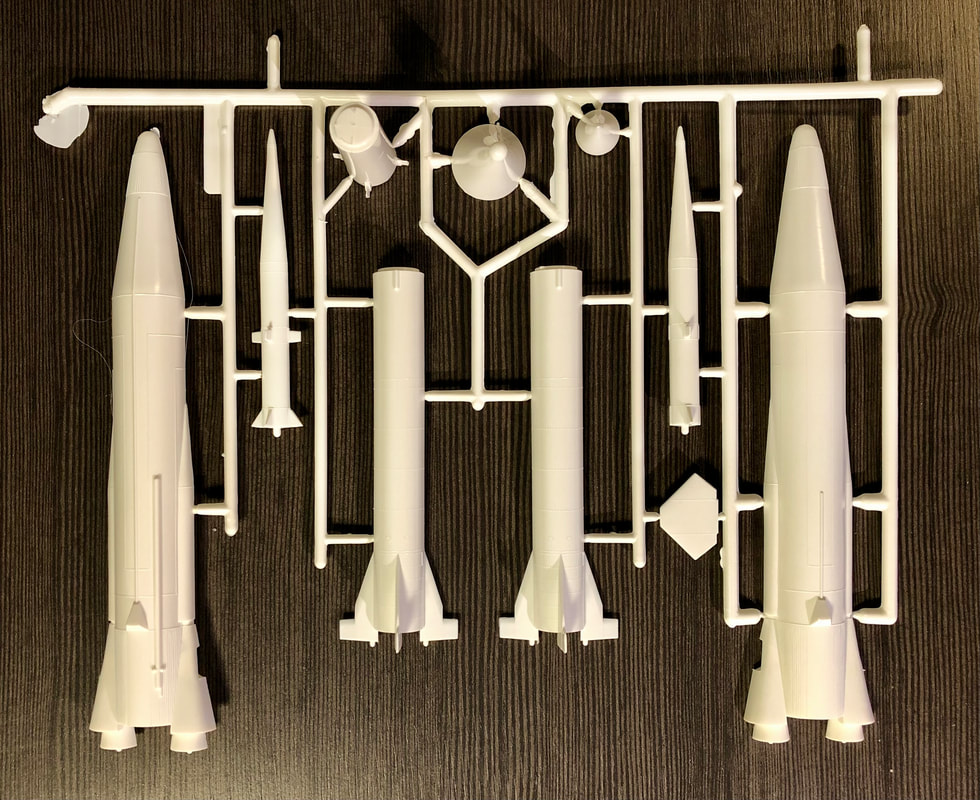
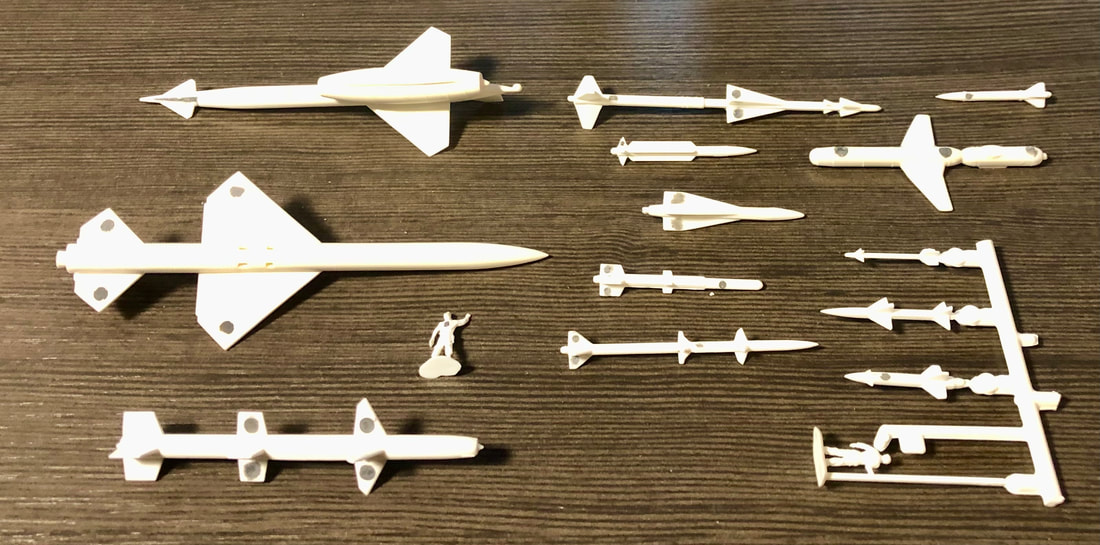
This sprue has most of the smaller missiles. Note the human figures included to provide a reference for the sizes of the missiles.
|
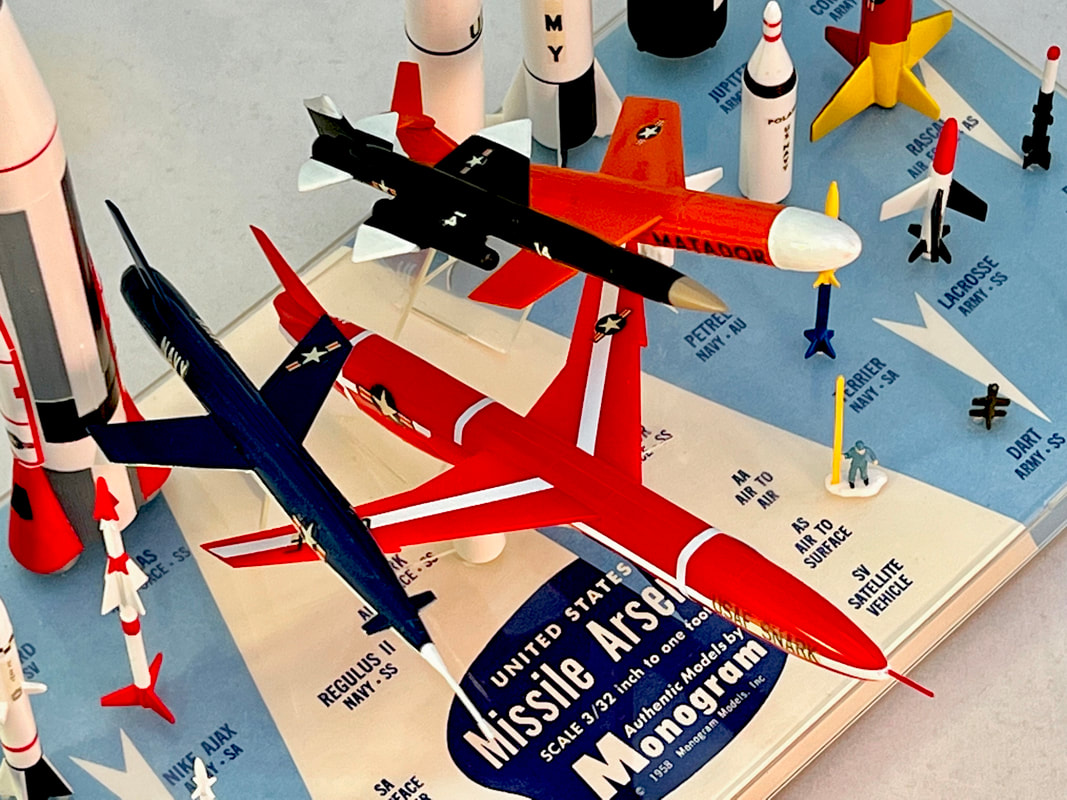
This sprue includes the Rascal, Hound Dog and Bomarc missiles. The Bomarc has six parts!
|
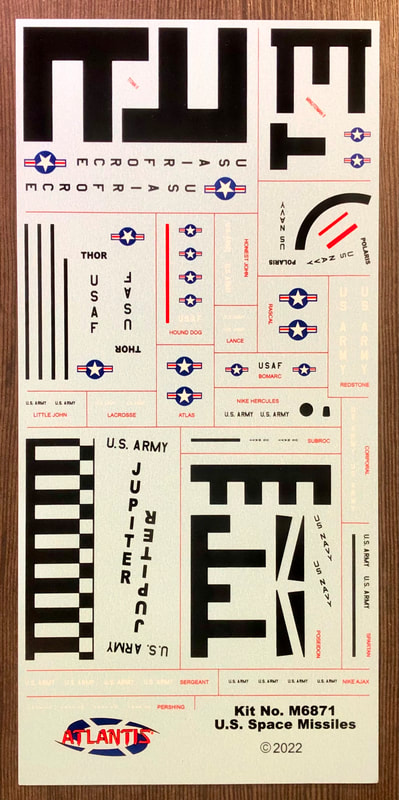
The decal sheet will look familiar to those who built the previous Monogram release of this kit. Note the many roll patterns; you won't have to paint those!
|
Most of the effort will involve painting but none of the missile schemes are difficult to execute. In our bonus features, we'll have specific tips and hints for building and painting each of the missiles.
This is not a window to the universe; you're looking at the box-bottom, which doubles as an enhanced display base. You can place the completed model on this all-new feature.
Note placement of the kit title, which will appear upside down when you first open the box. This arrangement is what allows its use as an additional display base for the completed kit.
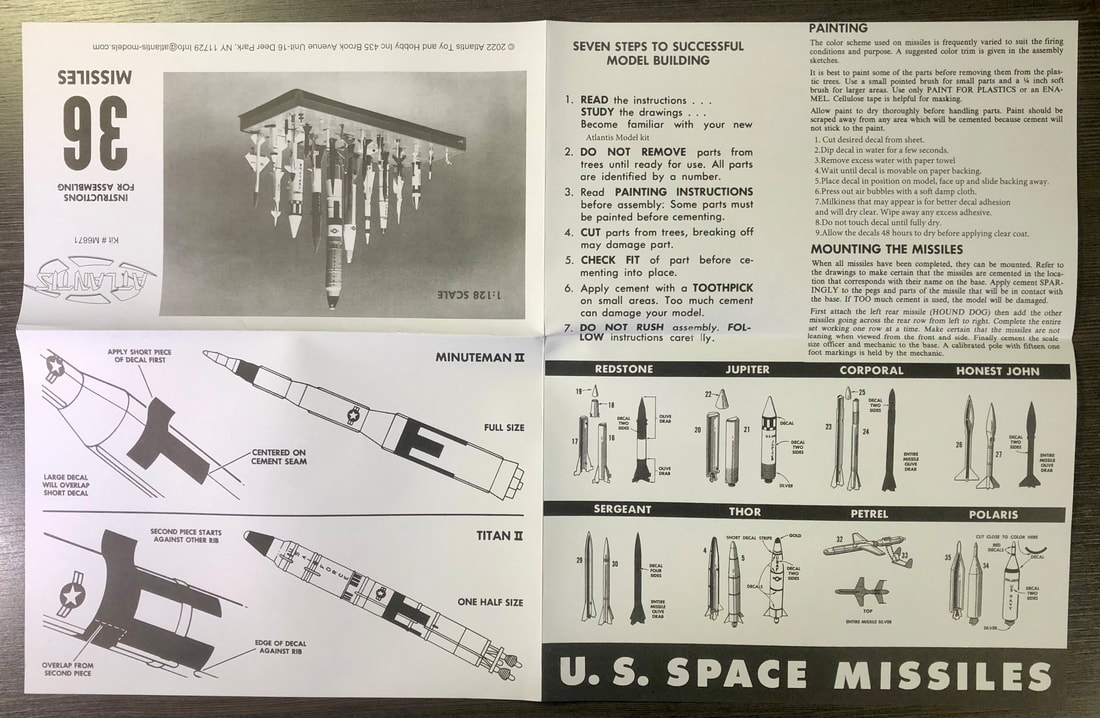
|
As part of Atlantis Models' educational STEM series of kits (Science, Technology, Engineering, Math), a special poster-sized "Know Your Missiles" sheet is included with vintage historical information about each rocket and missile along with a photo. This was not included with the 1983 Heritage Edition of the kit. Instructions utilize artwork from the 1969 version of the kit as well. It's nicely done and has specific painting instructions to finish each missile as they appear on the box photo. The instructions note: "The color scheme used on the missiles is frequently varied to suit the firing conditions and purpose. A suggested color trim is given in the assembly sketches." When I built my original model (1983 version), I utilized these versions. They are an eclectic mix of operational and test or even mockup versions of the missiles.
|
|
The offset-fold in the instructions provides an artful presentation. Clear assembly diagrams and descriptions provide excellent guidelines for finishing the missiles. Each missile is keyed to fit properly on the display base and of course the instructions provide identification to match each one with its proper location on the plastic base.
|
|

|
We love this unique collection-kit and as usual, Atlantis Models brings it back in better-than-ever form. It's still just as easy to build as ever. Most effort will be based around painting. We'll include specific tips in our Bonus Features. The 2Modeler guys give this kit four enthusiastic thumbs up! You won't regret adding it to your own model kit collection. It's an important piece of model kit history and portrays in detail the Post-WWII development of rockets and missiles used in many civilian and military applications.
|
BONUS FEATURES
BUILD IT!
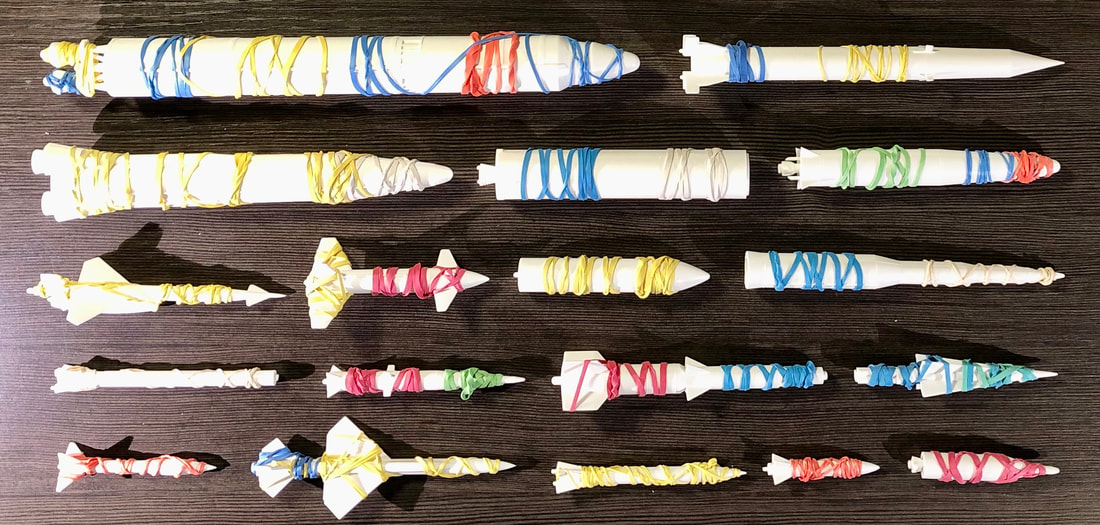
After some minimal cleanup, the missiles in halves can be glued together. We like to rubber-band them at least overnight to be sure the parts have a strong weld.
The larger missiles come in halves. After applying glue, we like rubber bands which will provide a stronger bond. Occasionally, you'll get a subtle shadow-seam over time as the glue fully cures. This might take months to happen. It's generally not very noticeable to anyone but a very picky contest judge, so most modelers shouldn't care about this. Using rubber bands greatly reduces this phenomena. If you use liquid cement, be sure not to apply it with rubber bands in place. It's likely that the glue will run between the model and rubber band on the outside of the model. This will complicate your cleanup after removing the rubber band and may damage raised details.
|
Assembly for most of the missiles is easy and straightforward thanks to Monogram's legendary engineering. Parts cleanup was really a breeze with a minimal amount of flash. Some scraping of mold parting lines with a hobby knife such as a #11 X-Acto is in order.
Sinkholes are minimal and will be very easy to fix since none are in areas where filling them will destroy detail. The Hound Dog and Bomarc missiles have wings with openings that will need a little trimming at front and rear to improve fit of these parts. |
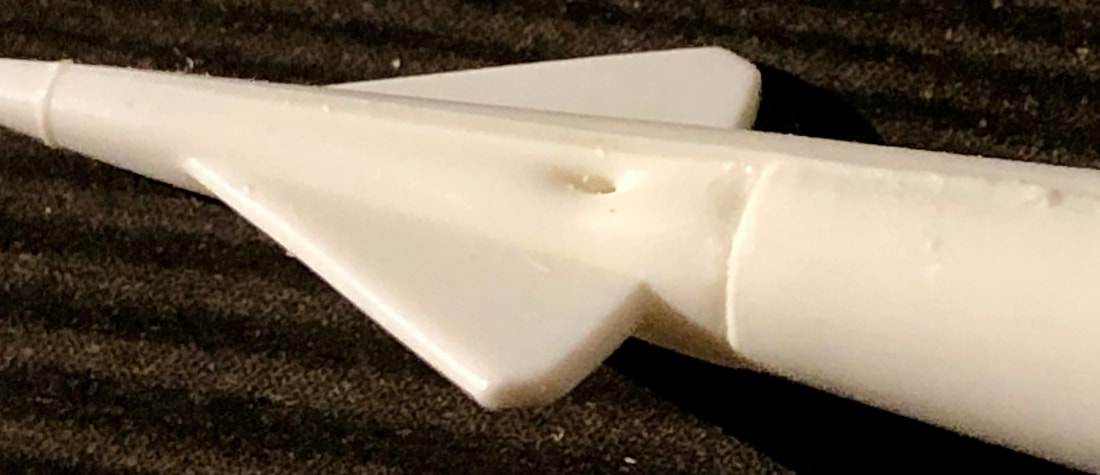
This is the worst sinkhole we could find; it's on the nose of the Hound Dog missile. The seam on that shorter half will definitely benefit from some trimming and putty. This is easy stuff for the contest modeler to fix and many builders would be content to ignore it.
|
What you see here is the putty work needed to take care of ejector pin marks and most sinkholes for our contest-quality build. It's minimal compared to many other kits.
Less than half of the missiles had external ejector pin marks. If you're not interested in buidling for a contest, you can probably ignore these. As noted in the accompanying photo, they'll be on only one side of the missile and you can simply orient them towards the back when you glue the painted missiles to the base.
The missiles molded in halves had all their ejector pin marks on the inside where they can be completely ignored. With the mold registration being pretty good on the previous issue and cleaned up pretty well by Atlantis, some minor sanding is all that will be needed to clean up the seams on the missiles made in halves.
The missiles molded in halves had all their ejector pin marks on the inside where they can be completely ignored. With the mold registration being pretty good on the previous issue and cleaned up pretty well by Atlantis, some minor sanding is all that will be needed to clean up the seams on the missiles made in halves.
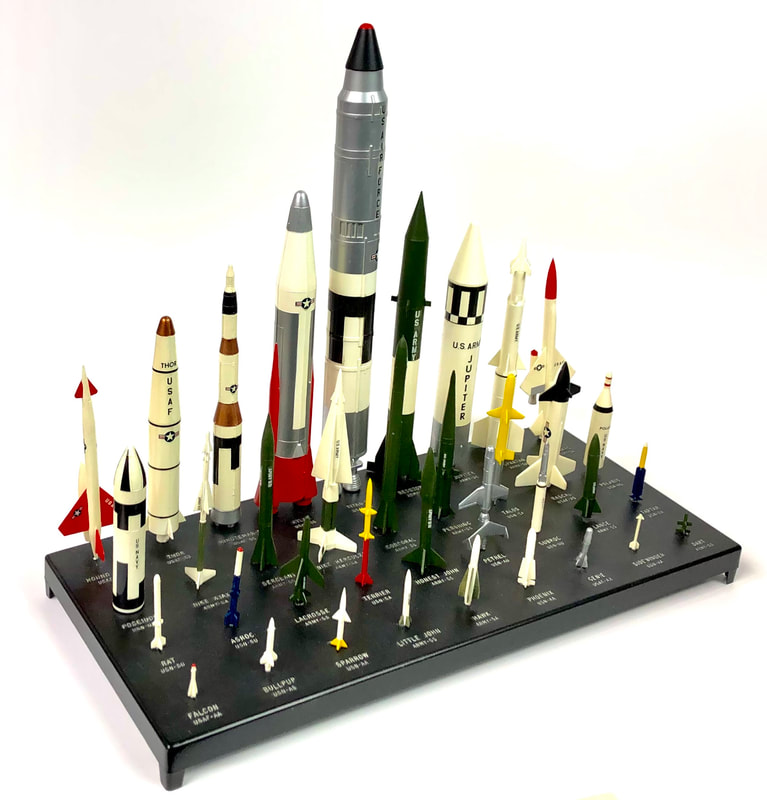
This is a photo of a 1983-vintage Space Missiles model built in the mid-1980's All missiles were painted following recommendations given in the instructions. The base was painted black.
|
We did a comparison between the Atlantis kit parts and the parts from another unbuilt 1983-vintage kit. As is typical, the Atlantis parts appeared to have been cleaned up compared to the earlier Monogram issue.
|
In the mid-1980's, I bought and built a 1983-vintage Monogram Heritage Edition of the Space Missiles kit. I didn't pay much attention to doing a perfect job; it was a purely fun-build. I used an airbrush for most of the painting along with hand-brushing for details like the fins on the Little John and Hawk missiles. Looking back, the only do-over's I would want if given the chance was to give some of the hand-brushing a second go-around, and I would have avoided the use of Testors clear-gloss lacquer to clearcoat the missiles once they were painted.
The biggest problem I experienced with Testors lacquer is a nasty tendency to yellow over time. This is fine on for anything that isn't white. Testors does make a clear ENAMEL gloss that I've used and it doesn't appear to yellow nearly as badly.
The biggest problem I experienced with Testors lacquer is a nasty tendency to yellow over time. This is fine on for anything that isn't white. Testors does make a clear ENAMEL gloss that I've used and it doesn't appear to yellow nearly as badly.
This was a fairly quick (1980's) build with little if any putty used. Obviously the painting comprised most of the effort. With perhaps the exception of the Atlas Missile, none of the paint process was anything other than simple.
Finishes on the models would probably be gloss or semi-gloss according to your preference. Anything "green" (olive drab) would most likely have a flat finish or semi-gloss at its shiniest. Anything with a metallic finish will probably be most accurate if done to replicate an aluminum finish; that is to say not very shiny. The sole exception would be the tank on the Atlas missile. The Atlas had a stainless steel tank that was polished to a sheen that would be noticeably brighter than that on the aluminum Titan II.
The lettering is finely raised detail. There are a couple ways you could paint it. One would be to use a rough-mask of tape covering the area just outside of the titles and dry-brush the lettering. This is probably the best solution if you want to leave your base in its unfinished molded-in-blue-plastic glory. I used a trick that required a little more effort.
The model's base has fine, raised lettering. Without any sort of contrasting paint enhancement, it can be a little hard to see. While building this model circa 1985, I came up with a trick that I use to this day for painting raised lettering commonly found on display bases. The basic trick is to paint the entire base white, over-coat that with your final base color, and carefully sand down until you reach the white paint on the raised lettering.
To make this easier, before doing any painting, gently sand the lettering so the top of all the lettering is flattened down slightly. You basically want to see that it has been touched by the sandpaper and has a flat area that will hold the white paint without easily being sanded through. Give the base a pretty thick coat of white paint (or whatever light color you wish your lettering to be). Let that dry well for at least a day or so, and then apply your desired base finish just thick enough to cover the white completely. This needs to dry thoroughly. Take some fine sandpaper (about 400-grit) and carefully sand through the base color over the lettering until you can see the white color underneath. If you accidentally sand too far, touch-up with a very fine paintbrush or even a tiny amount of lettering paint on a toothpick. This is a nifty technique for anything with raised lettering!
To make this easier, before doing any painting, gently sand the lettering so the top of all the lettering is flattened down slightly. You basically want to see that it has been touched by the sandpaper and has a flat area that will hold the white paint without easily being sanded through. Give the base a pretty thick coat of white paint (or whatever light color you wish your lettering to be). Let that dry well for at least a day or so, and then apply your desired base finish just thick enough to cover the white completely. This needs to dry thoroughly. Take some fine sandpaper (about 400-grit) and carefully sand through the base color over the lettering until you can see the white color underneath. If you accidentally sand too far, touch-up with a very fine paintbrush or even a tiny amount of lettering paint on a toothpick. This is a nifty technique for anything with raised lettering!
|
|
While our Monogram version of the Space Missiles kit has been finished for about four decades, our Atlantis version is a work-in-progress. We'll update this page as that effort is ongoing.
When I worked on my first Space Missiles kit, the Internet was still science fiction for the most part. Today, there are many references available for alternate color schemes for these missiles. I've decided that my current version of the Space Missiles kit will use decor differing from kit-supplied for many of the missiles. Most often, the test-schemes used in development of these missiles used high-visibility colors. Once in operation, the missiles were perhaps left unfinished or camouflaged. Many of the U.S. Army missiles in the set can be identified quickly by the fact that they are painted in olive drab. It's known as "Army-Green" for a reason! However, in development and testing, many Army missiles had high-visibility. For example, test-versions of the Pershing I may have had an olive-drab finish, but lower stages had bright orange stripes and the dummy-warhead was white with black stripes!
MORE ON THE INDIVIDUAL MISSILES - HISTORY AND BUILDING TIPS
Atlantis Models' Space Missiles kit is dripping with important aerospace and model kit history! The kit presents, in three dimensions, many rockets and missiles created after World War II that influenced the state-of-the-art in weapons development as well as space exploration. It has great educational value and clearly demonstrates the relative sizes of the rockets and missiles in the set.
Atlantis Kit instructions provide excellent painting guides for the missiles and a brief history is given for each one. Here, we'll provide photos with many of the missiles in alternate colors to consider for finishing your model. In addition, we'll provide some additional historical information, particularly regarding the history of the missile after the original historical book/poster for the model kit was produced.
Atlantis Kit instructions provide excellent painting guides for the missiles and a brief history is given for each one. Here, we'll provide photos with many of the missiles in alternate colors to consider for finishing your model. In addition, we'll provide some additional historical information, particularly regarding the history of the missile after the original historical book/poster for the model kit was produced.
|
DART
The Dart is featured as the shortest missile in the Atlantis Space Missiles set. This anti-tank missile program was cancelled just as the original 1958 Missile Arsenal set was released. Today, shoulder-fired weapons such as the fire-and-forget Javelin are much more practical and effective thanks to advances in electronics and explosives technology. The actual Dart has front and back fins offset by 45 deg as depicted in the photo. It'd be pretty easy to cut the Dart between the fins and glue it back together with them at the correct 45-degree angle. |

|
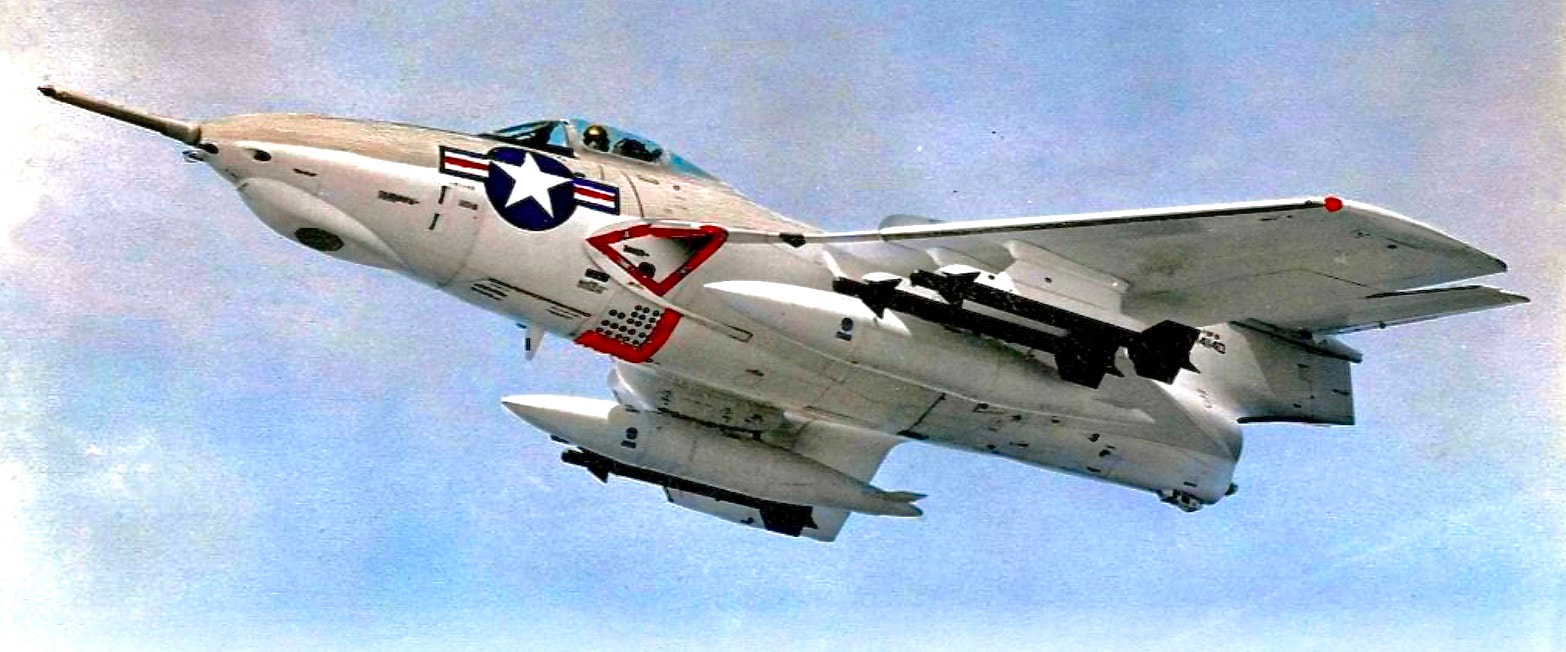
FALCON
The Falcon is another very small missile in the set. Don’t lose it! The Falcon was considered the first operational air-to-air guided missile deployed by the U.S. Air Force. Its compact size allowed it to be carried internally in the F-102 and F-106. Alas, the performance of the Falcon during air-to-air engagements in Vietnam was substandard compared to external pylon and wingtip-based missiles such as the Sidewinder. After this, missiles weren't designed to be carried internally until the advent of Stealth aircraft. Integral to the F-102 and F-106, improved versions of the missile were used until these aircraft were retired by the 1980's
The Falcon is another very small missile in the set. Don’t lose it! The Falcon was considered the first operational air-to-air guided missile deployed by the U.S. Air Force. Its compact size allowed it to be carried internally in the F-102 and F-106. Alas, the performance of the Falcon during air-to-air engagements in Vietnam was substandard compared to external pylon and wingtip-based missiles such as the Sidewinder. After this, missiles weren't designed to be carried internally until the advent of Stealth aircraft. Integral to the F-102 and F-106, improved versions of the missile were used until these aircraft were retired by the 1980's
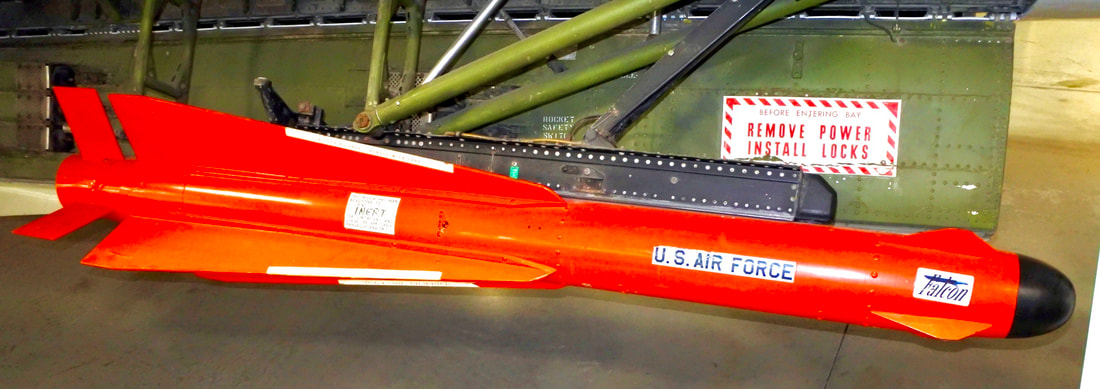
The Falcon was deployed on pop-down racks inside a missile bay on both the F-102 and F-106 interceptors.
|
BULLPUP
The Bullpup was an early precision air-to-ground missile. The pilot could fly the missile to its target using a joystick. This strategy, however, put a pilot at risk after weapons release and emerging technology at the time allowed development of the fire-and-forget missile. |
A Bullpup is fired by a P-3 Orion.
|
|
One of the more interesting aircraft types that carried the Bullpup missile was the P-3 Orion, an anti-submarine aircraft based on the 4-engine Electra airliner. Atlantis Models makes a P-3 in 1/115-scale.
HOUND DOG
|
|
The Hound Dog was an early cruise missile carried by the B-52. It was common for B-52 pilots to start the Hound Dog’s turbojet engine prior to aircraft takeoff, using the extra thrust to aid takeoff during training and deterrent missions. This procedure decreased the interval-between-departures which would improve the response time of a multi-plane mission.
|
This Hound Dog and pylon are finished in Southeast Asia colors typical of a Vietnam-era aircraft.
|
However, ground crews were frustrated by the extra maintenance required and many Hound Dogs had unacceptably high hours on their engines thanks to the B-52 pilots’ tendency to use them like on-demand JATO bottles. Adding two operational turbojets from a pair of wing-mounted Hound Dogs gave those B-52’s a total of ten turbojet engines! The Hound Dog was a new addition to the 1969 Space Missiles version of the the Missile Arsenal set. It wasn't there in 1958. In the kit, the shorter body half needs a little trimming where it meets the nose to improve fit. The other half has a sinkhole that benefits from a little epoxy or putty filler.
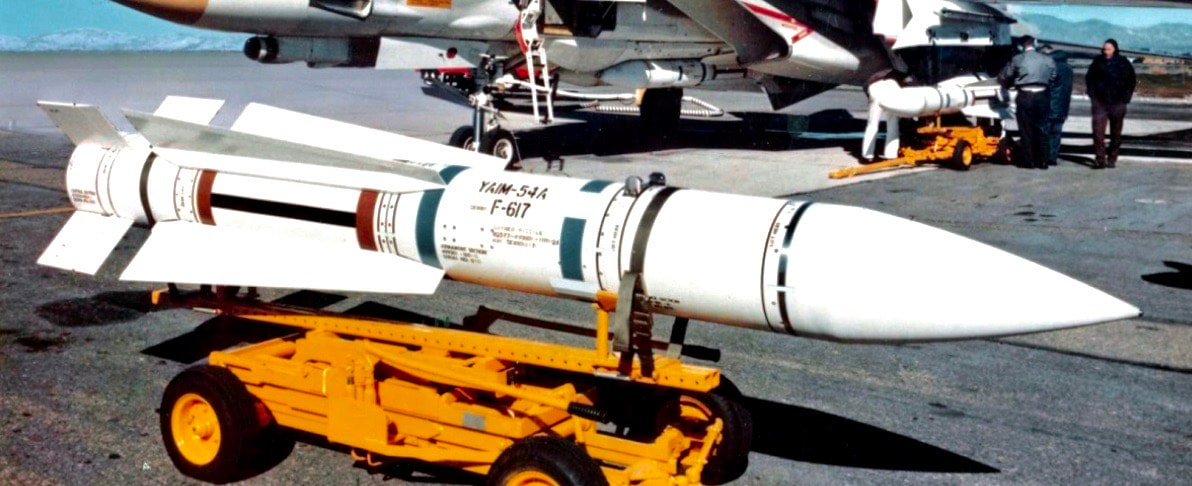
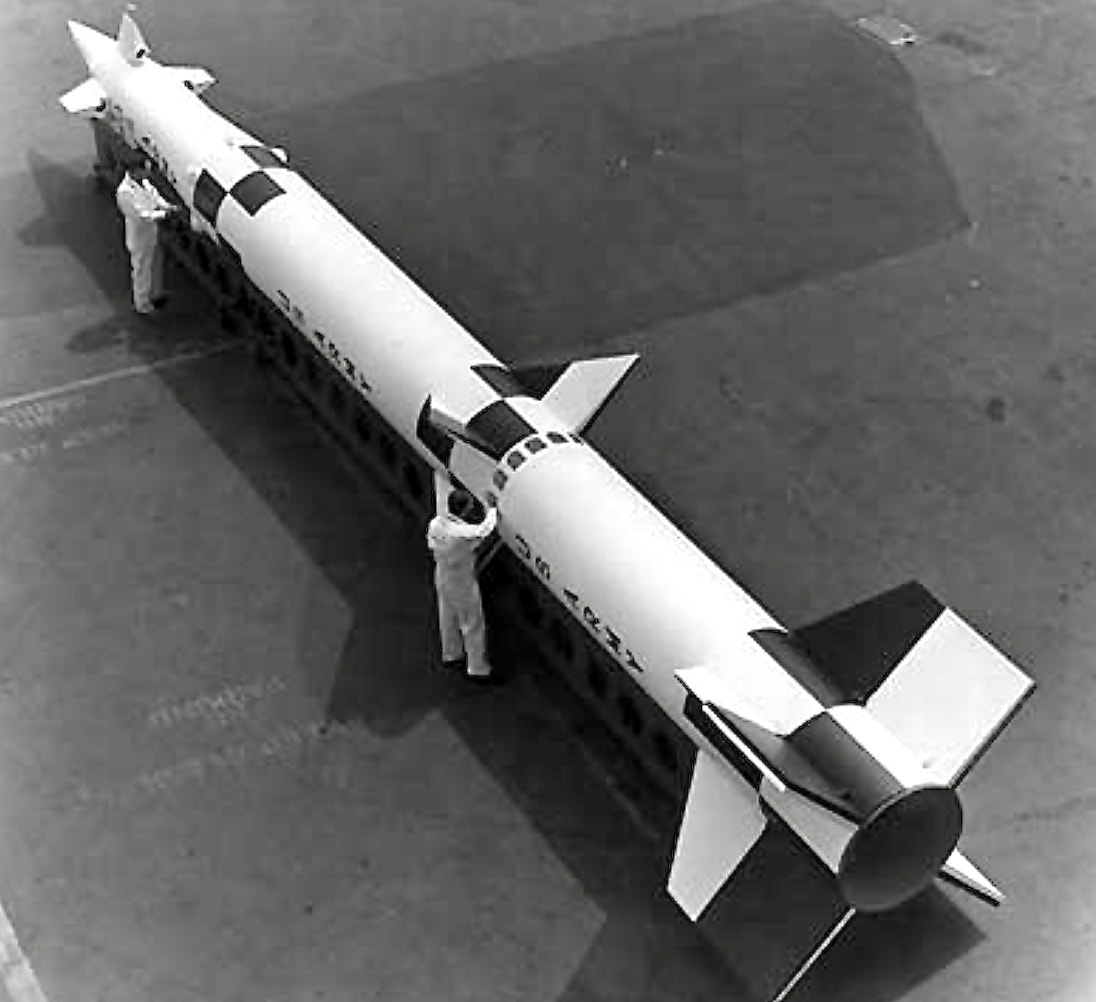
PHOENIX
|
The Phoenix Missile is a long-range air-to-air missile that was originally designed to intercept Soviet bombers at extended distances during the Cold War. It was not included in the original 1958 version of the Monogram Missile Arsenal; the model was added in 1969. Originally planned as part of the US Navy F-111B program, it transitioned to the F-14 when the Navy version of the F-111 was cancelled.
|
The U.S. Navy’s use of the Phoenix ended when the F-14 was retired in 2006. Sold to Iran prior to the Islamic Revolution in 1979, the Phoenix Missile and F-14’s intended to carry them are still in use in Iran. A number of successful intercepts have been made using the Phoenix by Iranian F-14’s during the Iran-Iraq war including the interception of Exocet anti-shipping missiles. In the Space Missiles set, the Phoenix was a bit out-of-round and benefited from some trimming.
SPARROW
The Sparrow medium-range air-to-air missile has had a long career. Brand-new when the Missile Arsenal kit was released in 1958, it is still in use at time of posting. The AIM-120 ARAAM is gradually replacing it but the Sparrow has been in service over six decades. I did some engineering contract work on the Sparrow program at Hughes Aerospace prior to its purchase by Raytheon.
The Sparrow medium-range air-to-air missile has had a long career. Brand-new when the Missile Arsenal kit was released in 1958, it is still in use at time of posting. The AIM-120 ARAAM is gradually replacing it but the Sparrow has been in service over six decades. I did some engineering contract work on the Sparrow program at Hughes Aerospace prior to its purchase by Raytheon.
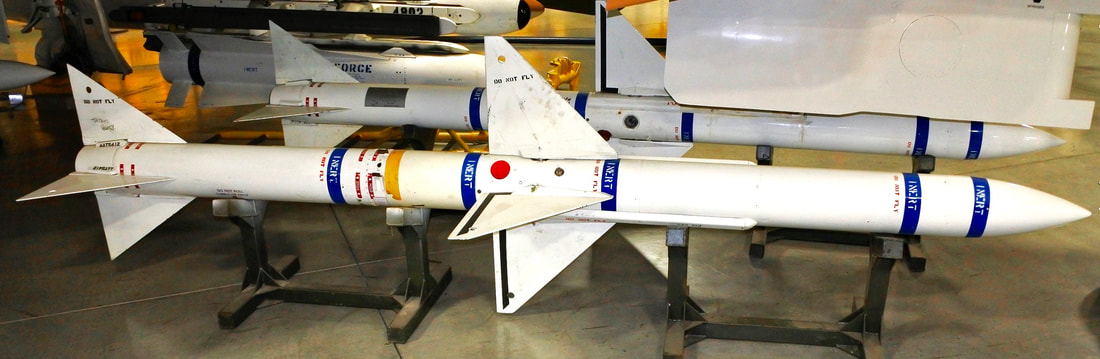
This is a demonstration and training missile currently at the Hill Air Force Base Museum. Note the blue bands that indicate it has no solid fuel which would have been factory-installed on an operational missile. It is intended for ordnance handling crews to practice loading the missile on an aircraft weapons hardpoint. Also note the "DO NOT FLY" message. This training article is not designed to be on an aircraft when it takes off.
PETREL
Hidden within all those colorful drop-away flight surfaces you can see a conventional underwater torpedo. Note the annular propeller ring just behind the rear boat-tail.
|
The Petrel air-to-surface missile was essentially a winged torpedo designed to target ships and surfaced submarines from a standoff distance. A rocket booster, wings and tail would drop away and the torpedo would enter the water within its normal underwater range. It was a fairly large weapon necessitating launch by a multi-engined aircraft, principally the P-2 Neptune. The Navy wished to prioritize antisubmarine capabilities with a weapon capable of targeting submerged submarines, which the Petrel could not do. It was phased out during 1959 just after the original Missile Arsenal kit was released. The missile in the kit has three large ejector pin marks that will need filling by the more picky contest modeler. They’re the most prominent in the set.
|
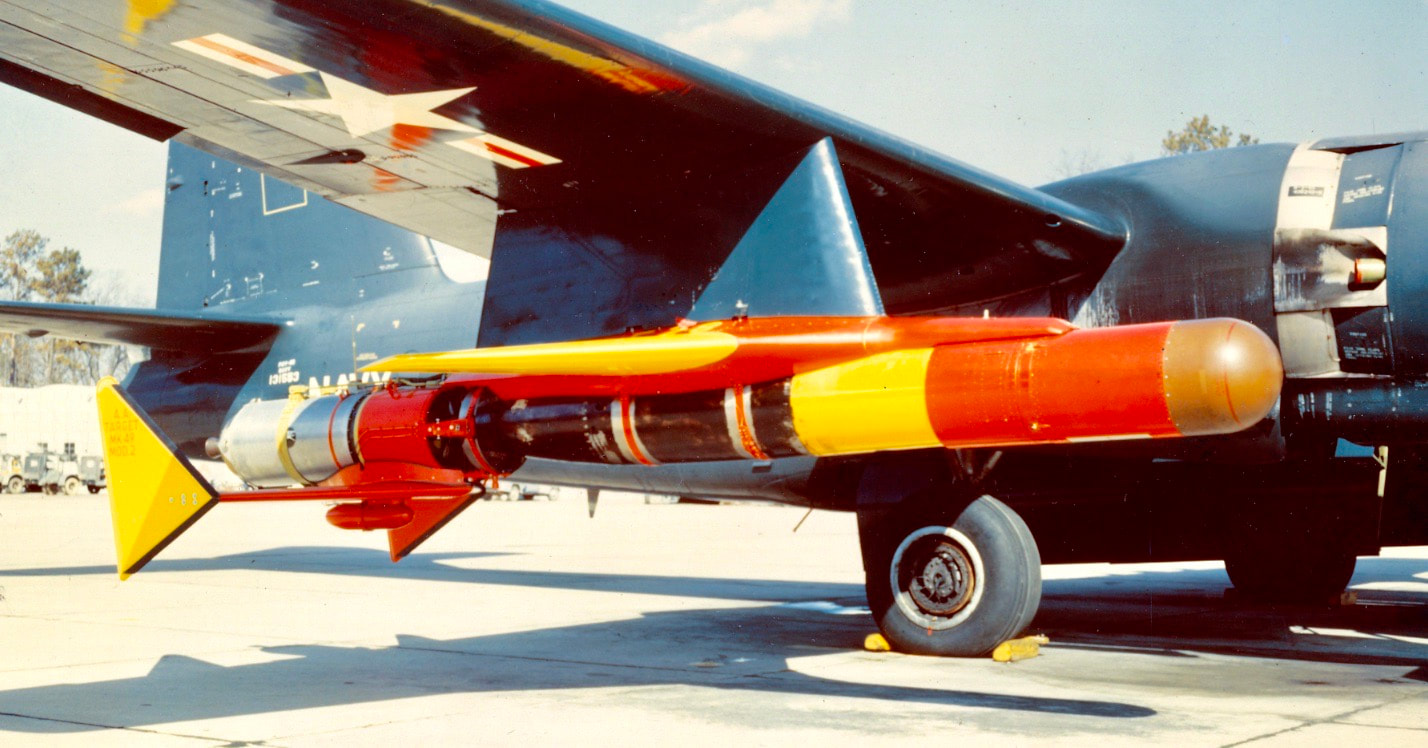
RASCAL
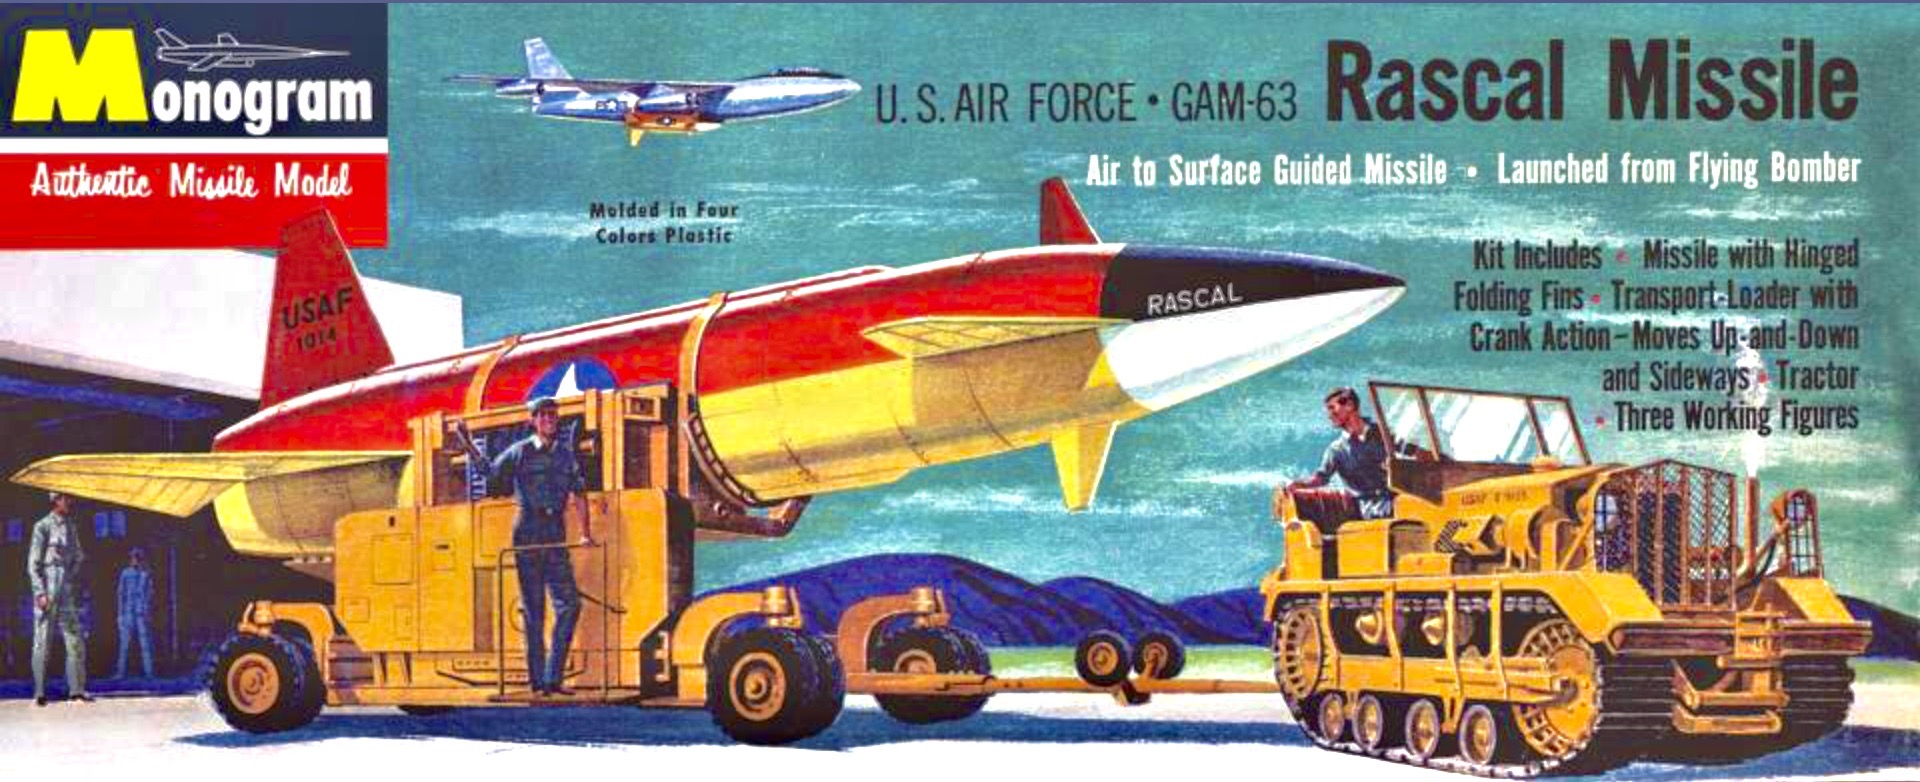
BoxArtDen provides this awesome image of Monogram box art for the 1/48 Rascal Missile kit released in 1958. We love this colorful test-scheme!
The Rascal was an early air-to-ground cruise missile. Rather large for an air-launched missile, it was drop-tested using a B-36 and then fitted to the B-47 for planned operational use. The Strategic Air Command (SAC) resisted development of this weapon as integrating the ungainly 30-foot missile into its aircraft such as the B-47 and B-52 was seen as too complex and expensive. It was cancelled in 1958.
TALOS
|
Talos was a radar-targeted surface-to-air (SAM) missile system designed for shipboard use. The rather large missile was too big to be deployed on anything smaller than a large cruiser and a number of former WWII cruisers from the Baltimore and Cleveland Classes were converted into a new type of ship—the guided missile cruiser. The upper stage was a ramjet with the warhead creatively acting as the center spike.
|
BOMARC

|
Bomarc was a long-range surface-to-air missile (SAM) intended to target formations of attacking Soviet nuclear bomber aircraft. It used a rocket booster for launch, transition to horizontal flight and acceleration to a speed where the podded ramjets would take over. On ramjets, the Bomarc could fly over 400 miles at Mach 2.5 to destroy a formation of bombers with a nuclear warhead--in theory. The advent of ICBM’s made the Bomarc obsolete. The system experienced developmental challenges and began to be decommissioned in 1969, the year that Monogram’s Missile Arsenal kit was retooled and released as the Space Missiles set.
In the set, the Bomarc has the distinction of having the most parts – 6 pieces. One of the bigger construction issues concerns the engine nacelles. While all other parts have almost perfect mold half alignment, the Bomarc’s engine nacelles have an offset that might benefit from some puttying and sanding to get an acceptably round cross-section. Wings and tail are a tight fit and some slight trimming was needed at front and rear of the wing openings. Take your time and be sure the wings and tail fit well before trapping them between the airframe halves.
At time of posting, Atlantis Models released a larger version of the Bomarc missile with "actual moving parts!"
|
JUPITER
The brave Miss Baker contemplates her upcoming Jupiter flight in 1959. The flight was successful. Miss Baker lived another 25 years.
|
The Jupiter was the first medium-range nuclear ballistic missile. It has development links to the Army Redstone with improvements that greatly increased its delivery range compared to the Redstone. The U.S. Navy had an interest in development of a shipboard ballistic missile system but the Jupiter turned out to be too big and complex with its requirements for cryogenic fuel handling. Inter-service conflicts within the U.S. military over the missile and geopolitical squabbles also limited deployment of the Jupiter as an intermediate-range ballistic missile (IRBM). As a weapons launcher, perhaps it is best known for being a political football.
In the end, the Jupiter was more remembered for its peaceful contributions to NASA’s space program instead of being an IRBM. The notion of experimental rocket flights using primates is controversial today but in the late 1950's it was seen as the only way to determine if it was safe for humans to be sent into space. Two Jupiter research flights determined that the manned program could proceed. It's little-known that the Jupiter was nearly used in Project Mercury as a stopgap between the suborbital manned Redstone flights and orbital Atlas flights. Jupiter’s airframe was used as the center tank in the Saturn 1 series which provided a vital link in development of the Saturn V Moon Rocket. Known as the Juno II with the Jupiter as a lower stage, it was also an important early satellite launcher. In these roles, it became a true "Space Missile." |
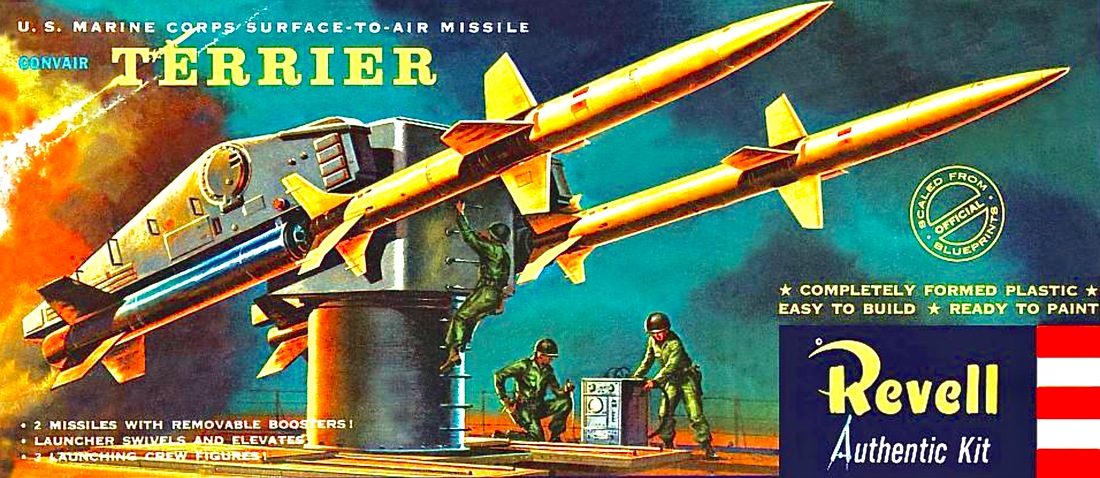
TERRIER
The Terrier was a two-stage SAM intended for US Navy carrier task force protection like the Talos system. Smaller than the Talos, the Terrier could be installed on smaller ships such as frigates. The USS Boston and Canberra, converted Baltimore Class cruisers, were the first ships with operational Terriers in 1956. The RIM-67 is similar to the Terrier, replacing it from 1981 and still in use. Terrier lower stages were useful as sounding rocket boosters for atmospheric research use and it was also used in the Army’s Nike Ajax SAM (the Nike Ajax is also included in the Space Missiles set). In the set, the Terrier has minor mold-parting lines to smooth and a small ejection pin mark on fin.
Many of Revell's vintage missile kits settled on 1:40 scale. At three times the size of the missiles in Monogram/Atlantis' Space Missiles set, they'll be quite a bit bigger and more detailed. We hope that Atlantis can release many of them some time soon!
|
|
GENIE
Unguided air-to-air rockets date back to World War 1. The Genie is perhaps the ultimate unguided air-to-air rocket considering that it was armed with a 1.7 kiloton tactical nuclear warhead! The Genie was codenamed “Ding dong” prior to receiving an official name. A USAF pilot would theoretically launch a Genie into a gaggle of Soviet bombers on their way to Nuclear Armageddon. Immediately after launch, the pilot would turn away as sharply as possible since the rocket motor in the Genie had only a 12-second burn time. You’d hope the Genie didn’t dispatch you as well if you were the pilot when the warhead detonated. A live missile complete with warhead was fired in a test by the very brave pilot of an F-89J in 1957. Observers on the ground directly below the blast, which occurred at an estimated 19,000 feet over their heads, were determined to have received only negligible gamma and neutron doses of radiation, which was great news. Flyers transiting the airburst cloud 10 minutes later received somewhat more. I’m glad I had nothing whatsoever to do with this program! Atlantis Models has a gorgeous F-89D kit. That’s our model on the back of the box.
The Genie in the Atlantis Space Missiles kit has some nice details. The fins should have a serrated look at the trailing edges. There were two switchblade-like vanes that would deploy at each of the four fin positions at launch and the trailing edges should have a jagged look.
|
|
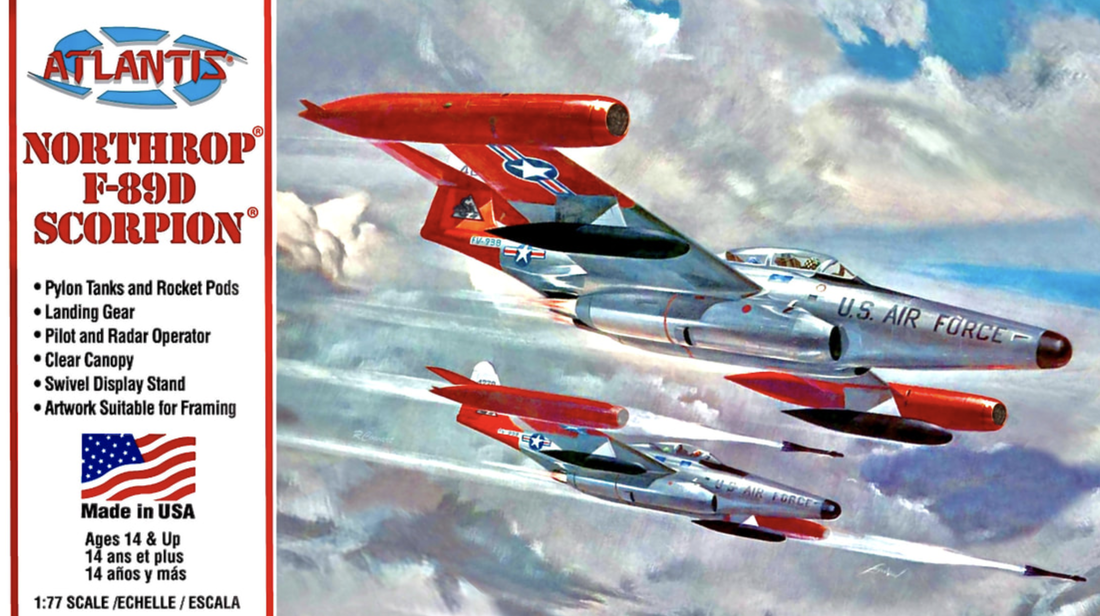
Atlantis Models makes an awesome vintage (1/77) F-89D. A "J" launched a live Genie missile.
|
Hint: the blue rocket stage indicates that it is inert (no fuel).
|
A view of the nuclear cloud after detonation.
|
THOR
The Thor missile competed with the Jupiter. The USAF preferred the Thor to the Jupiter, which was initially a US Army project. The intermediate range of both missiles meant deployments were limited to European countries which created a number of delicate political considerations. The Thor was eventually deployed operationally after a difficult development including several failures of test missiles with nuclear warheads on board. Progress of missiles with intercontinental range made Thor and Jupiter obsolete and their respective deployments were brief.
Thor finally achieved an acceptable reliability and like the Jupiter, was chosen for use as a NASA booster. The Delta rocket used a modified Thor as its first stage. Early Delta rockets were instrumental as launchers for pioneering weather and communications satellites which introduced technology that benefits each of us on a constant daily basis in our current age. Delta rockets were used to loft the first GPS systems, space probes such as the Mars Pathfinder and Mars Global Surveyor, earth sciences research satellites, orbital telescopes and many more notable space payloads.
Thor finally achieved an acceptable reliability and like the Jupiter, was chosen for use as a NASA booster. The Delta rocket used a modified Thor as its first stage. Early Delta rockets were instrumental as launchers for pioneering weather and communications satellites which introduced technology that benefits each of us on a constant daily basis in our current age. Delta rockets were used to loft the first GPS systems, space probes such as the Mars Pathfinder and Mars Global Surveyor, earth sciences research satellites, orbital telescopes and many more notable space payloads.
This early test Thor has a mockup early heat sink-style, blunt reentry nose cone.
|

This Thor has the lighter weight ablative-type reentry vehicle heat shield, an improvement over the heat sink version.
|
NASA's Explorer-21 awaits launch on a Delta-C in 1964. Explorer-21 studied near-Earth space phenomena such as cosmic rays and behavior of solar particles.
|
MINUTEMAN
An early test-missile. The black roll pattern would be for optical tracking purposes. An operational missile would not have this.
|
Containing solid rocket fuel in a large-diameter casing with a shaped, hollow core to precisely control fuel burn represented a major innovation in missile design. The USAF’s Minuteman I ICBM utilized this technology. Missile crews did not need to handle or maintain liquid propellants and upkeep on the missile was significantly reduced. US Navy ballistic missile submarines debuted during the early 1960’s with the solid-fueled Polaris missile and the Air Force needed to upgrade accuracy and survivability of the Minuteman 1 in the form of the Minuteman II by the mid-1960’s. The Minuteman III arrived in 1970. Still deployed in the 2020’s, the Minuteman is notable for outlasting by a significant margin its successors, the Titan and Peacekeeper missiles.
At time of posting, there are 400 active Minutemen missile installations. While these missiles have been in deterrent service for a period now exceeding a half-century, the various missile stages are replaced at various intervals, guidance systems are updated, test-firings regularly produce data utilized to improve safety and accuracy, and warheads are reprocessed and upgraded. I would guess that it is highly unlikely that such efforts are taking place with Russia’s nuclear stockpile. In general, a nuclear weapons system probably has a useful shelf life of 10-15 years without major overhaul. The top-stage wiring tunnel on the Minuteman model in the Space Missiles kit needs some attention. The tunnel dips across the sprue attachment point on both halves of the missile. A small segment of stretched sprue can be glued over this segment and trimmed to match the profile of the sections on the lower stages. |
In 1958, the notion of a solid-rocket missile with intercontinental range was in its development stages and the Minuteman did not make it into the Missile Arsenal kit. By 1969, the missile had become common and it was added to the Space Missiles kit.
Operational missiles were never all-white. "Gate guards"--display missiles--are often painted white. These dummy missiles would also be used for training purposes. In the kit, the quad-nozzles are nicely depicted.
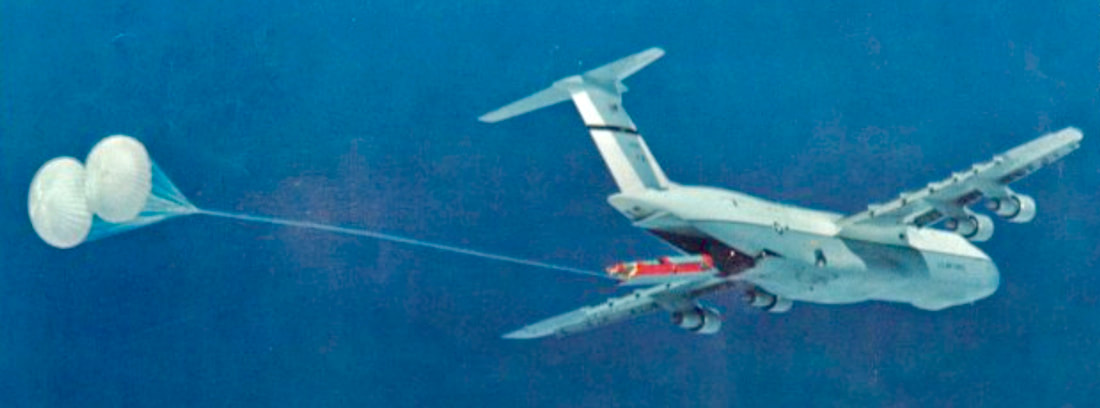
In 1974, a Minuteman I missile was successfully dropped from a C-5A and then air-launched. This proof-of-concept program, meant to influence arms reduction talks with the Soviets, was planned and executed in only 90 days.
SPARTAN
|
Spartan was planned as an anti-missile system intended to intercept incoming ICBM warheads through the midcourse phase that had already separated from their boosters. It was thought that a 5 megaton nuclear warhead would be sufficient to stop multiple warheads. However, as the numbers of Soviet missiles and warheads grew almost exponentially, it was considered that the system would be quickly overwhelmed by the numbers of incoming warheads and decoys expected in a theoretical full-force nuclear strike. Signal processing and detection technology improved dramatically by the 1980’s. In 1983, President Ronald Reagan announced the Strategic Defense Initiative, which was a multi-pronged anti-missile defense system. Spartan was considered obsolete even though a number of successful tests proved the concept’s viability for a limited strike.
The 3-piece model goes together easily. One half will have some gaps at the fin roots that will need filling with your favorite putty, epoxy, or seam filler. |
The Spartan missile model was added to Monogram's Space Missiles set in 1969.
|
LACROSSE
|
Lacrosse was a short-range battlefield missile intended as a super-accurate piece of field artillery. It had a 12-mile range and was intended for visual targeting by an observer. It was truck-mounted and would have carried a conventional or tactical nuclear warhead. It was operational with the U.S. Army, but problems prevented production beyond 1200 missiles and its deployment was fairly brief.
The model comes with three parts that stack on top of each other. Trim the alignment pins to be sure each part is centered. 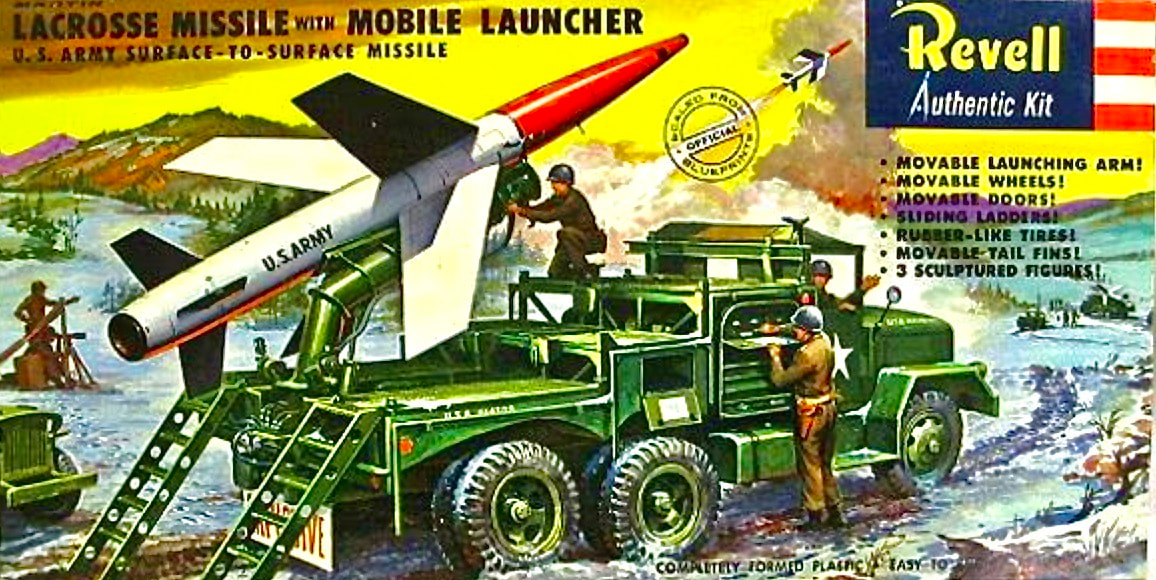
|
The Lacrosse Missile has been released by Revell in 1/40 and Renwal in 1/32. Both kits depict colorful test schemes. There's a chance that Atlantis has the tooling to one or both of these kits. Revell released the Renwal 1/32 version as recently as 2016.
|
SERGEANT

|
Sergeant was a solid-fueled artillery missile eventually deployed in Europe. It replaced the liquid-fueled Corporal missile, simplifying maintenance and setup procedures for crews. The Lance system was supposed to replace it but delays in that program left the Sergeant in use from the mid-1960’s through the late 1970’s.
Sergeant's booster was adapted for civil rocketry applications in the form of the Scout's second stage. Renamed Castor, a derivative of this motor was also used in the upper stages of the Jupiter-C rocket which orbited the USA's first satellite. The Sergeant model in the Space Missiles set has very nicely executed steering vanes! 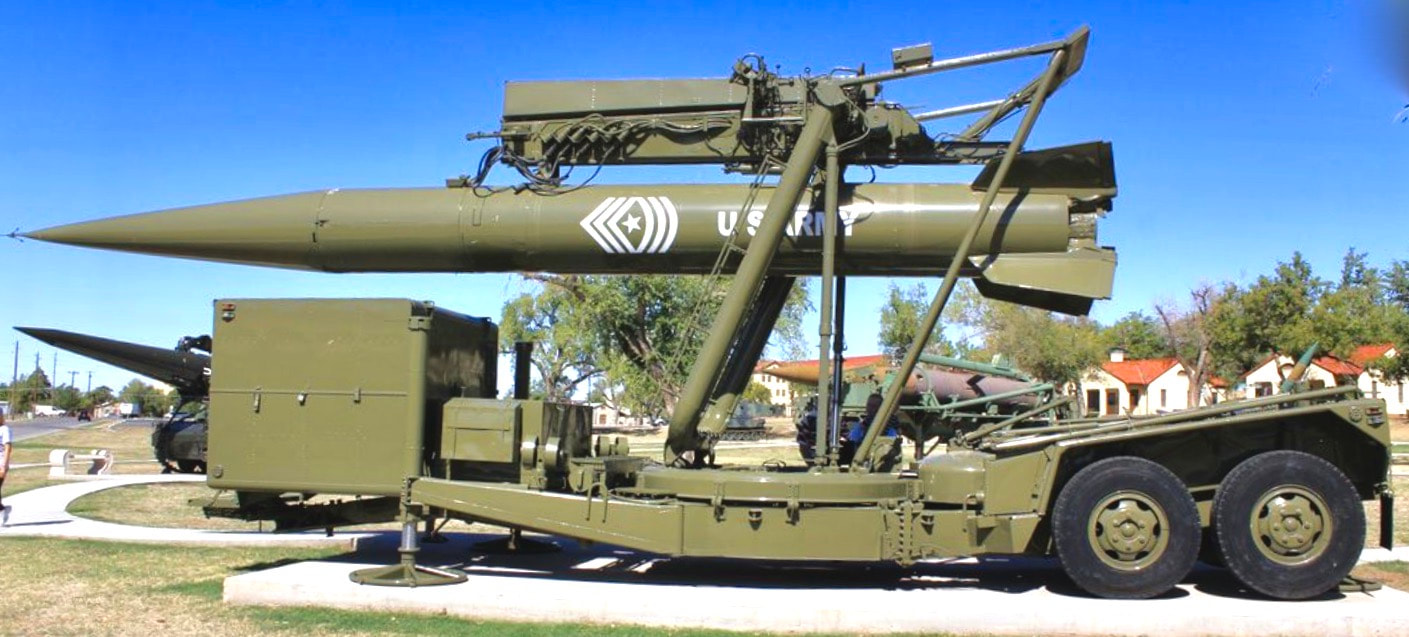
|
|
PERSHING
|
The solid-fueled Pershing replaced the Redstone as a frontline short-range nuclear ballistic deterrent. Developed in the early 1960’s, it flew at hypersonic speeds (Mach 8) and could be fitted with a nuclear warhead with up to 400kt yield ideal for destroying hardened targets. Greatly feared by the Soviet Union, a 1988 treaty scheduled elimination of the weapon. Pershing I and II missiles were finally decommissioned as the Soviet Union broke up in 1991.
The Pershing I is another model added to the Space Missiles set in 1969. It assembles in halves. Some gaps at fin roots might need filler. Pershing I missiles in a colorful development scheme. Early in their development, Pershings were fired from a testing area just off I-70 near Green River, Utah all the way to White Sands in New Mexico. |

|
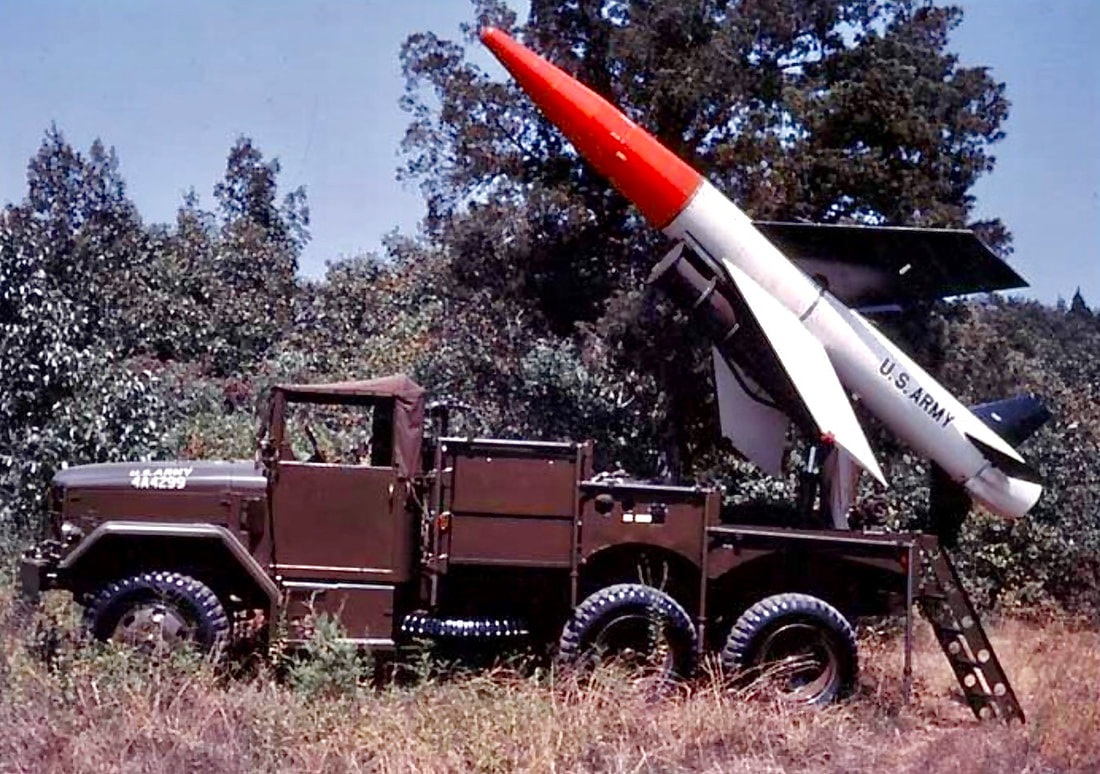
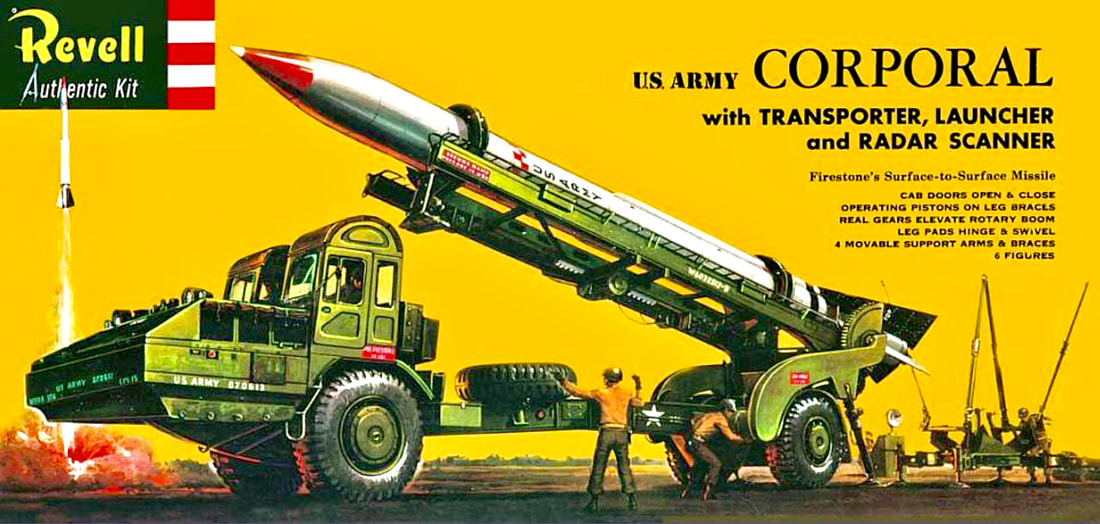
CORPORAL
|
The Corporal was the first nuclear missile with a guidance system. This consisted of an onboard inertial platform combined with external radar guidance using a WWII-vintage type. This was innovative Postwar but vulnerable to emerging countermeasures and jamming technologies. Crews had to contend with some rather nasty liquid chemicals to fuel the missile and a relatively lengthy setup time was a concern. Corporal was deployed between 1954 and 1964; the superior Sergeant system replaced it.
|
|
Corporal had a number of limitations but lessons learned were important stepping stones to improved missile systems that followed.
The forward section of the Corporal model has “scallops” depicted as flat facets. Line up the seams to keep the cross section correct. The nose cone has a bulbous appearance; consider sanding it straight to match the lower section.
The forward section of the Corporal model has “scallops” depicted as flat facets. Line up the seams to keep the cross section correct. The nose cone has a bulbous appearance; consider sanding it straight to match the lower section.
LANCE
|
The Lance missile replaced the Sergeant. Interestingly, it went back to liquid-fueled technology. However, the hypergolic propellent and oxidizer chosen remained temperature-stable in the Northern European climate where the Lance was deployed. Range was same as the Corporal at 75 miles. Capable of carrying different warhead types including nuclear up to 100 kt, Lance was quickly deployable, accurate, and immune to jamming. It was in service from 1972-1992.
The Lance missile was new in the 1969 Space Missiles release of Monogram’s original Missile Arsenal. |

|
HONEST JOHN
Honest John – The Honest John was an unguided tactical ballistic missile designed to carry a nuclear, conventional, or chemical warhead. Guidance was simply aerodynamic fins and spin-motors and it was the first U.S. surface-to-surface rocket to carry a nuclear warhead. It was a favorite of model rocketeers having been made into kits by a number of manufacturers.
The Honest John is one of the smaller models in the set to be in halves. Line them up carefully and be careful when trimming around the spin-motors. We believe the Honest John in the Monogram Space Missiles set is much more accurate than the twice-as-big Revell version. the shape of the bulbous nose and in particular the spin motors were executed better in the Monogram kit.
The Honest John is one of the smaller models in the set to be in halves. Line them up carefully and be careful when trimming around the spin-motors. We believe the Honest John in the Monogram Space Missiles set is much more accurate than the twice-as-big Revell version. the shape of the bulbous nose and in particular the spin motors were executed better in the Monogram kit.
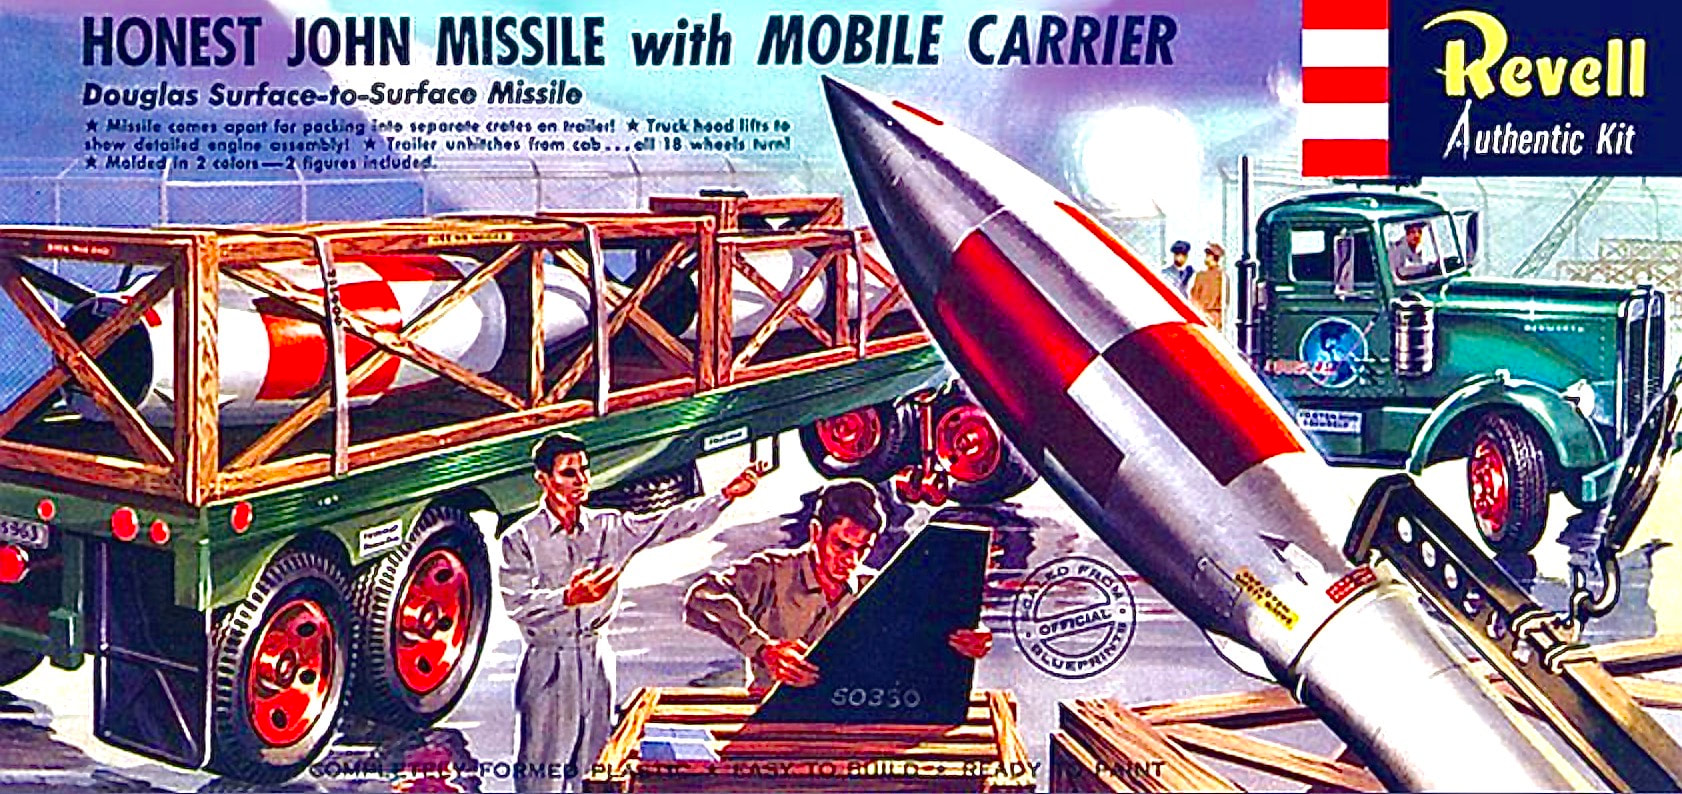
The "Mobile Carrier" in Revell's 1/54 Honest John kit was simply a flatbed truck with a crated missile on the back. Adams' 1/40 kit with the missile on its launcher truck was much more exciting.
|
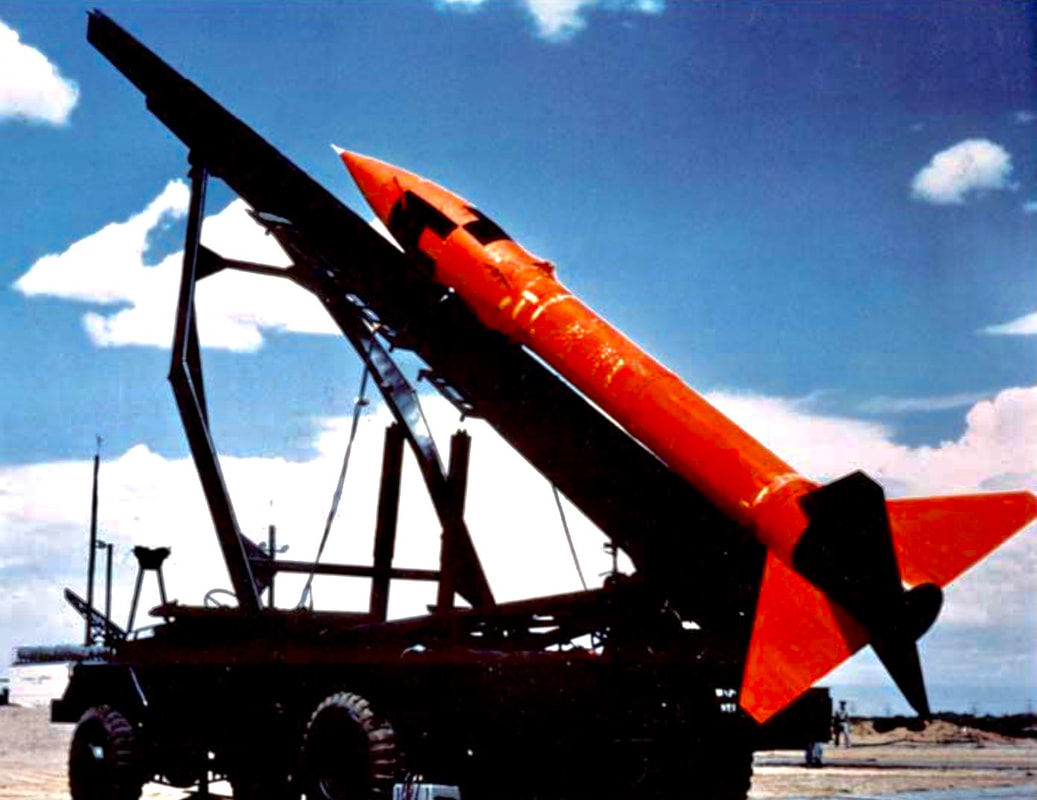
An Honest John on its actual transporter-launcher. The missile was aimed by pointing the truck towards the target and raising the launch rail to the correct angle. Period.
|
LITTLE JOHN
The Little John was pretty much a smaller version of the Honest John. Like the Honest John, it was unguided , spin-stabilized, and would be launched using standard procedures for aiming artillery. This means calculating angle and azimuth with a compass and maps as reference. Factor a wind correction and coordinate all this via radio with a forward observer to aim the missile. A lack of an electronic guidance system reduced costs and greatly enhanced reliability of the system. Range of the Little John was only about ten miles. You would not want to be launching into the wind if you were delivering a nuclear warhead.

DART and Little John were released by Revell in this 1/40 pair in 1957. This is another kit we hope Atlantis can release some time!
|
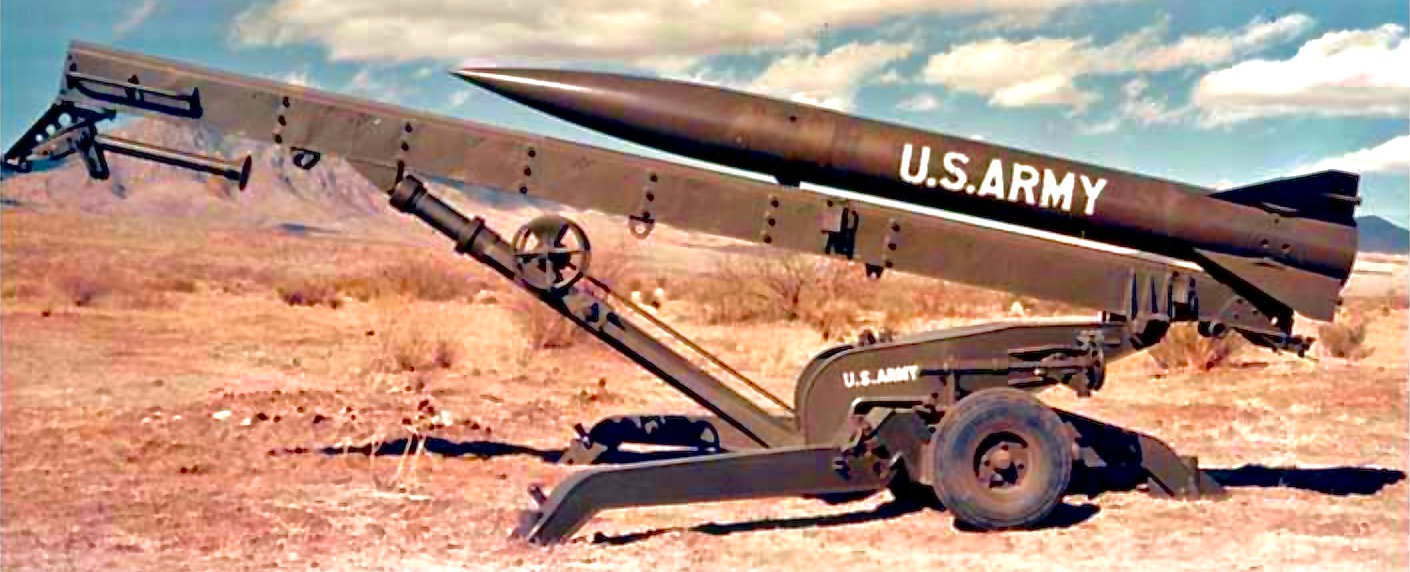
Early Little Johns had large, triangular fins. Even though this unit is depicted in Army camouflage, it was likely a development or training article.
|
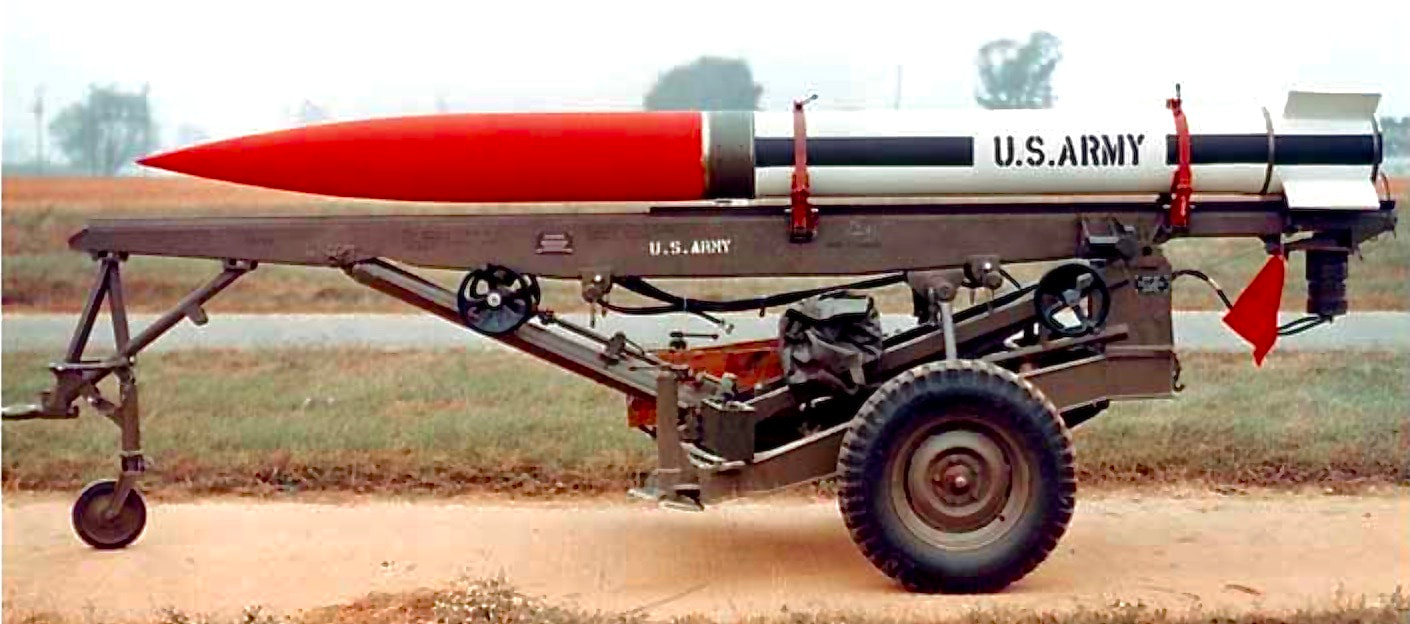
Operational Little John with a test scheme. The fins were needed only during the brief period post-launch before the spin-motors provided stabilization. Shrinking them lengthened the range.
|
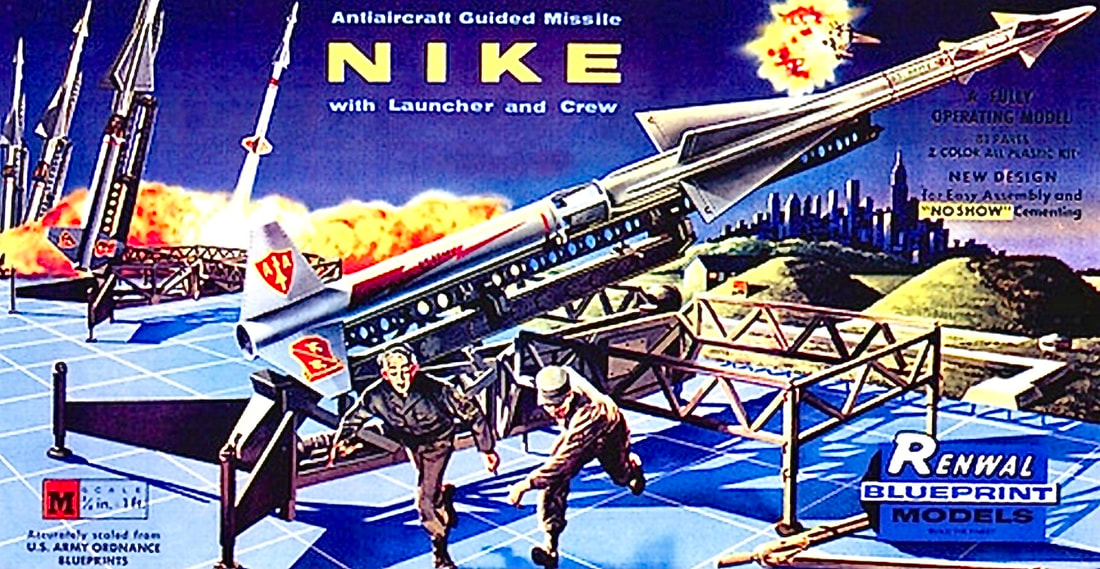
NIKE-HERCULES
The Nike-Hercules was a surface-to-air defensive missile designed to protect cities and military installations from aircraft or missile attacks. Targeting technology did not allow pinpoint accuracy and use of a nuclear warhead compensated for this, although a conventional warhead could be deployed as the targeting accuracy improved. Eventually, 25,000 Nike-Hercules missiles were made and deployed worldwide. The system was replaced by the much smaller Patriot missile by the late 1980’s.
The lower fin section has a “break” across center of the part created by a mold parting line – be sure the bevel in the center of each fin is in the same location as you clean up the part.
|
|
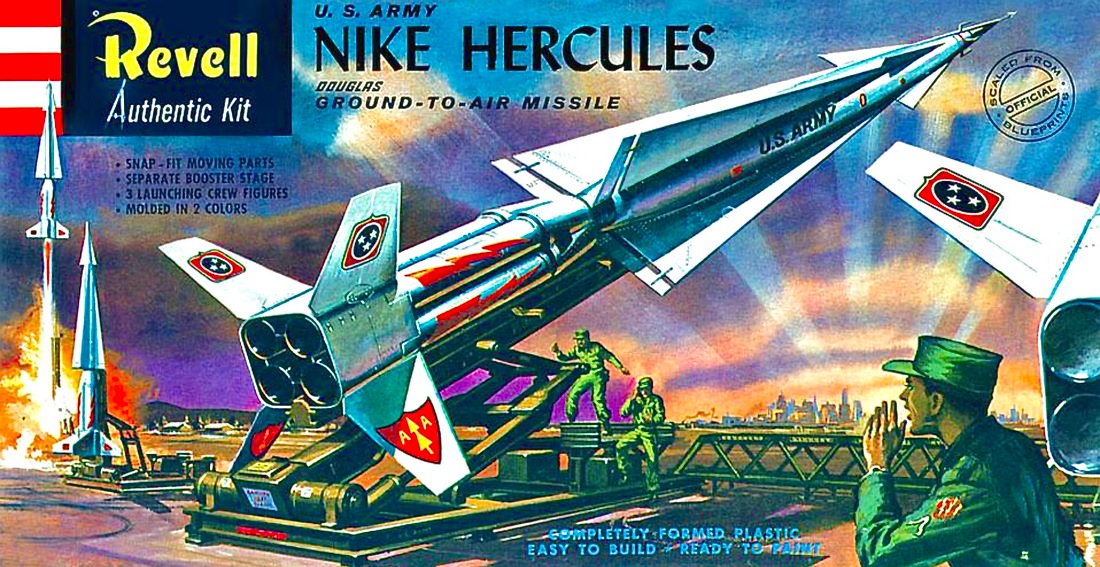
Revell released a Nike Hercules model kit in 1957. Atlantis Models has recently brought it back after restoring some lost parts via retro-tooling.
|
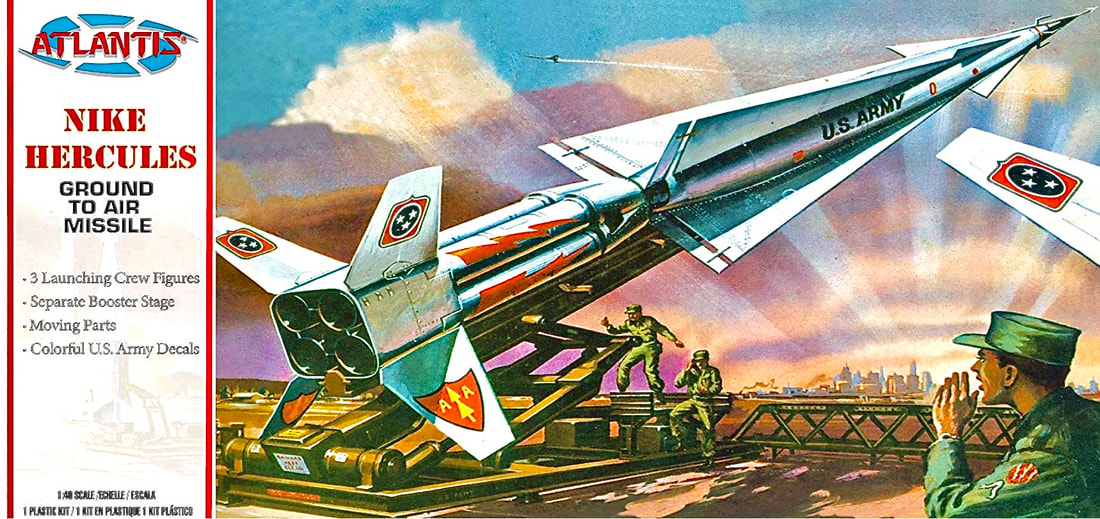
Atlantis retains the original box art in a "suitable for framing" format with their Nike Hercules kit, re-released in 2021.
|
HAWK
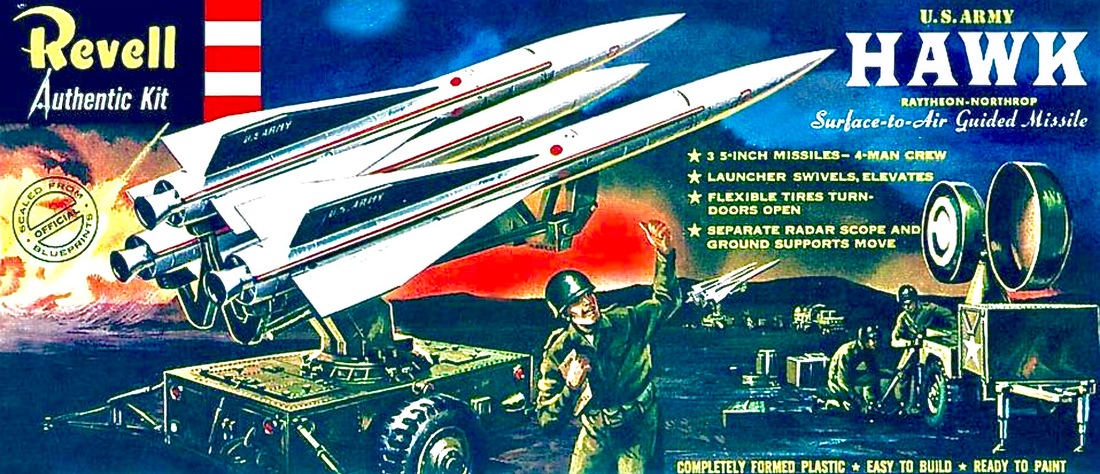
Both Renwal and Revell released competing kits of the Hawk missile system in the late 1950's. Revell's is 1/40-scale, matching many of the other missile kits they did.
|
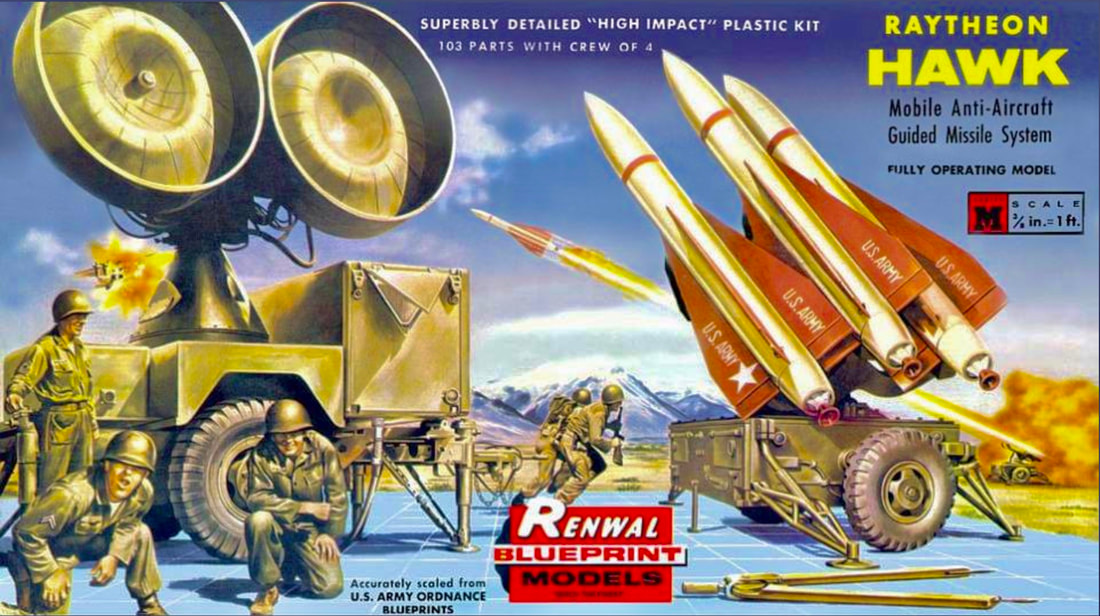
Many of Renwal's missile and tank kits were 1/32-scale. This kit was re-released in recent years by Revell.
|
The Hawk Surface-to-Air missile was similar to the Nike-Hercules except it was smaller and much easier to transport. It was more of a front-line tactical weapon intended to intercept close-in targets. The US Army used the Hawk system until 1994 as the Patriot Missile was manufactured in the numbers to replace it. US Marine detachments deployed them into the early 2000’s. The Hawk is still in use in other countries having scored a number of successful intercepts. 40,000 missiles were manufactured.
NIKE-AJAX
Renwal released a 1/32 Nike-Ajax kit in 1955. Note that it was simply known as the Nike during this vintage release prior to the advent of the newer Nike-Hercules. Revell released the same plastic in 1983 in its History Makers series and again in 2013.
|
The Nike Ajax was the world’s first operational surface-to-air missile system intended to intercept Soviet bombers and was deployed starting in 1954. Originally referred to simply as Nike, it received the hyphenated designation once the much more capable Nike-Hercules was available. Designed to intercept subsonic targets, the Nike-Ajax quickly became obsolete as ICBM and supersonic bomber threats came along. The basic Nike booster was well-designed and many civilian sounding and research rockets were based around it.
|
REDSTONE
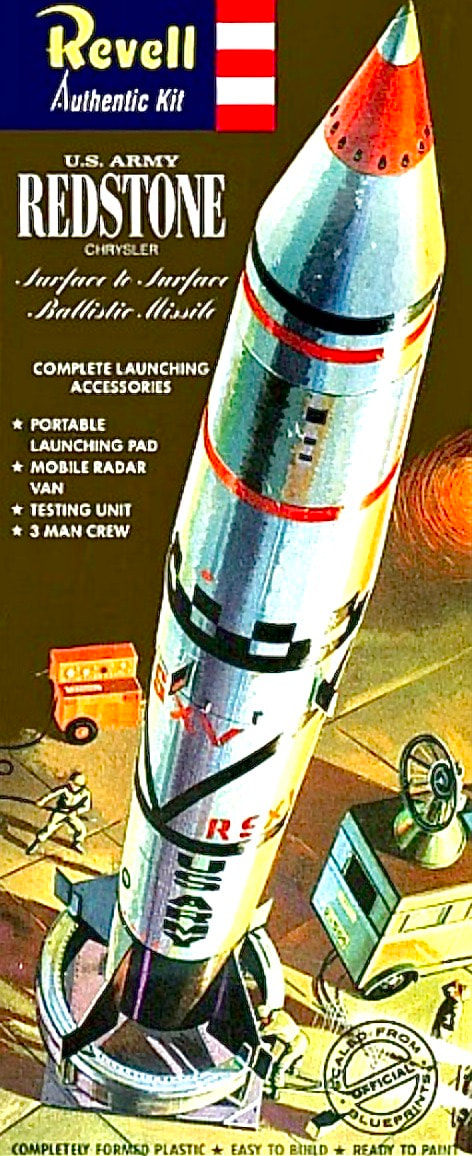
Revell released its own kit of the Redstone missile in 1/110-scale.
|
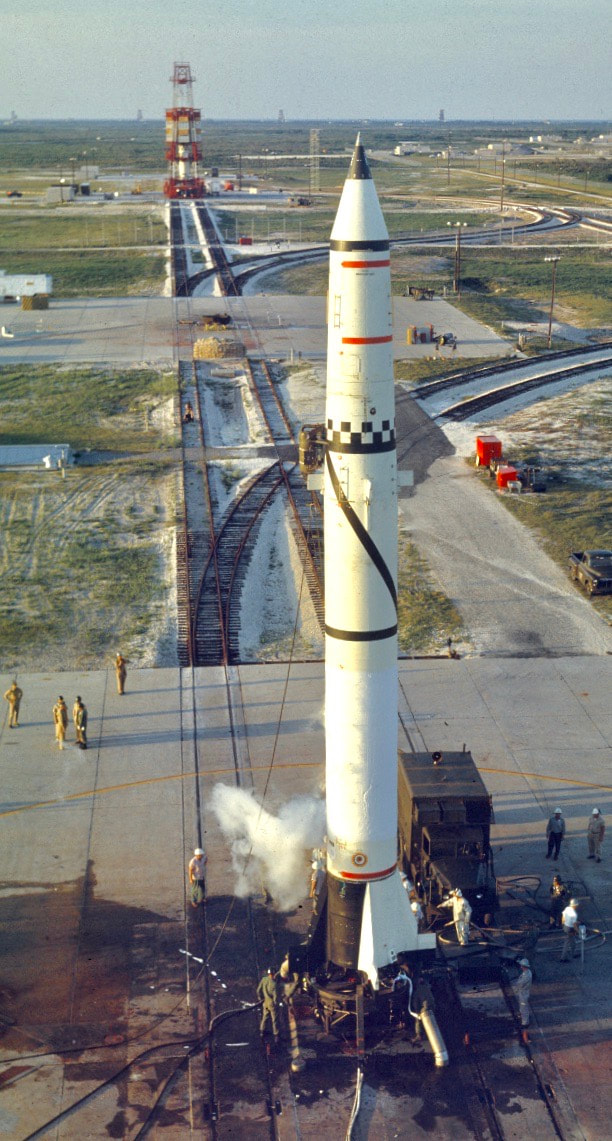
A test-Redstone being prepared for flight at Cape Canaveral in 1958. Battlefield versions were olive drab-green.
|
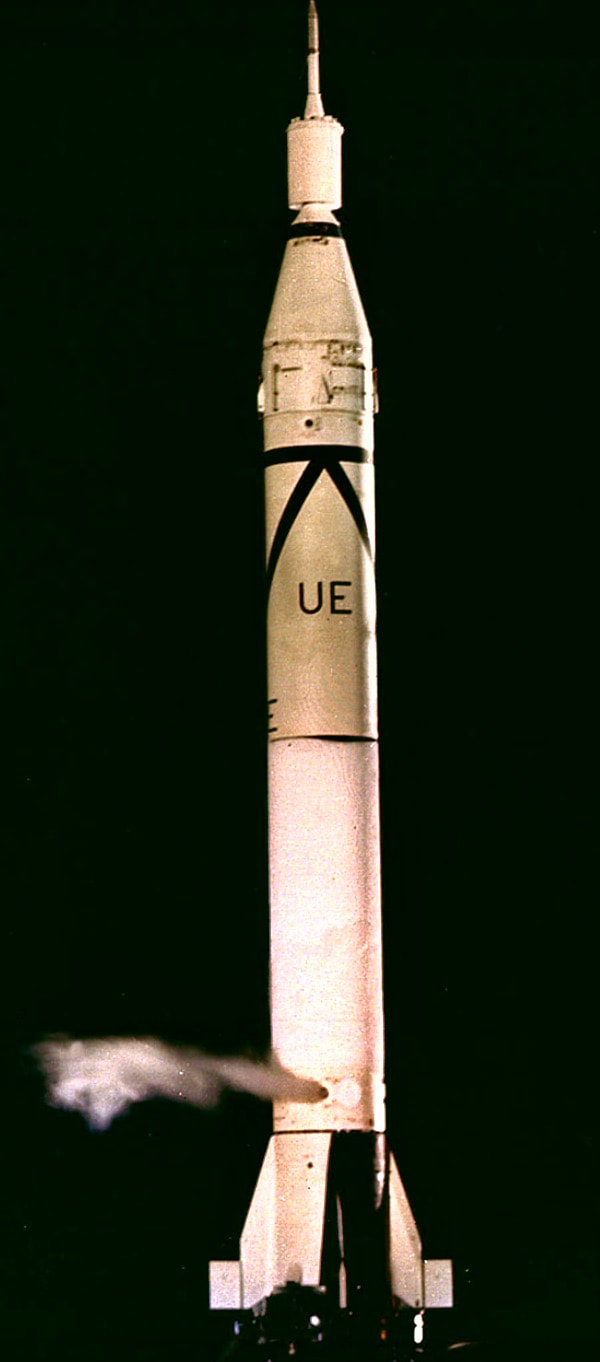
The Redstone was the basis for the Jupiter-C, which launched America's first satellite.
|
The Redstone initiated NASA's manned space program in 1961.
|
Redstone is a direct descendent of the original V2 rocket having been developed by Werner Von Braun’s team of German engineers that was relocated to the United States after WWII. It was the first large American ballistic missile. Its range was limited to just over 200 miles, but it could deploy a 3.75 megaton W39 warhead. It was replaced by the Pershing missile in 1964. Rapid advances in missile technology quickly obsoleted the Redstone as a battlefield weapon but it played a significant role in early NASA use. Redstone was the first U.S. rocket to carry an astronaut as part of Project Mercury and in its Jupiter incarnation successfully orbited the USA’s first satellite in 1958. The Redstone was a true "Space Missile."
Align the missile halves before gluing to keep the model “round”. You might want to trim off the locator pins. Trim the interior locating groove and mount disc for the warhead and nose section so that fit of these parts is concentric.
Align the missile halves before gluing to keep the model “round”. You might want to trim off the locator pins. Trim the interior locating groove and mount disc for the warhead and nose section so that fit of these parts is concentric.
TARTAR

Tartar didn't have a model kit made since the missile was the top stage of the Terrier.
|
Tartar was the third of the “3 T’s,” a nickname for the US Navy’s trio of SAM’s designed in the 1950's. The Talos and Terrier, also included in the Space Missile set are the other two. Talos and Terrier were too large to be deployed on smaller ships such as destroyers whose role was to engage targets at close range. Tartar was simply the top stage of the Terrier missile. The Standard Missile replaced the “3 T” missiles from the 1980’s.
The Tartar model in the Space Missiles set has minor mold sep lines and a small ejector pin mark on fin. |
ASROC
An ASROC launch.
|
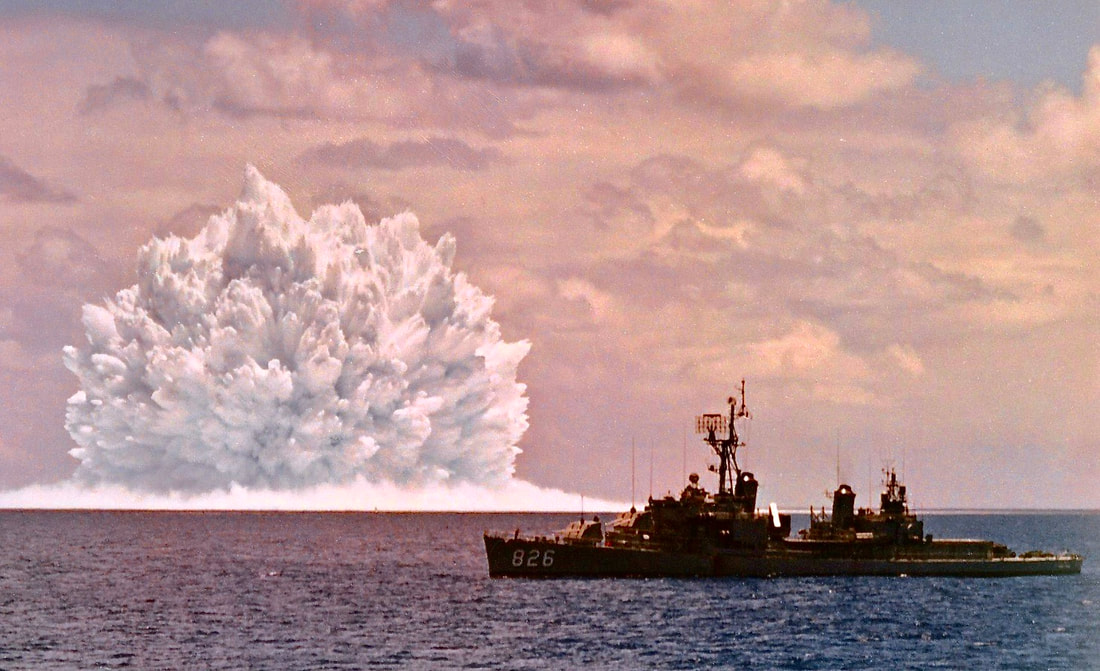
Shot Swordfish, a nuclear depth charge test deployed from an ASROC as part of Operation Dominic.
|
ASROC was an antisubmarine rocket deployed on surface ships. A block of 8 storage/launching cannisters had roughly the same proportions as a matchbox and this became the nickname for the launcher unit. A few early test versions had nuclear warheads but after targeting upgrades, a conventional warhead was sufficient. The RUR-5 ASROC served into the 1990’s and was replaced by the RUM-139 version which is currently in use.
|
ASROC was a maturing version of the old RAT missile and was newly added to the 1969 Space Missiles set.
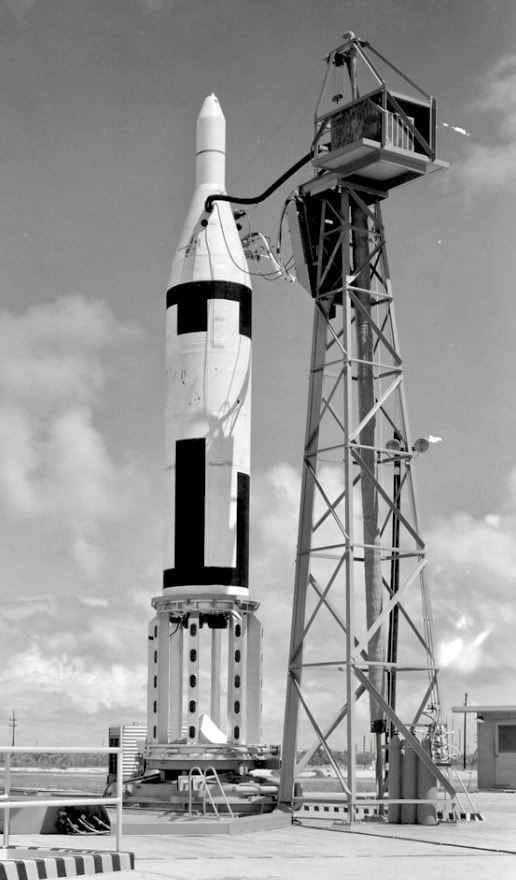
ATLAS
The Convair Atlas was the first operational intercontinental ballistic missile. It had a number of innovations including an airframe kept rigid solely by internal pressurization. Instead of a skin stretched over a rigid frame as was standard for aircraft design, the weight of the missile was supported by a very thin skin pressurized to 5 psi like a balloon or blimp. Development of the Atlas was difficult with many launch failures. In spite of the innovations, the missile required a lengthy and complex launch preparation procedure and newer missiles like the Minuteman and Titan made the Atlas obsolete once it reached a state of reliability.
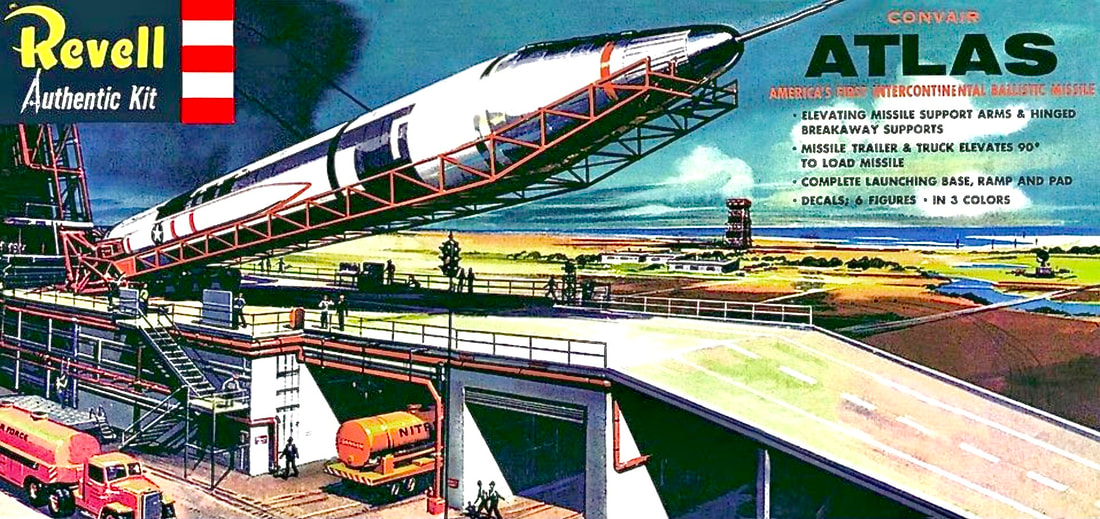
Revell released an Atlas missile and launchpad in 1/110-scale. Atlantis Models has re-released a later version that includes a Mercury capsule.
|
An early Atlas being prepared for a test-launch.
|
The Atlas gained a second life as an important NASA booster. While the Redstone rocket could only launch a Mercury capsule a short 250 miles or so downrange, the Atlas had just enough power to put the Mercury spacecraft into orbit. Astronaut John Glenn became a household name during his 1962 flight which began on board an Atlas. His Mercury spacecraft completed three orbits around the Earth. This first orbital space mission for the United States had considerable risks and Glenn was considered a national hero upon his safe return.
Project Mercury concluded in 1963 with four manned orbital flights on the Atlas and in 1965, it was retired as an ICBM. Development continued however, with the Atlas evolving as an effective and reliable satellite launcher. Modern versions of the Atlas fly to this day.
Project Mercury concluded in 1963 with four manned orbital flights on the Atlas and in 1965, it was retired as an ICBM. Development continued however, with the Atlas evolving as an effective and reliable satellite launcher. Modern versions of the Atlas fly to this day.
An Atlas-A which resembles the model in the Space Missiles kit.
|
Note how shiny the booster is here. This picture was taken prior to loading fuel. If an empty Atlas wasn't pressurized with 5 psi of nitrogen gas, it would collapse!
|
With liquid oxygen aboard, moisture in the air condenses on the rocket's surface and freezes into a white layer of ice as seen in this Mercury-Atlas launch.
|
The Atlas in your Space Missiles kit has only two parts! During assembly, be mindful of the alignment pins. You might want to cut them off to be sure the missile is circular after being glued. Speaking of glue, be careful not to get any on the corrugations. Remember, the Atlas was made from a very shiny 300-series stainless steel. A bright silver finish is appropriate for your Atlas.
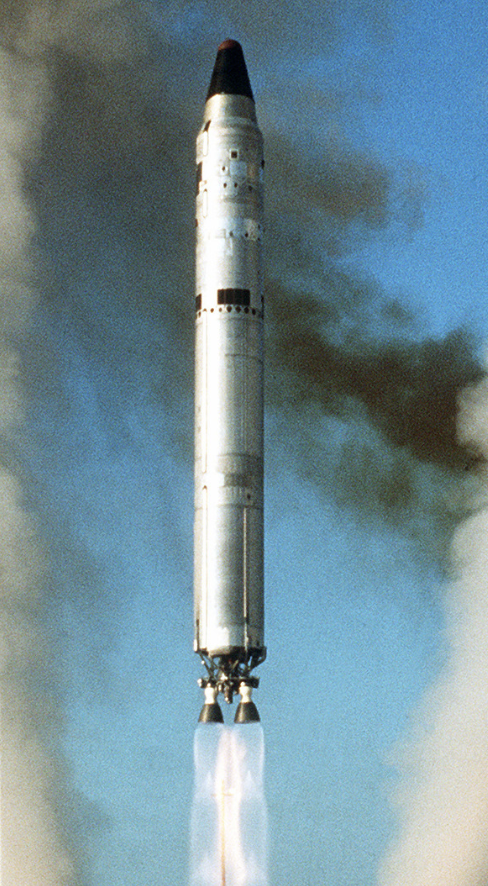
TITAN II
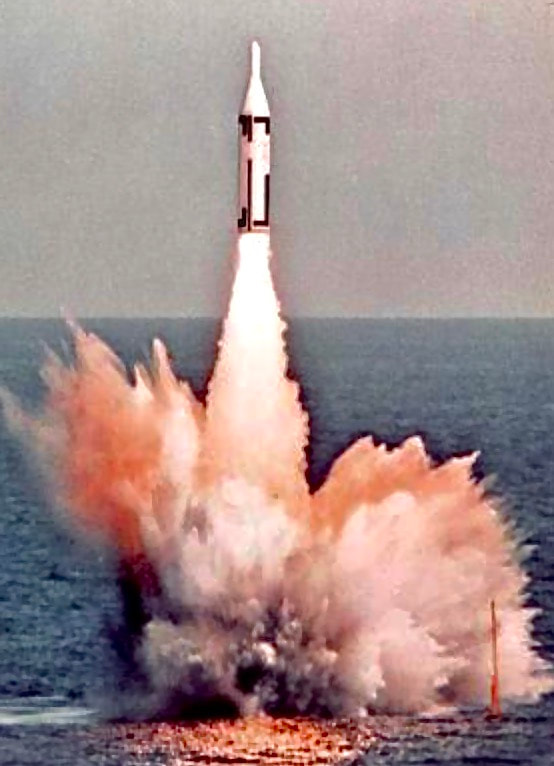
The Titan program began as a backup for the Atlas missile. Developmental challenges facing the Atlas program motivated the US Air Force to create a competing contract for the Titan I as insurance against delays in deploying an operational ICBM. Unlike Atlas, Titan rockets utilized conventional aircraft-style construction with an aluminum skin riveted to a frame with reinforcement stringers. The Titan I was quickly retired once the much improved Titan II became available. The Titan II was much easier to prep for launch than the Atlas since its liquid propellants could be stored inside the missile and its silo system offered far superior protection. Even though the Titan program was intended only as a backup to the Atlas, the Titan II quickly replaced the Atlas missile and was deployed from 1962 to 1987.
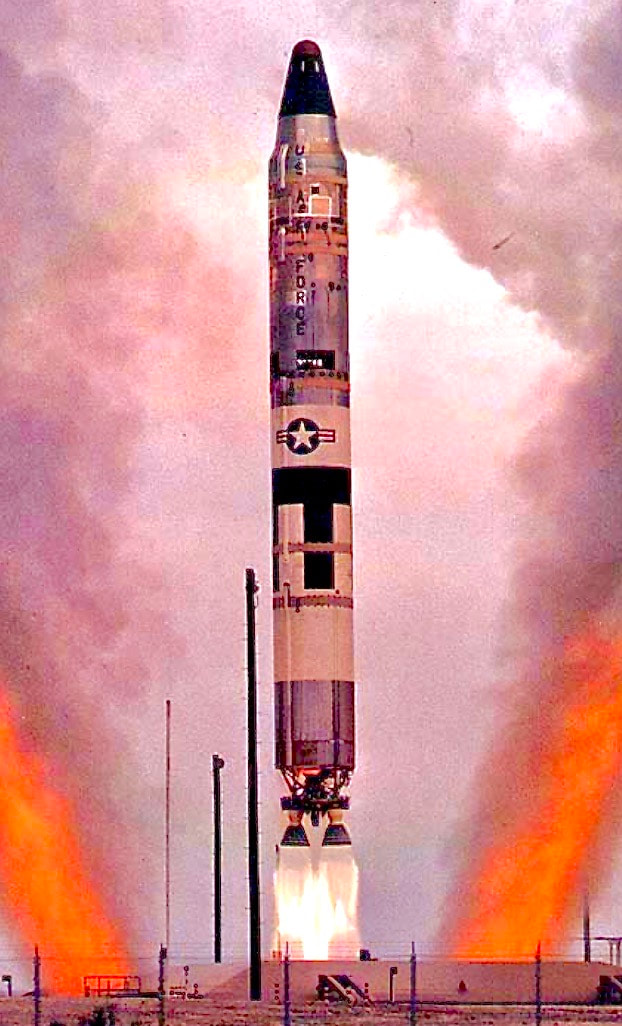
A Titan II test flight. I believe the operational Titan II's had a plain aluminum scheme like this.
|
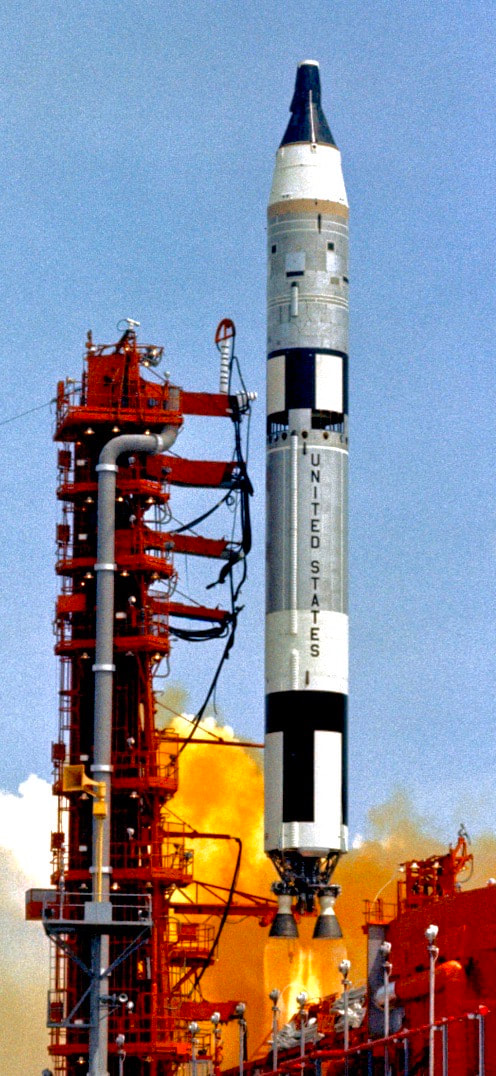
This Titan II has a roll pattern which would be helpful in analyzing tracking photos and film after a test-launch.
|
Titan II's used in the Gemini program had roll patterns on first and second stages.
|
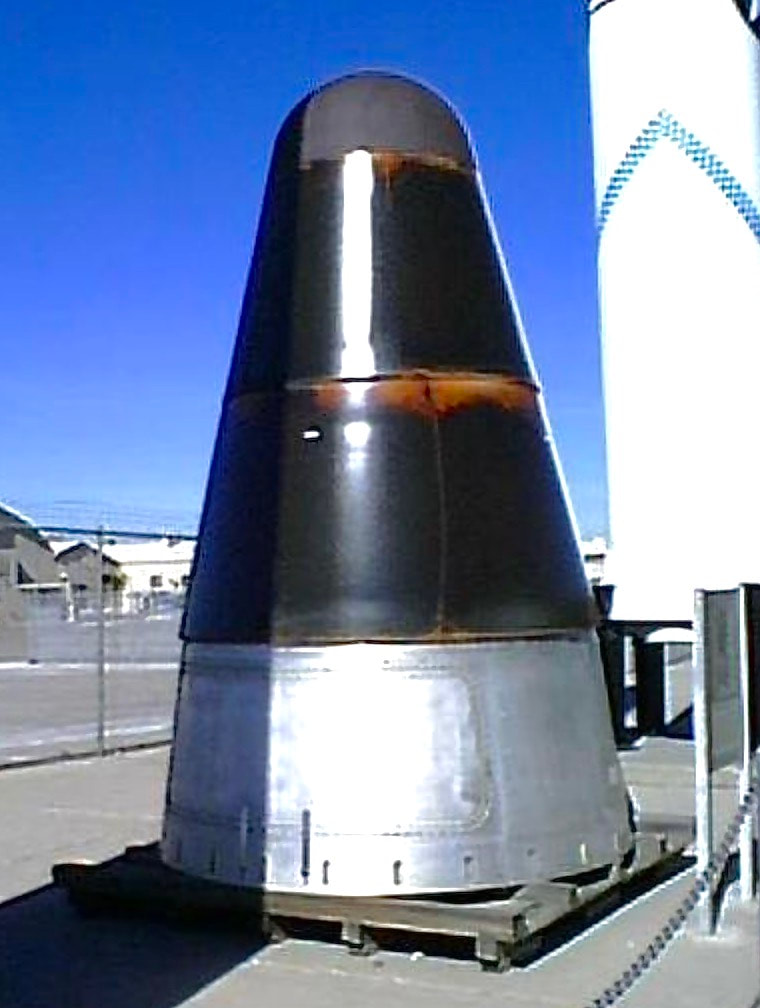
A closeup shot of the warhead reentry shroud shows the ablative cap and cone. This museum piece has been outside for decades.
|
In addition to use as an ICBM, the Titan II played a significant role for NASA. Project Gemini was necessary to develop techniques needed to land men on the moon. The Titan II was fully capable of orbiting the 2-man Gemini spacecraft with 12 successful launches during 1964-6. Additional enhanced versions of the Titan flew many satellites and space probes including the Viking Mars missions. The U.S. Air Force used Titan boosters to launch a number of large reconnaissance satellites that played an important role in monitoring Soviet military activity during the Cold War.
I built my first Space Missiles kit prior to seeing an actual Titan II missile and followed kit instructions for painting. Since then, I've noted a few differences between what the old Monogram instructions recommended and the actual colors for the warhead reentry shroud.
I worked on the Titan IV program and spent some time at Martin Marietta in Denver, CO converting de-militarized Titan II missiles into civilian space launchers. There was actually quite a bit of engineering work involved! Believe it or not, putting a satellite into orbit is quite a bit different from sending a warhead on a parabolic trajectory to a target point.
Like the Atlas, the Titan II has only two parts in spite of being the largest rocket in the model kit. Assembly is the same; you might want to cut off the alignment pins to keep everything in-the-round. Titan rockets are a rather dull aluminum color. The nose cap of the operational Titan missiles was a brownish-red. I believe these ceramic-impregnated resin caps changed color over time, getting darker as they aged. The conical warhead heat shield was made from a polyamide resin plastic that had a very high melting point. It's a translucent dark brown color, almost black, and fairly glossy. A gloss or semi-gloss sheen for your paint will be accurate here. I've seen a number of these nose cones that have been in the elements for decades (mostly as museum displays) and the plastic still has a nice shine. I've used this same plastic in several laboratory applications and it is amazing stuff. It's practically impervious to high heat and strong acids.
The Titan II could be enhanced by the ambitious modeler with extra detailing done to the engines. Bits of wire and styrene could be added to depict the open rats-nest appearance of the plumbing on those Aerojet engines. The Titan was a new addition to the 1969 release of the Space Missiles kit. Of course in 1969, we were used to the huge Saturn V so maybe we didn't consider it a big rocket in those days but the Titan towers over the Atlas in the Space Missiles kit.
POLARIS
The US Navy originally planned to use the Jupiter missile as a submarine-launched ballistic missile. However, the Jupiter was really too large to be deployed practically in a submarine. The need to store and handle hazardous liquid missile fuel would have immensely complicated submarine operations. Along with shipboard nuclear propulsion, the large solid rocket booster was an additional innovation that really created the modern ballistic missile submarine.
|
A specially shaped hollow core that ran the length of the solid rocket motor and engineering propellant grain with specific burning properties that could be mixed with rubber-like binders really opened the door to development of the modern SLBM. Polaris was the first large U.S. Navy missile to incorporate this technology. A Polaris was first launched from the submerged USS George Washington in 1960 and the missile was deployed the following year. Polaris evolved through several improved versions and the Poseidon began to replace it in 1972.
Like many of the other missiles in the set in halves, do plenty of dry-fitting and trim if necessary to be sure the seams are flush and the missile has a nice round cross-section. |
Polaris had a number of test launches from Cape Canaveral.
|
Like modern SLBM's, the Polaris is blasted from its silo via compressed air. Above the ocean's surface, the first stage is ignited
|
POSEIDON
The Poseidon replaced Polaris SLBM'S with a number of improvements to accuracy and number of warheads that could be carried. “MIRV” means Multiple Independently Targetable Reentry Vehicles and the Poseidon warhead bus could accommodate up to 14 warheads, eventually. Each of these warheads could potentially be sent to their own target within a certain radius. This technology helped escalate the arms race and the tens of thousands of warheads produced during the Cold War on both sides was done in part to fill available slots in single land- and sea-based missiles that could each carry many warheads. However, it was common for dummy warheads to be included with the intention of overwhelming any potential defenses. Any good missile defense system must be able to take out a missile prior to the terminal phase of its flight where the warhead bus deploys its MIRV's.
Poseidon was very new when the Space Missiles kit was released. It wasn't deployed until 1972, but it made it into the 1969 Space Missiles version of Monogram's kit.
Poseidon was very new when the Space Missiles kit was released. It wasn't deployed until 1972, but it made it into the 1969 Space Missiles version of Monogram's kit.
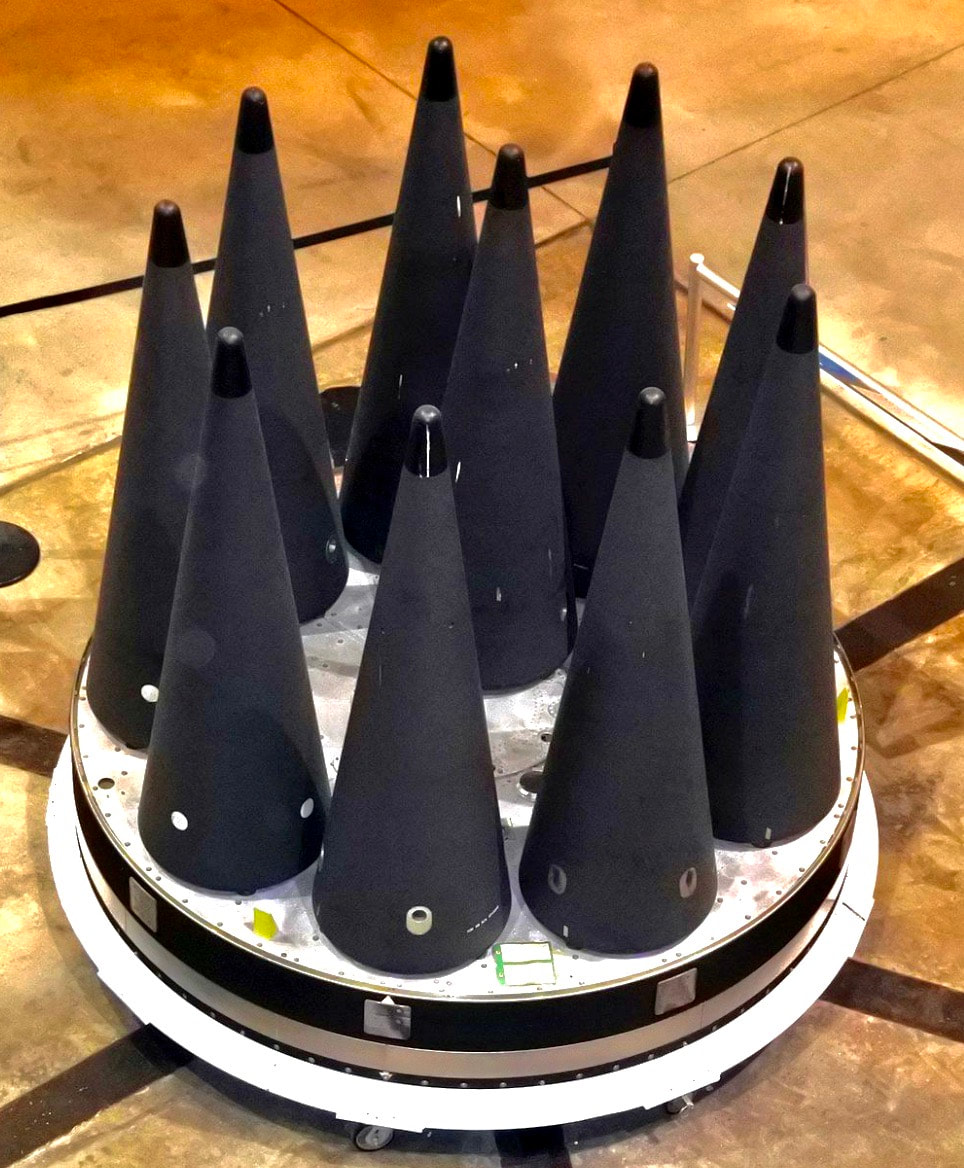
A MIRV bus platform for the Peacekeeper (MX) missile. Poseidon's would have been similar.
|
A Poseidon missile on display at the Smithsonian Museum. Note that the body of the missile is resin-impregnated wound carbon fiber. This material is stronger and lighter than aluminum or steel which increases range and payload of the missile. Improvements in targeting technology gave the Poseidon better accuracy than the Polaris. A smaller-yield warhead could be expected to destroy a given target with the same probability as the Polaris.
|
The small square on the warhead shroud indicates that this is a test-shot. The markings would help with film and photo analysis.
|
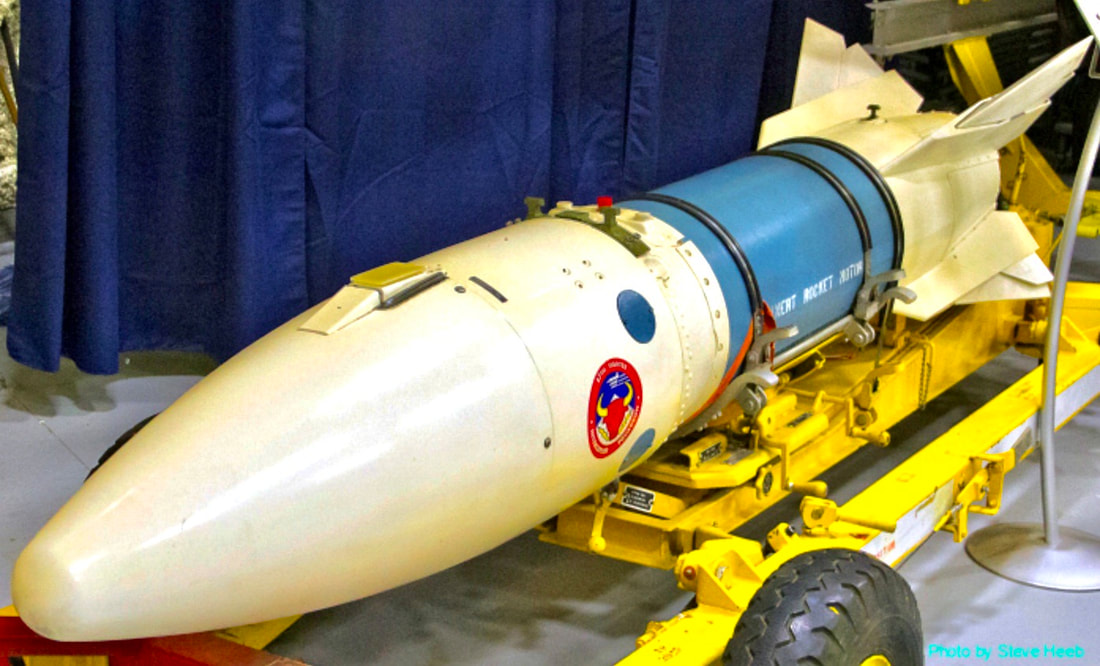
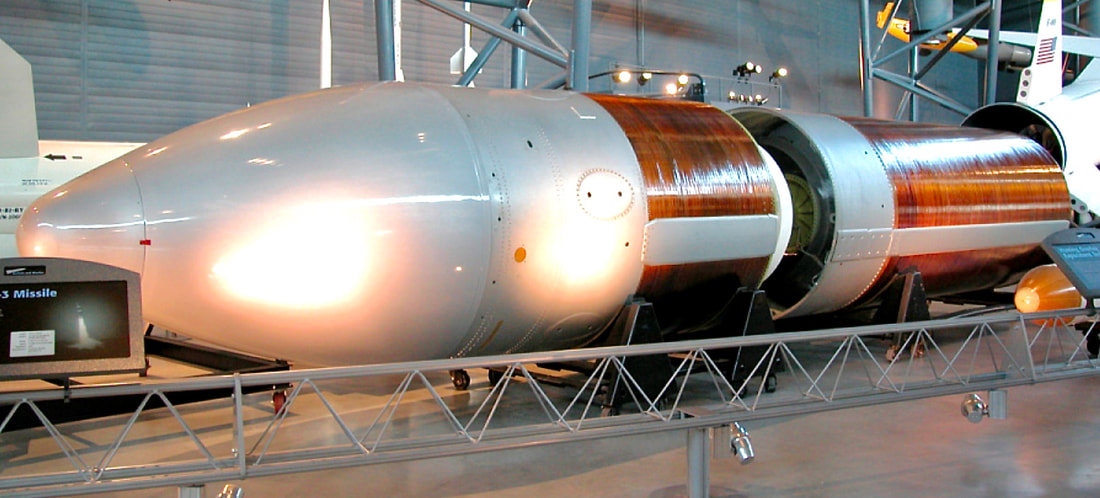
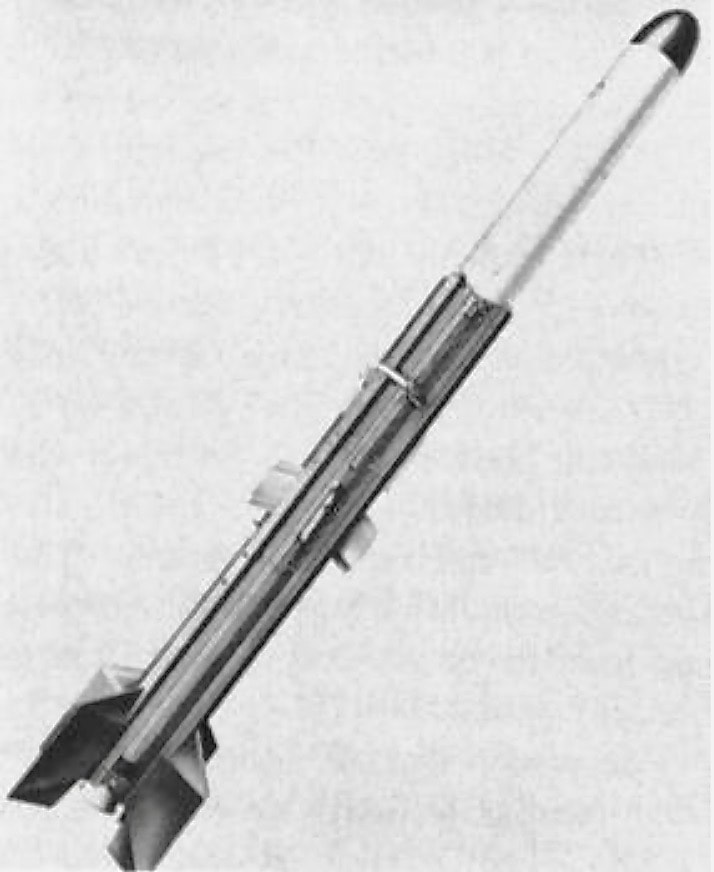
SUBROC
A SUBROC in the Smithsonian Air And Space collection.
|
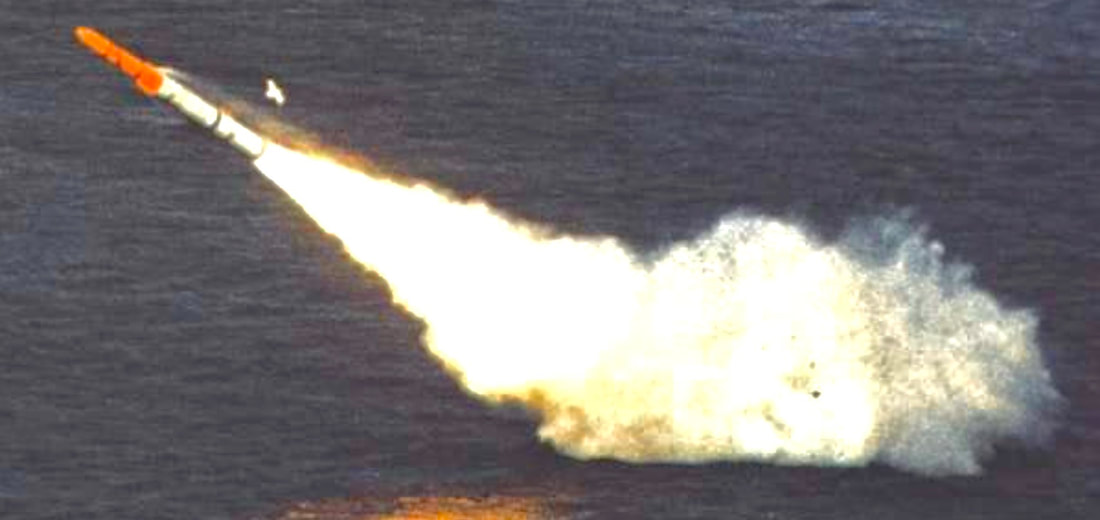
The SUBROC in this test-launch photo has an orange warhead section.
|
SUBROC was a long-range antisubmarine weapon designed to be fired from a standard 21-inch horizontal torpedo tube on an attack submarine. The missile would be ejected from the tube conventionally using compressed air. Unlike an SLBM, SUBROC’s solid motor would be ignited upon launch while in a horizontal orientation and still under water. The missile would rise to the ocean’s surface and fly towards the target at a range further than any underwater torpedo had at the time.
Its warhead was a 250 kt nuclear depth bomb that would only need to be targeted for the vicinity of an enemy submarine. SUBROC was intended as a last resort weapon anticipating that an enemy submarine was closing on a position to fire its ballistic missiles. It never had a conventional warhead and was retired at the end of the Cold War.
SUBROC is another newer missile that wasn't present in the 1958 Missile Arsenal set.
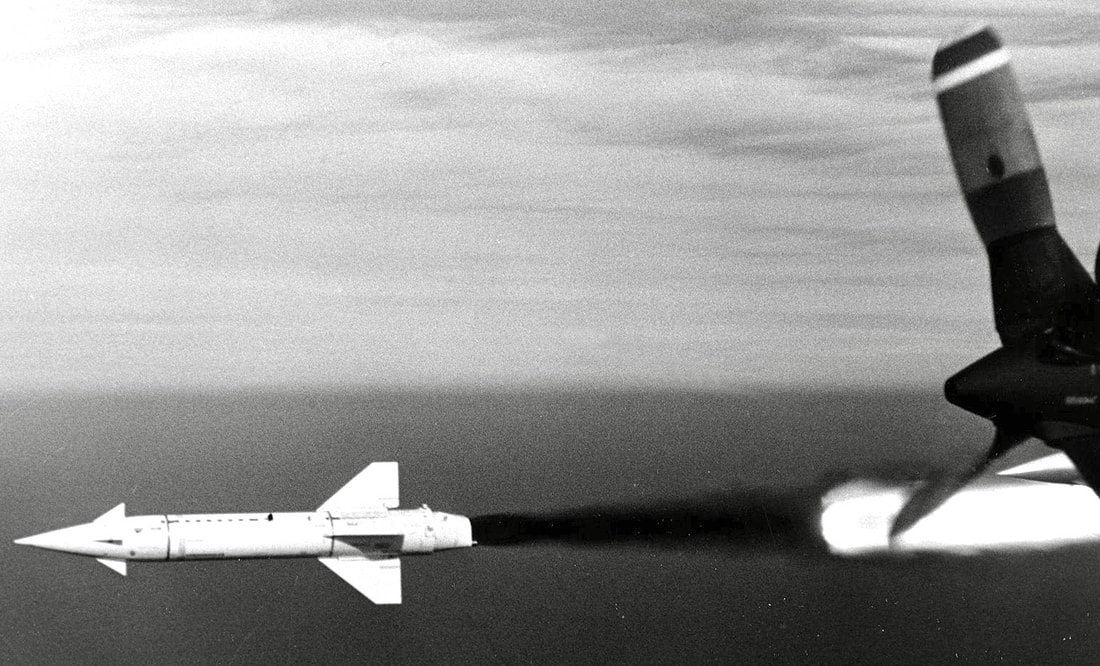
SIDEWINDER
The Sidewinder was originally a US Navy short-range air-to-air guided missile deployed in 1956. Development of the Sidewinder began by adding a crude guidance system to a 5” unguided Zuni rocket. In late 1952, the first live firing of a Sidewinder 1 occurred. Interception of an airborne drone occurred a year later. The US Air Force was impressed with the economical, effective Sidewinder and adopted it in 1964. The Sidewinder has been extensively upgraded, produced, sold, and even illegally copied worldwide. It is expected to be in service beyond 2050, quite likely a full century after it was first developed. At time-of-posting, the Sidewinder was in the news when an AIM-9X was used to shoot down a Chinese spy balloon over the Atlantic Ocean. The large balloon, which had the ability to maneuver like a blimp, crossed a swath of the USA directly through the Minuteman ICBM missile range including Malmstrom and Whiteman Air Force bases. The Chinese claimed it was an errant weather balloon.
1950's: A USN F9F-8 carries Sidewinder missiles on underwing pylons.
|
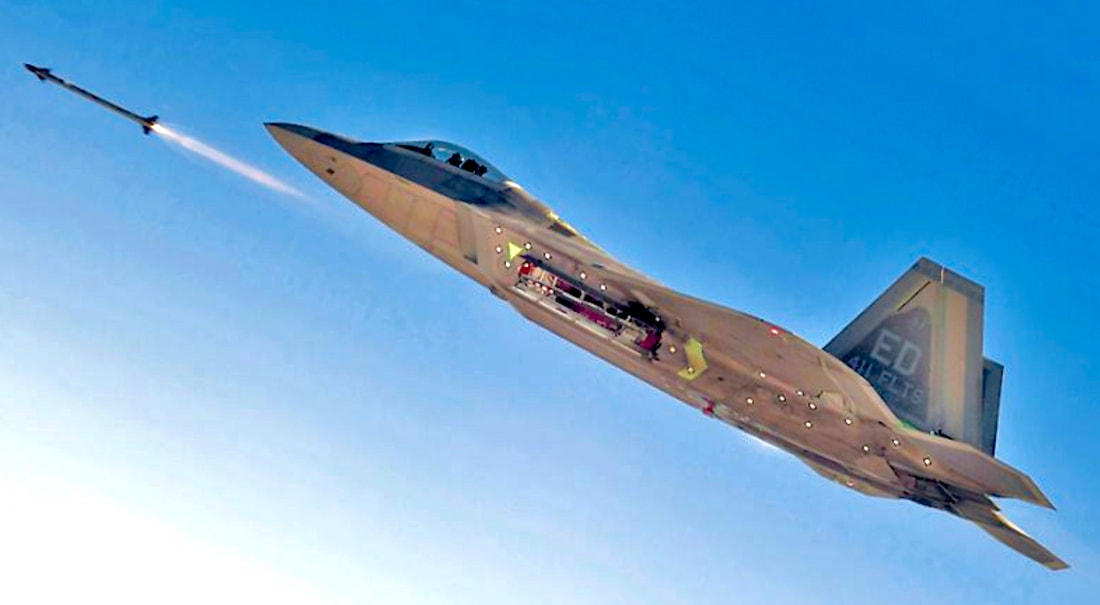
2020's: A USAF F-22A fires a Sidewinder missile from an internal bay.
|
In your Space Missiles kit, Sidewinder is one of the tiny, easy-to-lose models. Fins are petite and realistically thin. There is a minor mold seam line to clean up. Be careful; the Sidewinder is small and easy to lose! Put it in a small Ziploc bag with the Falcon and Dart as you build your Space Missiles set.
RAT
Like Petrel, ASROC and SUBROC, RAT was an anti-submarine rocket/torpedo.
|
RAT stood for Rocket-Assisted Torpedo. The US Navy began this program in the early 1950’s. By then, the range of underwater antisubmarine sensors exceeded the range of standard torpedoes. The RAT was basically a homing torpedo with a simple solid rocket booster on the back added as a range-extender. It was launched from a surface ship on a ballistic trajectory to the region inside the underwater range of the torpedo. After motor burnout, two parachutes lowered the torpedo into the water where it was intended to acquire the enemy submarine and intercept it using its homing mechanism. Unfortunately, the rocket couldn’t reliably put the torpedo within range of the target. RAT wasn’t operationally deployed but further development of the concept resulted in the ASROC.
We're intrigued as to why Monogram chose to put the rather obscure RAT in the set since it was pretty much an engineering test only for the later ASROC. It didn't even round out the original 31-piece set to a nice even number. Still, the RAT is nicely executed and its inclusion carves out a historic subset of ASW weapons in the Space Missiles kit. Like many of the others, there will be a minor mold seam to clean up a little. Be sure to preserve the fin-strips on the seam. |
MONOGRAM, ATLANTIS AND THE FAMOUS MODEL KIT SETS
|
|
Atlantis re-released the former Monogram Space Missiles kit in 2022.
|

In 2022, Atlantis released another set of models in a constant scale, the 1/1200 US Combat Task Force Fleet. Check out our comprehensive review for this awesome former Renwal kit.
|
|
Monogram released its United States Missile Arsenal in 1958. A year later, the Air Power set followed. It was a collection of 18 U.S. Air Force aircraft in use in 1959. All the models were rendered in a constant 1/240-scale and it was interesting to compare sizes of planes ranging from the big B-52 to the small F-94C. At a then-pricey $4, the Air Power set was not a big seller and it was never re-released in its entirety. The Missile Arsenal was updated and re-released in 1969 as the Space Missiles set and returned in 1983. Around that same time, Monogram newly tooled the USA/USSR Missile Set kit.
Fast forward to the 2020's. Atlantis Models had acquired the assets of Revell/Monogram when owner Hobbico imploded. They have re-released many dozens of vintage model kits. Today, the US Combat Task Force Fleet is the companion kit to the Space Missiles set and you'll enjoy having both of these models in your own collection.
Fast forward to the 2020's. Atlantis Models had acquired the assets of Revell/Monogram when owner Hobbico imploded. They have re-released many dozens of vintage model kits. Today, the US Combat Task Force Fleet is the companion kit to the Space Missiles set and you'll enjoy having both of these models in your own collection.
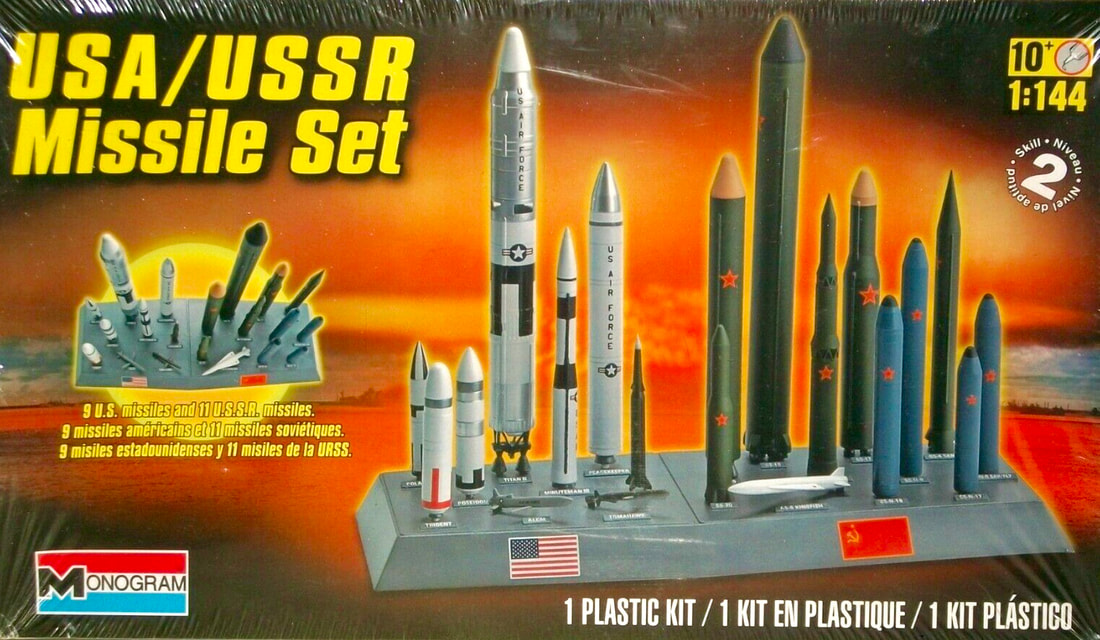
Revell-Monogram re-released its USA/USSR Missile Set in 2013. The original Monogram kit was released in the early 1980's. This kit was done in 1/144-scale. It's "pretty close" to the Space Missiles set in scale; both sets look good displayed together.
|
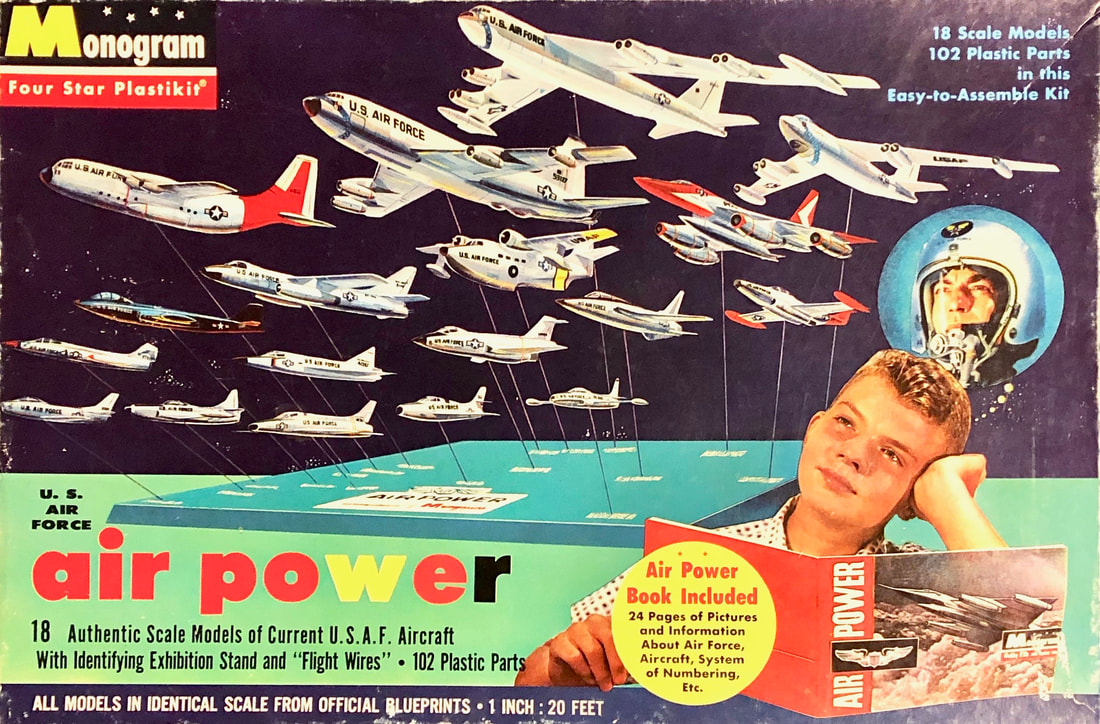
The legendary 1/240 Monogram Air Power Set was a companion-kit to the original Missile Arsenal. Released only once in 1959, the tooling has been lost and it is one of the most valuable collector kits. Will it ever return?
|
To learn more about the Air Power set, check out our article elsewhere on this site as well as our popular YouTube video. This is exclusive content that you simply won't find anywhere else on the Internet. Our publishing of this material has generated a huge response with nearly 50,000 views of the YouTube video at time of posting. The webpage has consistently been one of our most-visited ever since it was posted in late 2019.
We've recently confirmed with former Revell executives that the tooling to the original Air Power Set is indeed lost. However, the response to our webpage and video has proven that there is a considerable amount interest among the modeling community for a retro-engineered version of the AP set to be available. We'd love to see that happen!
THE ORIGINAL 1958 MISSILE ARSENAL KIT
Box art from the original 1958 version of the Monogram Space Missiles set, originally known as the United States Missile Arsenal. You don't need "Where's Waldo" observation skills to see that there are considerable differences between this and the Space Missiles set. Special thanks to BoxArtDen for their permission to use these images!
Mike Turco from Thornton, PA is one of our IPMS/USA pals. He's an excellent modeler who enjoys building any type of model. We've got pictures of Mike's Monogram Air Power Set elsewhere on this website. Similarly, Mike built the 1958 Missile Arsenal in its original form and he generously shared photos of his model with us!
Mike got his original-issue Monogram Missile Arsenal and USAF Air Power sets from an eBay seller and built them both about ten years ago. He recollects, "I always followed the instructions back then with respect to build sequence and painting, as opposed to now where I may modify things to better construct and paint a model, or look for photos of the real thing and build an alternative to the specific kit.
I also prefer a more colorful paint scheme on those aircraft or missiles that sported them, such as the earlier paint scheme of the Atlas vs. the later plain aluminum finish, and the Rascal’s test color scheme as in the original Monogram Rascal kit (a complete one of which I have in my stash). This is another reason I prefer the ‘58 vs. the ‘69 set. Don’t get me wrong, the ‘69 set is cool but the ‘58 set is a literal rainbow by comparison."
Before the Space Missiles set, there was the Missile Arsenal! This is the what the original 1958 version of the kit looked like!
"The builds are pretty straightforward with no fit problems and I did not worry about sinkholes or imperfections when I built those kits as I might today. I was not building for shows at the time, just for fun and the satisfaction of completing a nifty model almost as cool as the Air Power kit.
The decals in the ‘69 set were fine, but those in the ‘58 kit were unusable (due to age). I must have bought a reprint of the ‘58 decals from a fellow who sells such reprints on eBay. I still have the instructions and sprue remnants for both kits, since I always keep such for all the kits I build. I used the original decals in the ‘69 set and still have the dried and faded decals of the ‘58 set, which indicates I got the reprints for the latter."
The decals in the ‘69 set were fine, but those in the ‘58 kit were unusable (due to age). I must have bought a reprint of the ‘58 decals from a fellow who sells such reprints on eBay. I still have the instructions and sprue remnants for both kits, since I always keep such for all the kits I build. I used the original decals in the ‘69 set and still have the dried and faded decals of the ‘58 set, which indicates I got the reprints for the latter."
|
The current Space Missiles set with 36 missiles built as instructions suggest with the exception of a black-painted base.
|
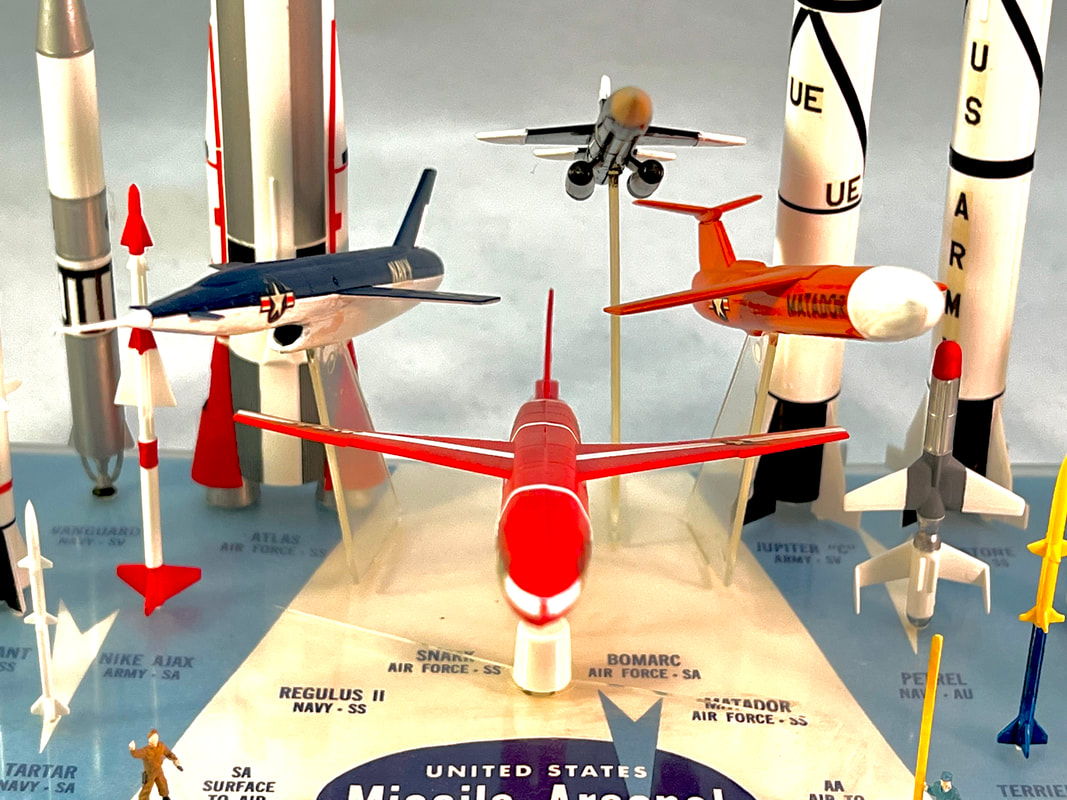
Compare it to the classic 1958 Missile Arsenal version. Other interesting rockets that you see here are a Vanguard to the left of the Atlas and the Jupiter-C to the left of the Redstone. This version had 31 missiles.
|
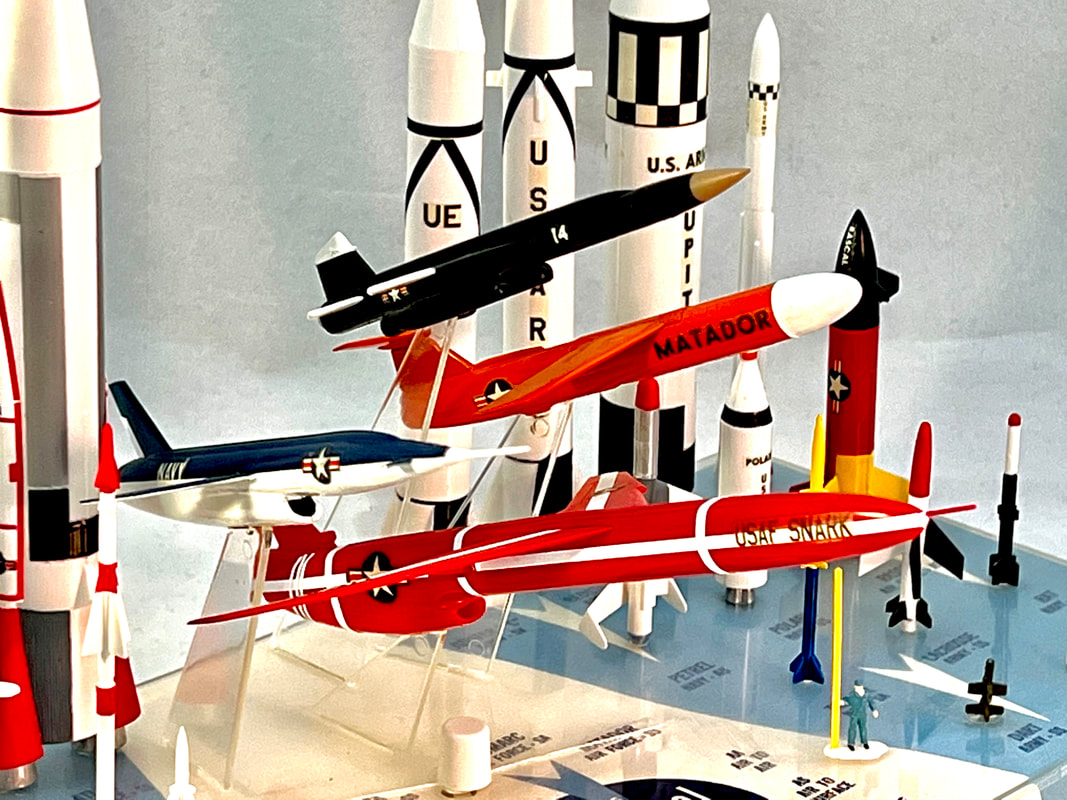
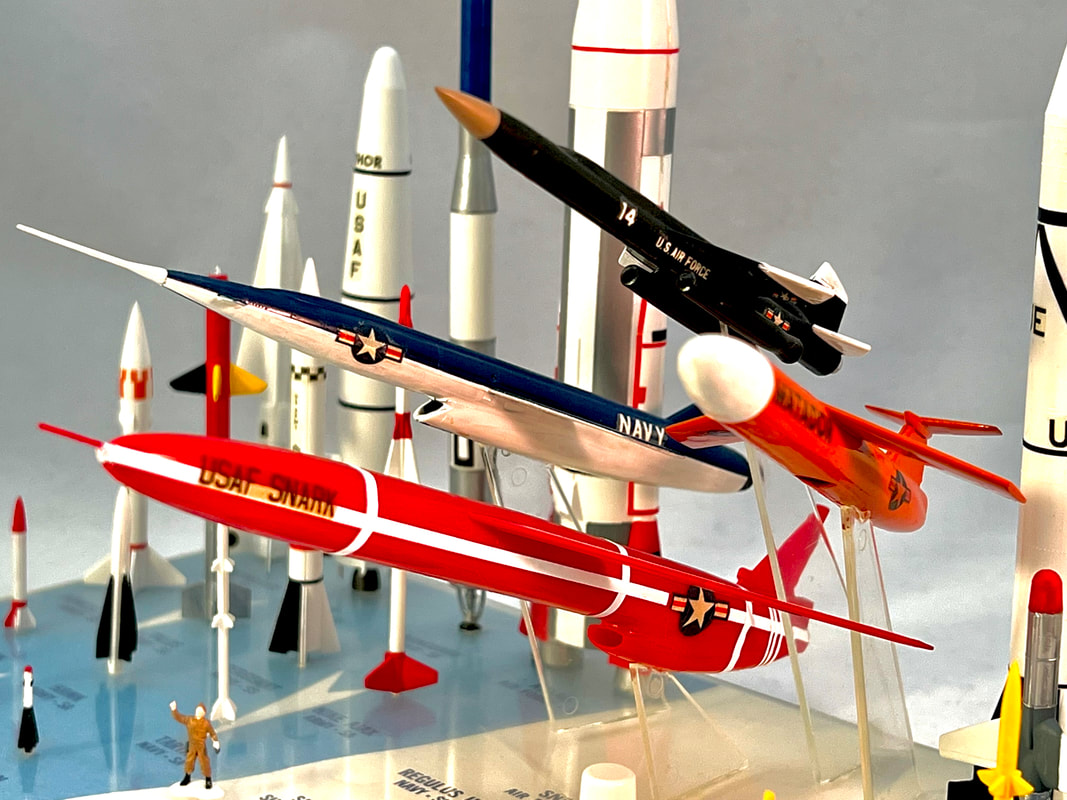
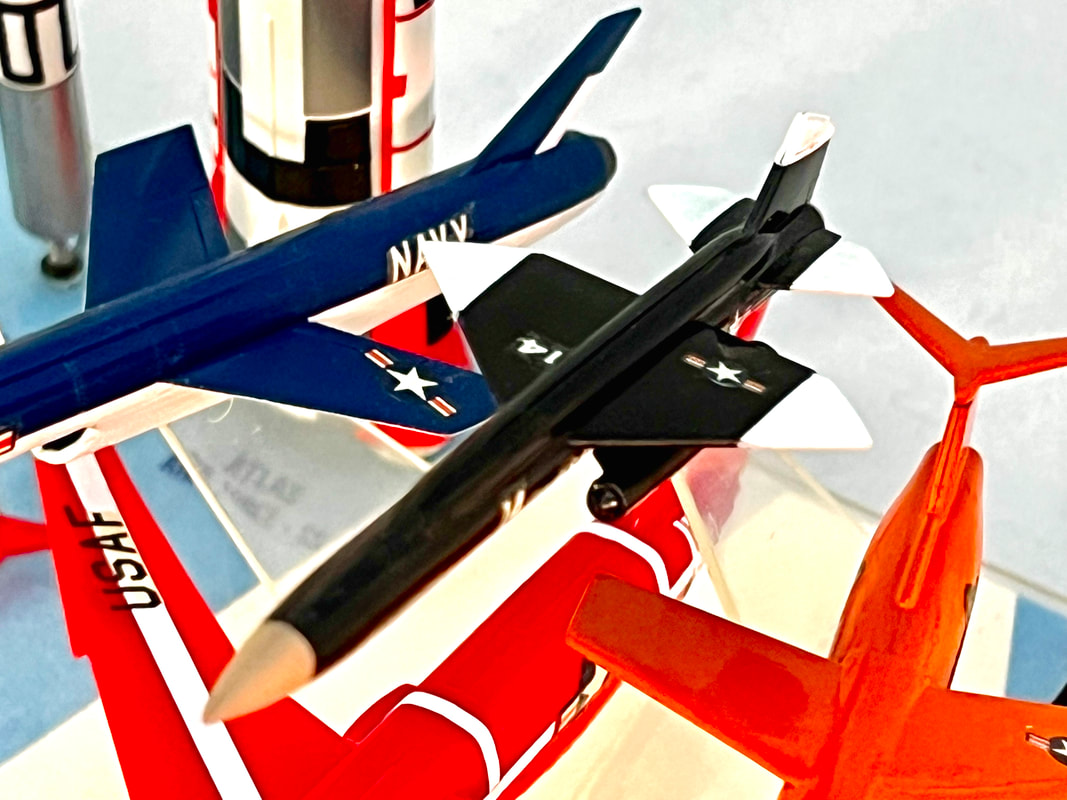
The original Missile Arsenal set had a different composition. For the 1969 set, a few missiles were deleted and some were added. The most noticeable differences concern the deletion of three early cruise missiles, the Regulus II, Snark, and Matador/Mace. The Bomarc remained except it was placed in a vertical orientation instead of horizontally "in flight" on a pedestal-type stand.
During the period when the original Missile Arsenal set was released, missile technology progressed rapidly. The cruise missile was a cutting edge concept. Programs like the Snark, Matador, Mace and Regulus II showed promise but these programs either experienced developmental delays or were quickly made obsolete by other developments. The Snark, for example, was designed as a cruise missile with intercontinental range. This explains its large size. However, ballistic missiles of intercontinental range quickly made it obsolete. Even though it actually received a limited deployment, its targeting inconsistencies and competition with ICBM programs caused its discontinuation.
During the period when the original Missile Arsenal set was released, missile technology progressed rapidly. The cruise missile was a cutting edge concept. Programs like the Snark, Matador, Mace and Regulus II showed promise but these programs either experienced developmental delays or were quickly made obsolete by other developments. The Snark, for example, was designed as a cruise missile with intercontinental range. This explains its large size. However, ballistic missiles of intercontinental range quickly made it obsolete. Even though it actually received a limited deployment, its targeting inconsistencies and competition with ICBM programs caused its discontinuation.
|
|
These views show the original four cruise missiles. Unlike the others, the Bomarc (black with white wingtips in Mike's set) was still in service in 1969, so it wasn't removed from the then-new Space Missiles version.
The Hound Dog was a new addition to the 1969 set. It was new enough in 1958 that it didn't make it into the original Missile Arsenal. By 1975, it was retired but other cruise missiles were in development including the ALCM and Tomahawk. These missiles owe their existence to lessons learned from the early versions included in Monogram's Missile Arsenal kit.
|
|
These side views show the accurate and colorful paint schemes that these missiles had. The Regulus II was a U.S. Navy project. It was a submarine-launched supersonic unmanned aircraft with a tailless design. The Polaris missile quickly made this program obsolete. Years later, the Tomahawk revived the concept except in a subsonic terrain-hugging form.
Two additional interesting deletions are the Vanguard and Jupiter-C missiles. In 1958, these were prominent in the news as the Russian Sputnik had been launched as the first successful artificial earth-orbiting satellite in October, 1957. The Vanguard was a US Navy project intended to be the USA's first satellite following Sputnik a few weeks later; as we remember, it was a spectacular televised failure. The US Army quickly got the assignment to orbit a satellite with the Jupiter-C, which successfully launched Explorer-1 satellite on 01 Feburary, 1958.
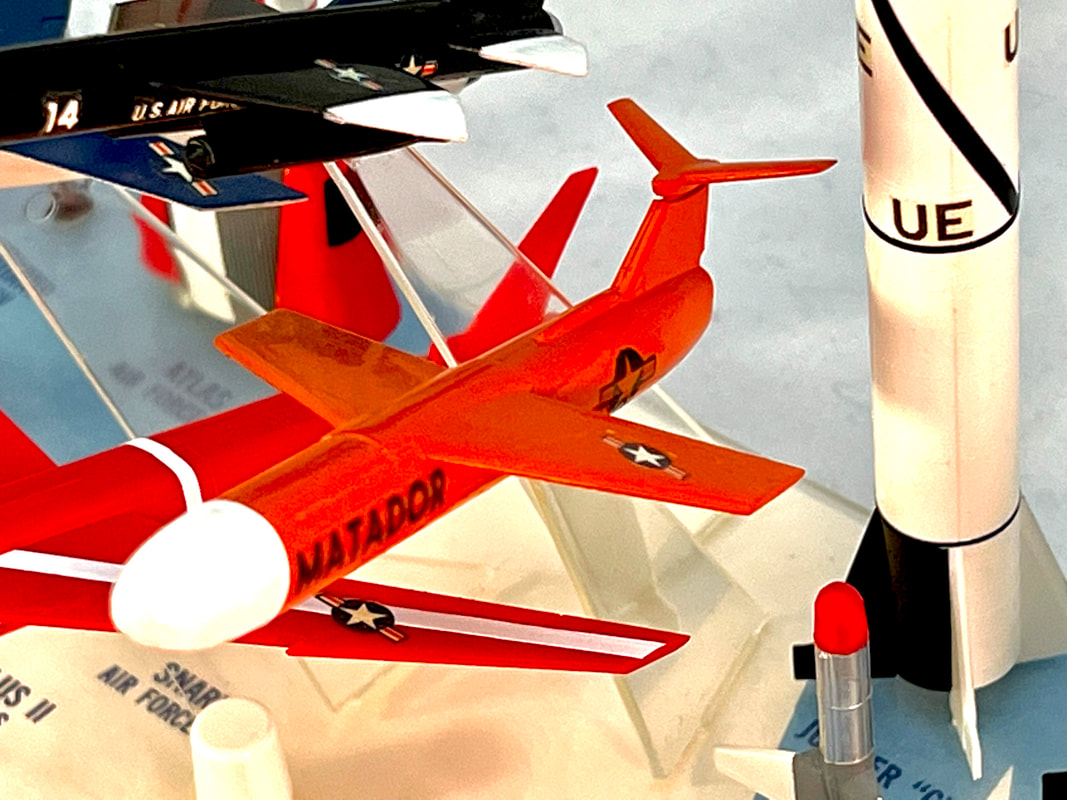
The Matador was the USA's first operational surface-to-surface cruise missile. It was a further development of the JB-2 Loon, a copy of the German V-1 of WWII. Renwal made a kit (large in 1/32-scale) of the Mace missile.
|
Bomarc development and deployment was ongoing in the 1960's and the model was retained for the 1969 Space Missiles set update. It joined the new Hound Dog. Atlantis has re-released a 1/56-scale version of the Bomarc.
|
Both the Jupiter-C and Vanguard rockets were intended for research purposes, but they were developed by the US Army and Navy respectively. In 1958, NASA was formed, which was intended to be a specifically civilian aerospace research organization for the United States. This occurred after the first Vanguard and Jupiter-C launch attempts. So officially, Vanguard and Explorer were not NASA programs but they are sometimes considered as such since many of the resources to execute these programs were eventually rolled into NASA. These rockets are certainly at home in the original Missile Arsenal.
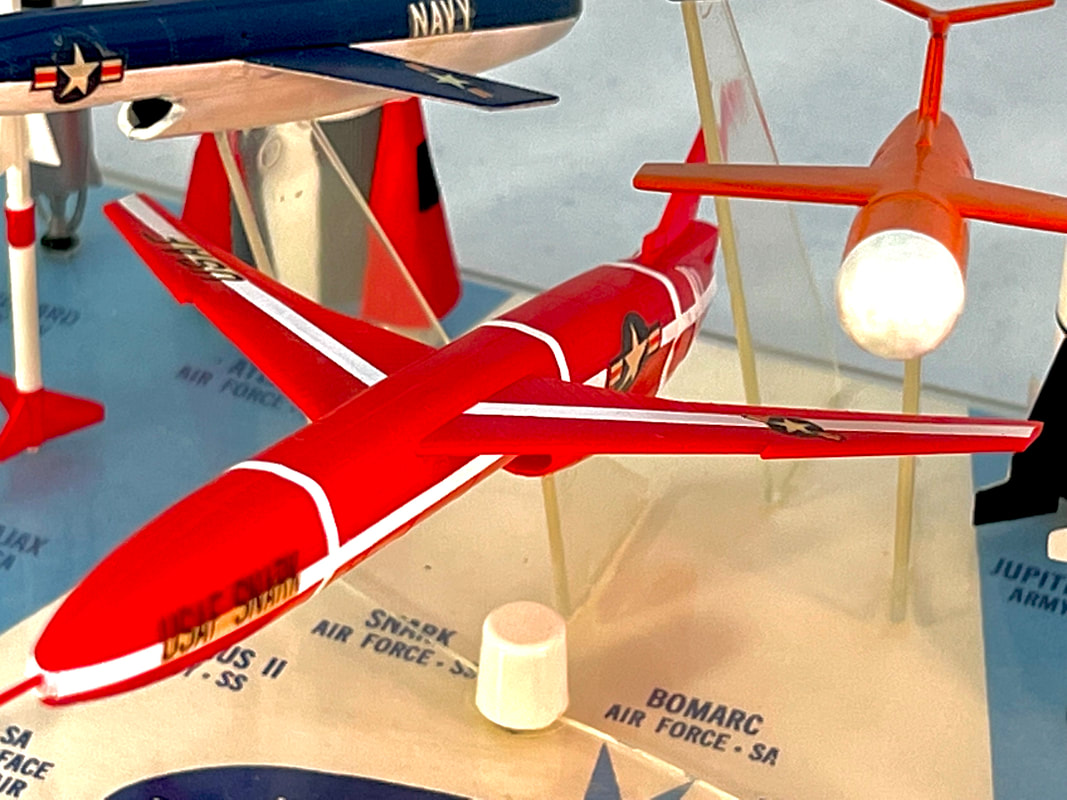
The Snark was released as a model kit by Revell. You never know; it might be re-released in an Atlantis Box one day.
|
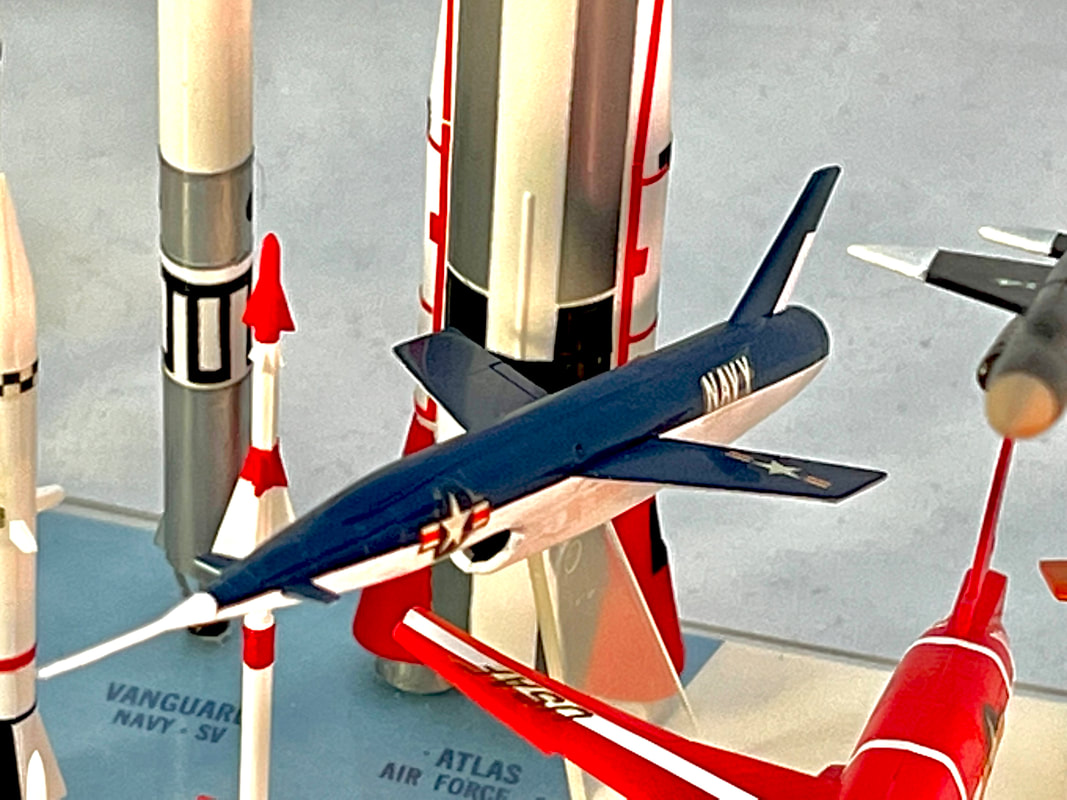
Regulus II was released as a Revell kit in 1958. It saw a History Series re-release in 1983. We hope that Atlantis has it and can bring it back some time!
|
|
MISSILES DELETED FROM THE 1969 SPACE MISSILES SET:
VANGUARD JUPITER-C REGULUS II SNARK MATADOR |
MISSILES ADDED TO THE 1969 SPACE MISSILES SET:
|
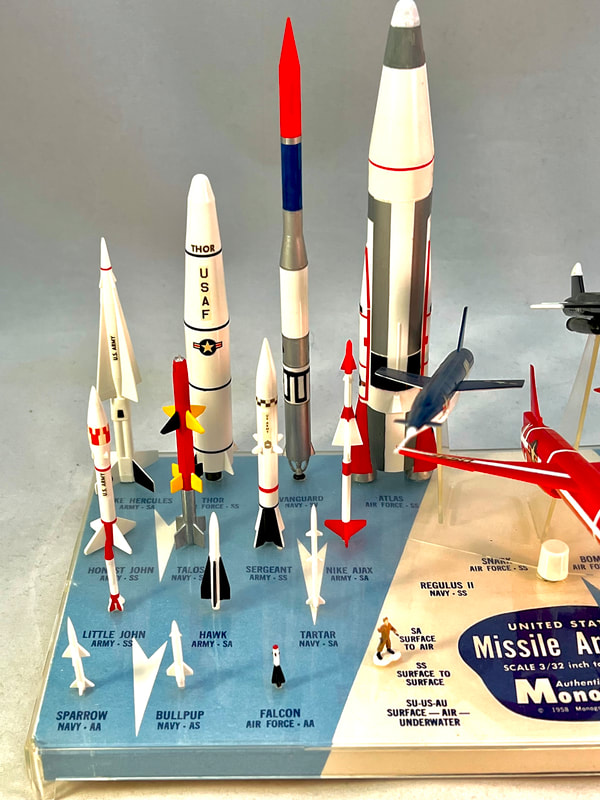
From this view, you can get a pretty good look at that Vanguard rocket, center, rear, with the red nose.
|
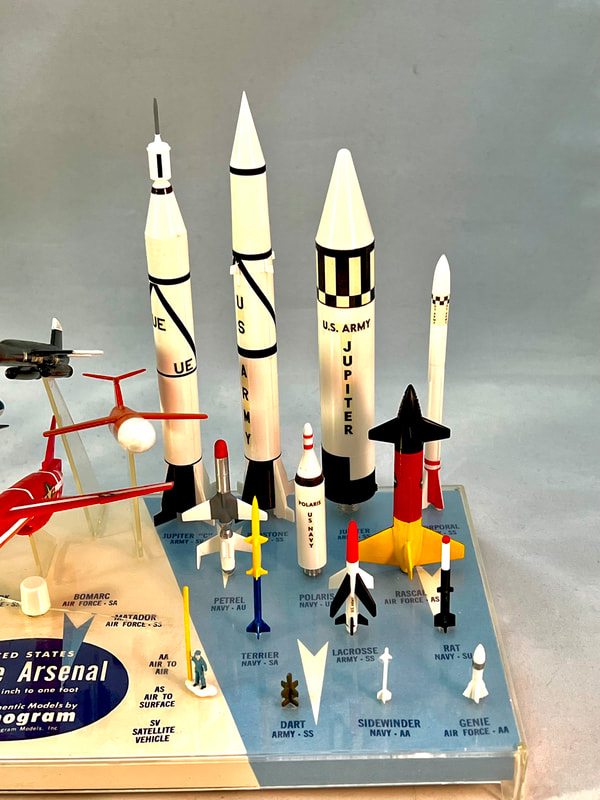
The Jupiter-C satellite launcher is next to the Redstone at top-center in this photo.
|
The other major change between 1958 and 1969 versions of the missiles set concerns the base. The early version had a transparent base with a cardboard insert that had missile names printed on it. For 1969, the base received a pebbly texture and the names of the missiles were engraved in the tooling so they would appear as raised lettering on the molded base. Making large, clear parts is challenging for a model kit maker. Perhaps the original base was damaged or even scratched on the backside. Chances are the tooling changes for the base made it easier to release it as an opaque part. As Mike Turco mentioned above, working with the clear plastic was a bit finicky and we can probably be glad the more recent base as supplied by Atlantis Models is molded in blue plastic with raised lettering. It's far less likely to be brittle and get stress cracks!
WE HAVE LOTS OF COOL STUFF GOING ON AT 2MODELER.COM! SCROLL DOWN A BIT TO CHECK IT OUT! SAVE US IN YOUR FAVORITES!
WE HAVE LOTS OF COOL STUFF GOING ON AT 2MODELER.COM! SCROLL DOWN A BIT TO CHECK IT OUT! SAVE US IN YOUR FAVORITES!